8 - 9
8 Power Steering Service
Steering Cylinder Removal and Installation
Steering Cylinder Removal
1. Park the tractor on a level surface.
2. Place blocks in front of and behind the front wheels.
3. Turn the ignition key switch to the OFF position,
remove the key, set the parking brake, and turn the
PTO switch off.
4. Disconnect the negative (-) battery cable
(see Section 7, ELECTRICAL SYSTEM SERVICE).
5. Lower any attachments to relieve hydraulic pressure.
6. Disconnect spark plug wires or to prevent the possi-
bility of accidental starting.
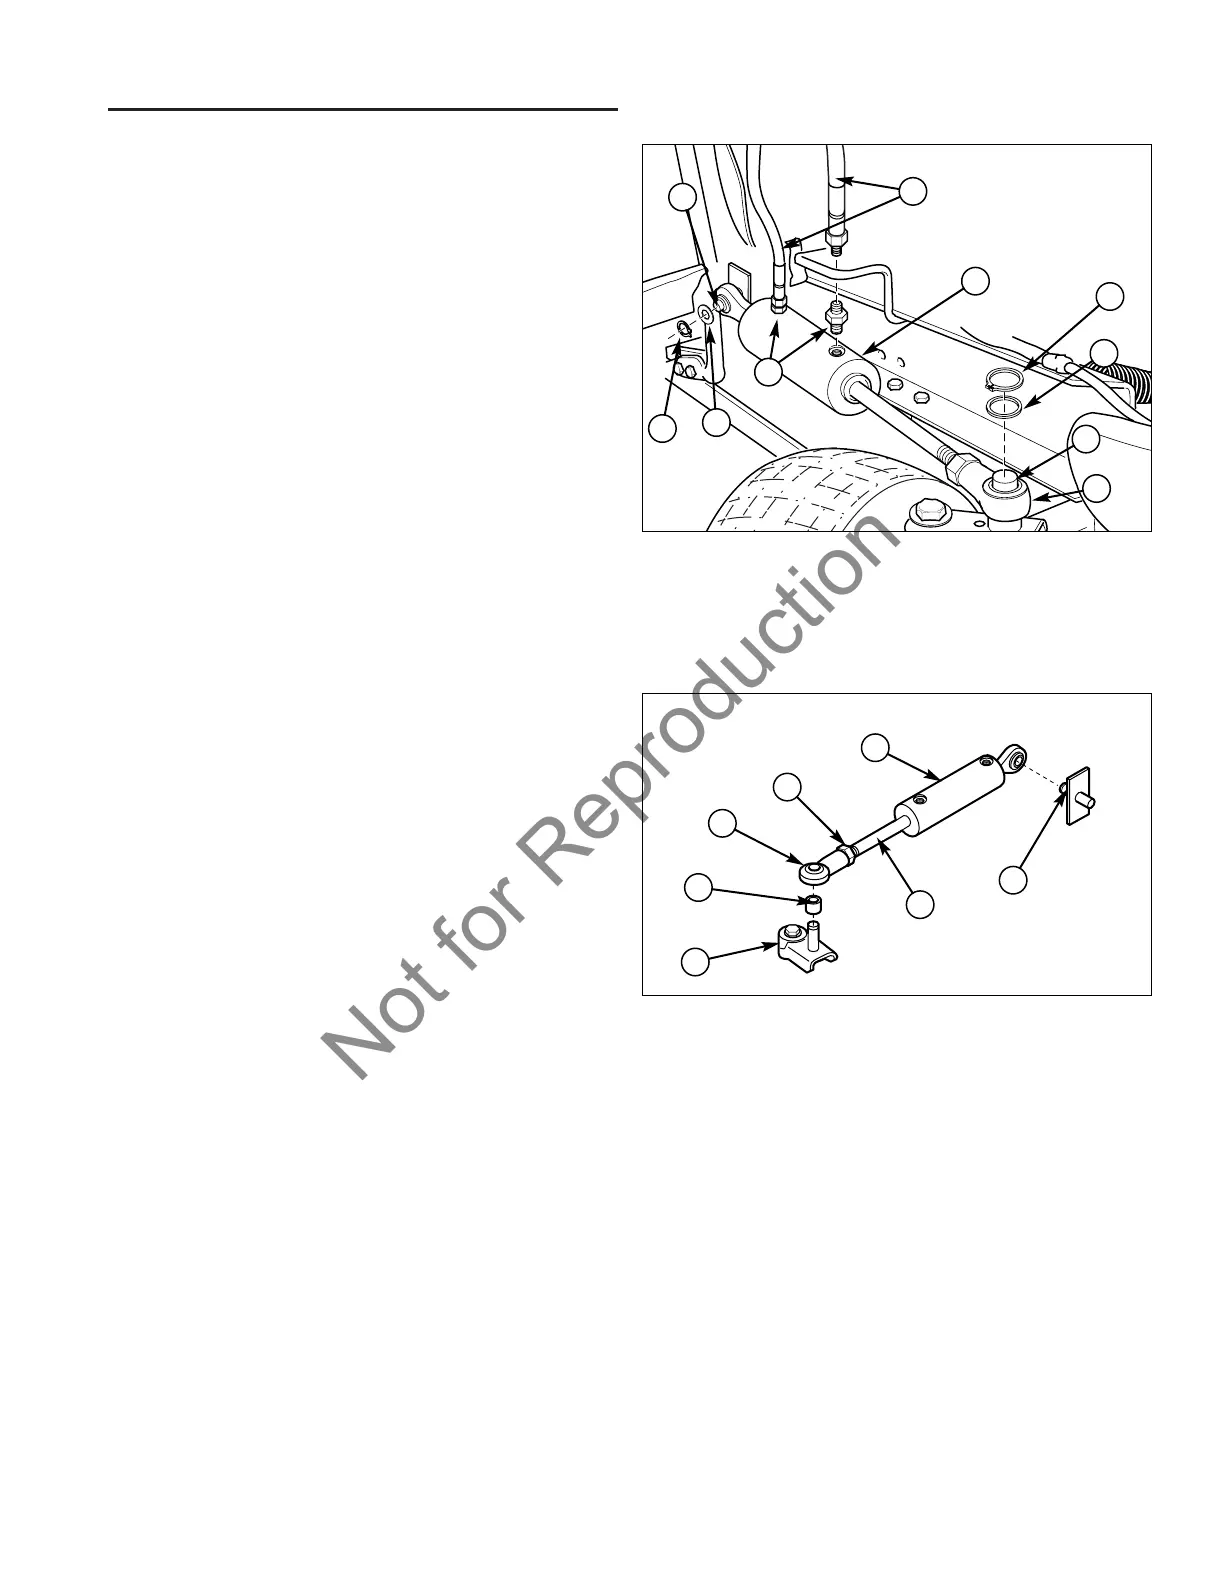
7. Disconnect the hydraulic hoses (B, Figure 11) and
hydraulic fittings (C) from the steering cylinder (A).
8. Remove the retaining ring (D) and washer (E) that is
holding the steering cylinder (A) to the mounting stud
(F).
9. Remove the retaining ring (G) and washer (H) that is
holding the steering cylinder (A) and ball joint assem-
bly (J) to the steering hub (I).
10. Lift the steering cylinder (E, Figure 12) and spacer
(B) off of the steering hub (A) and mounting stud (F).
11. Loosen the jam nut (D) on the cylinder shaft (G) then
remove the ball joint assembly (C).
Figure 11. Steering Cylinder Retaining Hardware
A. Steering Cylinder F. Mounting Stud
B. Hydraulic Hoses G. Retaining Ring
C. Hydraulic Fittings H. Washer
D. Retaining Ring I. Steering Hub
E. Washer J. Ball Joint Assembly
J
I
H
G
E
D
B
C
A
F
Figure 12. Removing Steering Cylinder
A. Steering Hub E. Steering Cylinder
B. Spacer F. Mounting Stud
C. Ball Joint Assembly G. Cylinder Shaft
D. Jam Nut
E
D
F
B
A
G
Steering Cylinder Installation
1. Thread the jam nut (D, Figure 12) onto the cylinder
shaft (G).
2. Thread the ball joint (C) onto the cylinder shaft (G).
3. Do not tighten jam nut (D) against ball joint assembly
(C) just yet.
4. Place rear of steering cylinder (E) onto the mounting
stud (F) first.
5. Place the spacer (B) onto the steering hub (A).
6. Align the ball joint assembly (C) with the steering hub
(A) by turning the ball joint assembly. Once aligned,
place the ball joint assembly onto the steering hub.
7. Tighten jam nut (D) on cylinder shaft (G).
8. Replace the retaining ring (G, Figure 11) and washer
(H) that holds the steering cylinder (A) and ball joint
assembly (J) to the steering hub (I).
9. Replace the retaining ring (D) and washer (E) that
holds the steering cylinder (A) to the mounting stud
(F).
10. Reconnect the hydraulic hoses (B) and hydraulic fit-
tings (C) to the steering cylinder (A).
11. Reconnect spark plug wires.
12. Reconnect the negative (-) battery cable
(see Section 7, ELECTRICAL SYSTEM SERVICE).
13. Start engine and check for leaks.
14. Turn wheels from lock to lock several times. If
uneven, readjust ball joint (steps 6-8).
15. Shut off engine and check for proper fluid level (see
Section 3, MAINTENANCE). Fill to proper level.
C

 Loading...