31
STRAIGHT STITCHING
RECHTE STEEK
GERADSTICH
Straight stitch is most frequently used for all types of sewing. Let’s begin by following
the steps below.
NOTE:Basedupontheweightofthefabric,slight“netuning”ofthetension
may be desired.
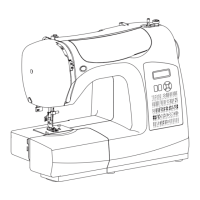
A. Thread tension control
B. Reverse stitch button
C. Presser foot lifter
1.SETTINGS
Presser foot - All purpose foot
Thread tension control - 5
6. First turn the handwheel toward you (counter-clockwise) until the needle is at its
highest position. Raise the presser foot, draw materials to the rear and cut o excess
thread with the thread cutter located on the bottom of face cover as shown.
2. Pull both threads under the presser foot toward the back of the machine, leaving
about 4” (10cm) clear.
3. Place the fabric under the presser foot and lower the presser foot lifter.
4. Turn the hand wheel toward you (counter-clockwise) until the needle enters the fabric.
5. Start the machine. Guide the fabric gently with your hands. When reaching the edge
of the material, stop the sewing machine.
NOTE: To secure the stitching and avoid raveling, press the reverse stitch
switch and sew a few stitches at the start and end of the seam.
NOTE: The needle plate has both metric and inch markings as an aid for
guiding your fabric when sewing a seam.
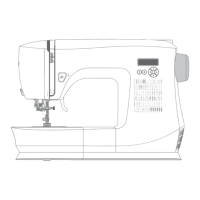
1.INSTELLINGEN
Voetje - Standaardvoet
Spanningsregelaar - 5
Bij elk aspect van het naaien wordt de rechte steek het meest veelvuldig gebruikt. Laten we aan de hand
van onderstaande stappen leren naaien.
OPMERKING: afhankelijk van het stofgewicht kan er een “exacte instelling” van de
draadspanning noodzakelijk zijn.
A. Spanningsregelaar
B. Achterwaartsknop
C. Persvoethevel
6. Draai eerst het handwiel naar u toe totdat de naald in de hoogste stand staat en zet vervolgens het
voe tje omhoog, trek de stoen naar achteren en knip het teveel aan draad af met behulp van de
draadsnijder aan de onderzijde van het frontkapje, zoals getoond.
OPMERKING: als hulp voor de stofgeleiding is de steekplaat van maatindeling in mm en inch
voorzien.
2. Trek beide draden onder het voetje in de richting van de achterzijde van de machine en laat daarbij
ongeveer 15cm over.
3. Plaats de stof onder het voetje en laat het voetje zakken.
4. Draai het handwiel naar u toe totdat de naald in de stof gaat.
5. Start de machine. Leid de stof voorzichtig met uw handen. Stop de naaimachine wanneer u de rand
van de stof bereikt.
Opmerking: ter versterking van de naaduiteinden de achterwaartsknop ingedrukt houden en
3-4 steken aan het begin en einde van de naad naaien.
100 stitch model :
80 stitch model :
60 stitch model :
00
00
00
 Loading...