1-16
BVM-D9H1U/D9H5U/D9H1E/D9H5E/D9H1A/D9H5A
26
(E)
Chapter 2 Menu
Basic Menu Operations
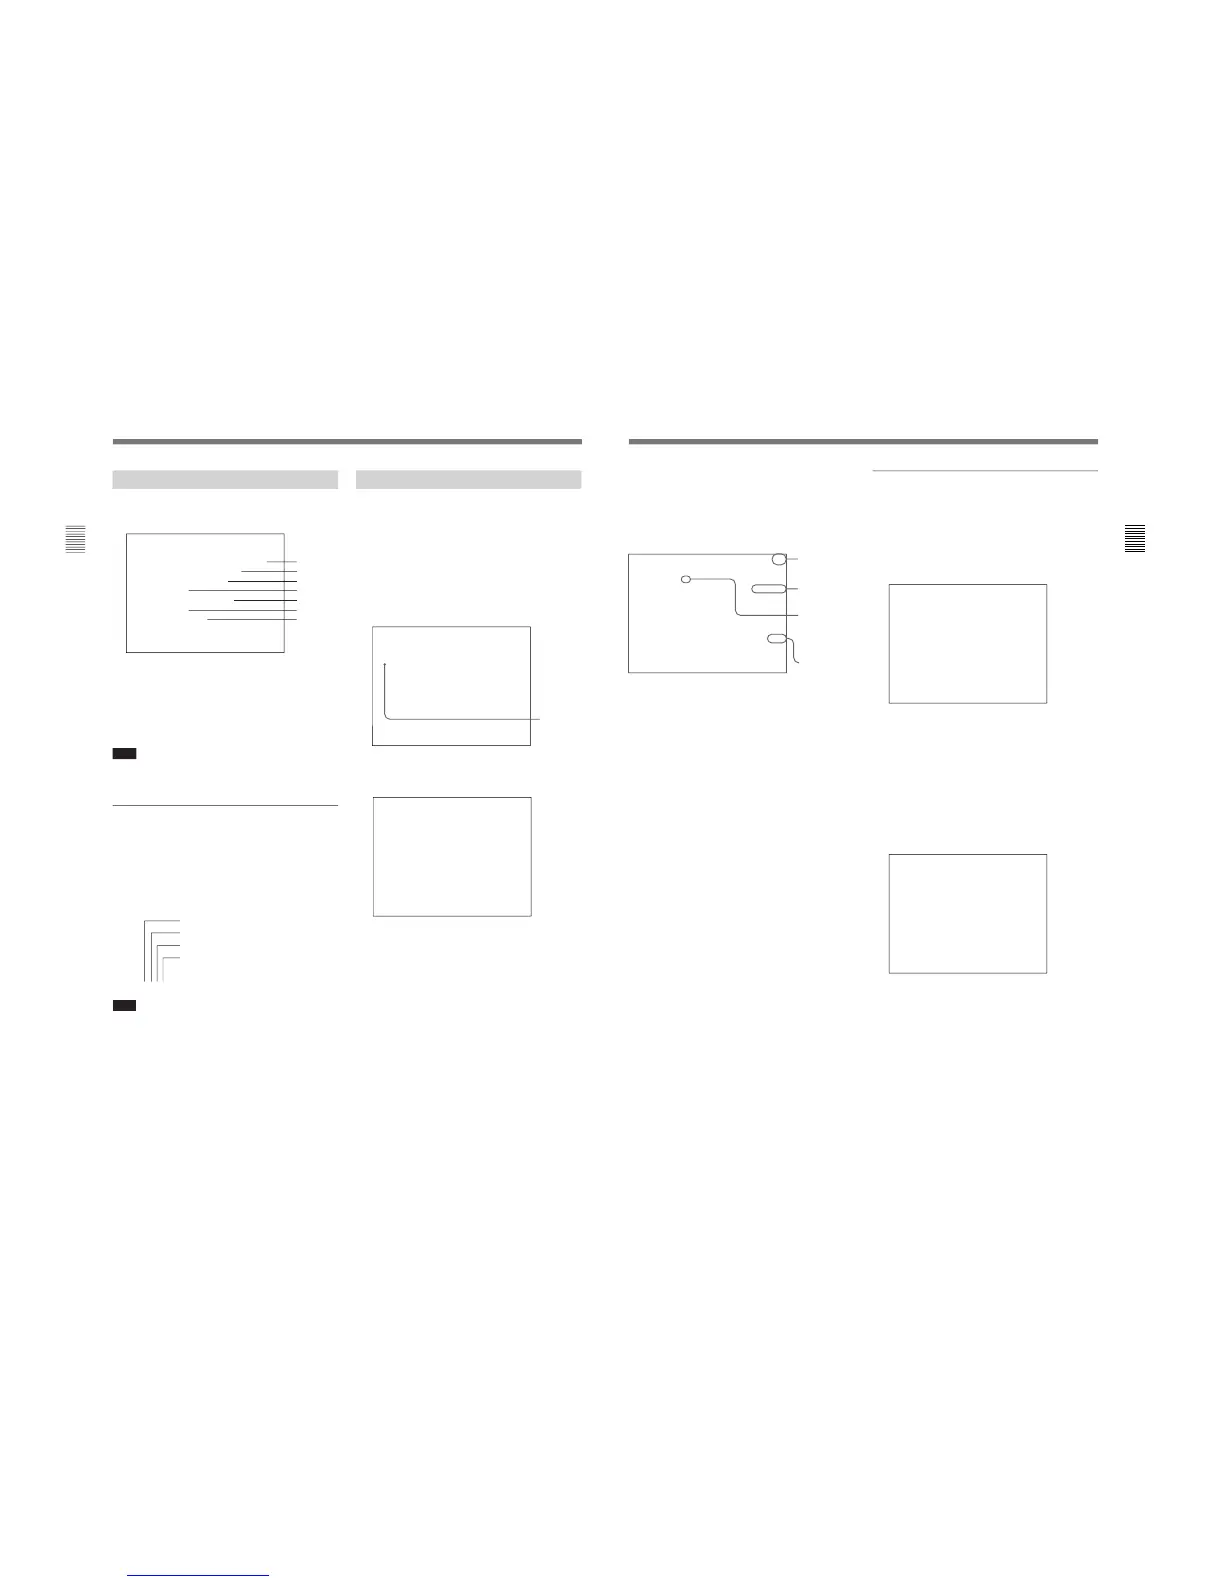
Displaying the Menus
Press the MENU button.
The menu list is displayed on the screen.
CONTROL PRESET ADJ...
MENU
COLOR TEMP ADJ...
INPUT CONFIG...
REMOTE...
SYSTEM CONFIG...
STATUS...
ALIGNMENT...
p
Menu List
When you select one item on the main menu, the level
1 menu corresponding to the selected item on the main
menu appears.
For information about the items on the main menu, see
“Menu Structure” on page 30(E).
Note
Menu settings that cannot be changed are displayed in
blue.
About menu numbers
For purposes of explanation in this manual, each menu
is preceded by menu numbers. The alphabet
determines the classification of menus on the Menu
List (Main Menu), and the numbers determine the
level and the order. These menu numbers are not
shown on the screen.
e.g. A135
Note
Only the menus which require explanation are
preceded by menu numbers. Thus, the menu number is
counted without menus which do not require
explanation.
Menu Operation
Follow the steps described below to display the menu
and perform the adjustment or setup you wish.
1
Press the MENU button.
The Menu List is displayed.
2
Using the UP/DOWN buttons or PHASE knob,
move the cursor to the desired item. (Example:
select the INPUT CONFIG menu by pressing the
DOWN button.)
3
Press the ENTER button or Ent button.
The Level 1 of the selected menu is displayed.
Cursor
Menu List
CONTROL PRESET ADJ...
MENU
COLOR TEMP ADJ...
INPUT CONFIG...
REMOTE...
SYSTEM CONFIG...
STATUS...
ALIGNMENT...
p
(continued)
Indicates the CONTROL PRESET ADJ menu
Indicates the first menu in Level 1
Indicates the third menu in Level 2
Indicates the fifth menu in Level 3
HC 1
INPUT CONFIG(1/2)
↓
FORMAT... YPBPR
SLOTNOSLOT1
INPUTNO1
EXT S YNC SLOT SLOT1
AUDIO INPUT ---
COLOR TEMP STD
APERTURE VALUE ---
CHANNEL NAME... PROG
p
↓
27
(E)
Chapter 2 Menu
4
Repeat steps 2 and 3 until the desired menu is
displayed.
For more information about setting and
adjustments, see below.
To abort menu operation
Press the MENU button. The menu of the upper level
is displayed.
The setting or adjustment being performed is canceled,
and data loading or saving is aborted.
If “NG” or “ERROR” appears during menu
operation
Press the MENU button to return to the menu in use.
Enters
numerical
values.
[ ↓ ] indicates that
the menu
continues onto
next page.
[ ↑ ] indicates that
the menu is
continued from
previous page.
Selects from
various options.
Indicates that
this item has
sub-list. Thus,
you can go to
the lower level.
HC 1
INPUT CONFIG(1/2)
↓
FORMAT... YPBPR
SLOTNOSLOT1
INPUTNO1
EXT S YNC SLOT SLOT1
AUDIO INPUT ---
COLOR TEMP STD
APERTURE VALUE ---
CHANNEL NAME... PROG
p
↓
Choosing one of two or more selections
Selecting in setting mode
1
Using the UP/DOWN buttons or PHASE knob,
move the cursor to the desired item and press the
ENTER or Ent button.
The selected item is displayed in yellow text and
set to setting mode.
2
Using the UP/DOWN buttons or PHASE knob,
change the setting.
3
Press the ENTER or Ent button.
The setting is confirmed (The item is displayed in
white text again).
Selecting from the setting list
1
Using the UP/DOWN buttons or PHASE knob, move
the cursor to the desired item in the setting list.
2
Press the ENTER or Ent button.
The display returns to the menu of the upper level,
and the selected setting is executed.
HC 1
CHANNEL NAME
PROG
EDIT
CAM
VTR
NEW NAME
p
HC 1
INPUT CONFIG(1/2)
↓
FORMAT... YPBPR
SLOTNOSLOT1
INPUTNO1
EXT S YNC SLOT SLOT1
AUDIO INPUT ---
COLOR TEMP STD
APERTURE VALUE 100
CHANNEL NAME... PROG
p
↓

 Loading...

