6 Configuration
Installation and operation manual
20
RXYSQ8~12TMY1B
VRV IV-S system air conditioner
4P400263-1F – 2017.02
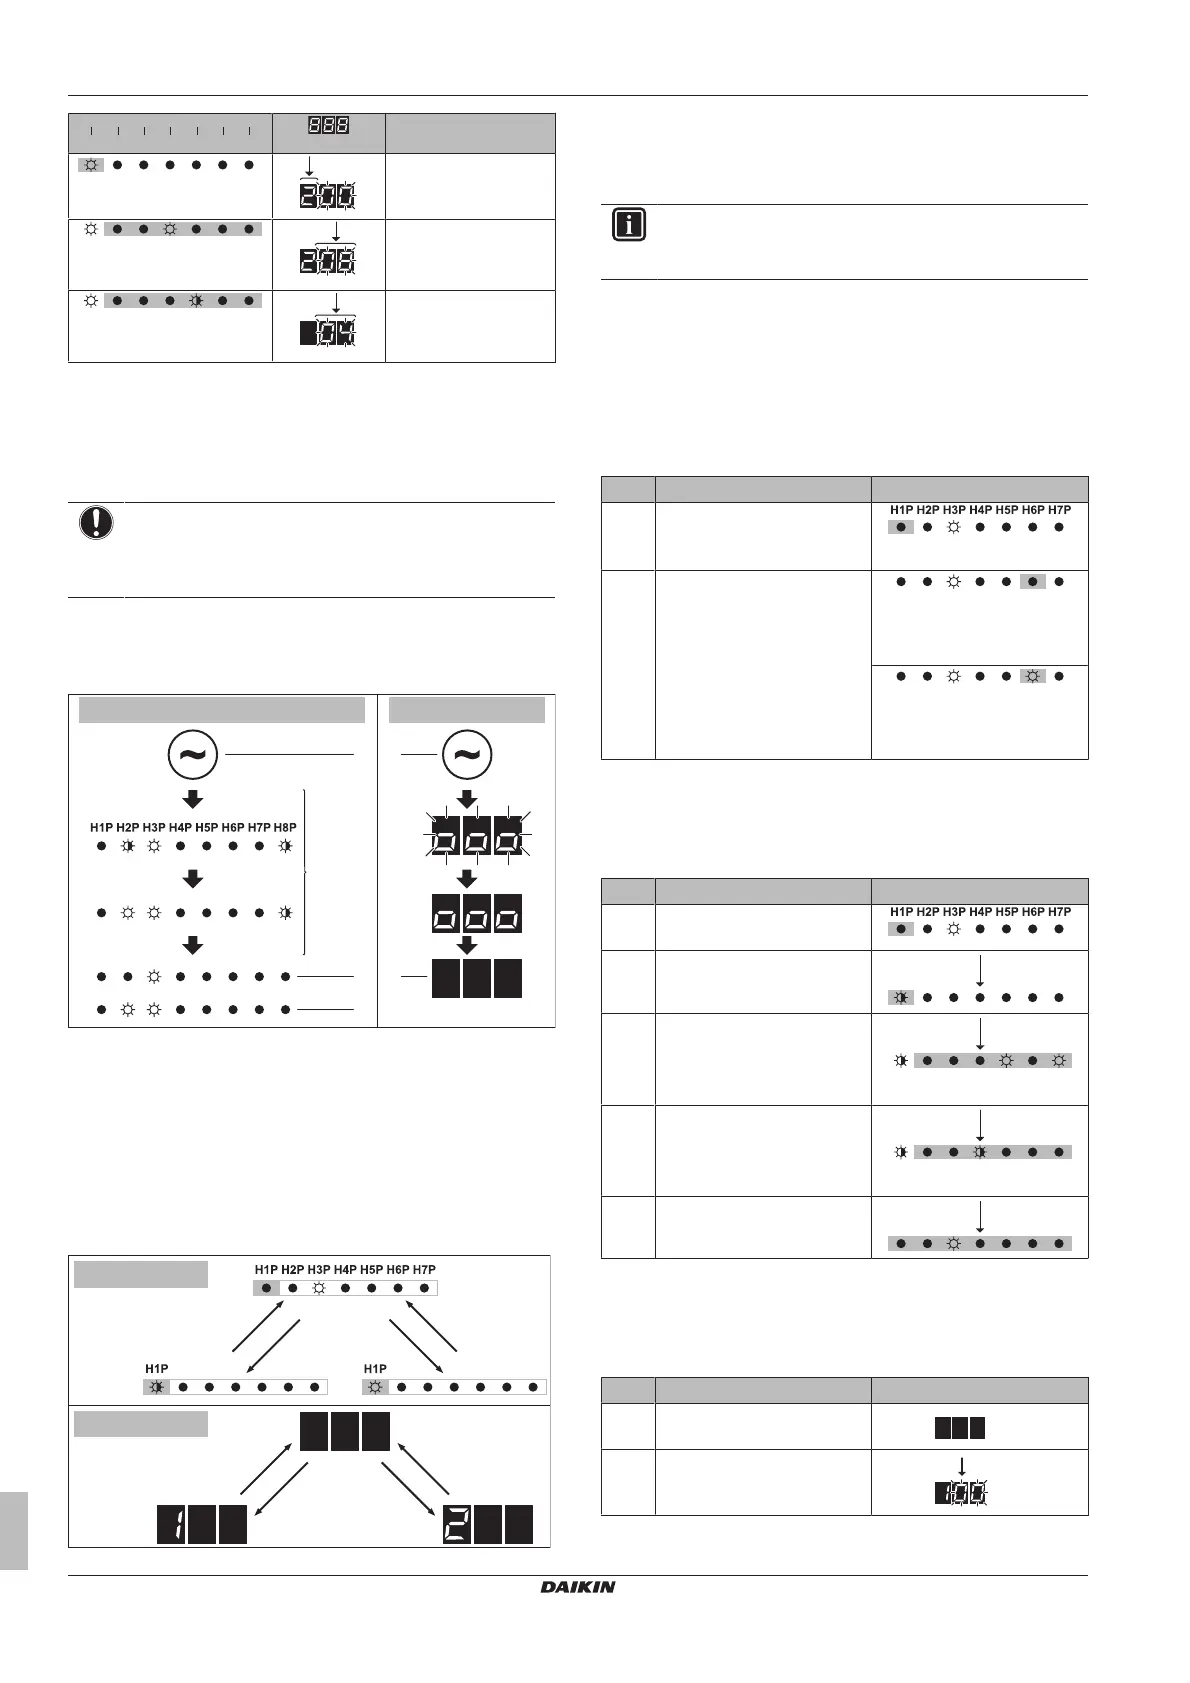
H1P
H2P H3P H4P H5P H6P H7P
- + + + + +
[
H1P
32 16 8 4 2 1]
Description
(H1P ON)
Mode 2
(H2P~H7P = binary 8)
Setting 8
(in mode 2)
(H2P~H7P = binary 4)
Value 4
(in mode 2)
6.1.4 To access mode 1 or 2
After the units are turned ON, the display goes to its default
situation. From there, you can access mode1 and mode2.
Initialisation: default situation
NOTICE
Be sure to turn on the power 6 hours before operation in
order to have power running to the crankcase heater and
to protect the compressor.
Turn on the power supply of the outdoor unit and all indoor units.
When the communication between indoor units and outdoor unit is
established and normal, the display indication state will be as below
(default situation when shipped from factory).
1~2 min
8~10 min
10~12 min
8 HP 10+12 HP
b
c
b
a a
a Power ON
b Default situation
c LED indication when there is a malfunction
If the default situation is not displayed after 10~12 minutes, check
the malfunction code on the indoor unit user interface (and in case of
RXYSQ10+12 on the outdoor unit 7‑segment display). Solve the
malfunction code accordingly. First, check the communication wiring.
Switching between modes
Use BS1 to switch between the default situation, mode 1 and
mode2.
BS1 [5 s]
BS1
BS1
BS1
a
cb
BS1 [5 s]
BS1
BS1
BS1
a
b c
8 HP
10+12 HP
a Default situation (H1P OFF)
b Mode 1 (H1P flashing)
c Mode 2 (H1P ON)
BS1 Press BS1.
BS1 [5 s] Press BS1 for at least 5s.
INFORMATION
If you get confused in the middle of the process, press BS1
to return to the default situation.
6.1.5 To use mode 1
In mode 1 (and in default situation) you can read out some
information. How to do this differs depending on the model.
Example: 7‑LEDs display – Default situation
(in case of RXYSQ8)
You can read out the status of low noise operation as follows:
# Action Button/display
1 Make sure the LEDs are
showing the default situation.
(H1P OFF)
2 Check the status of LED
H6P.
H6P OFF: Unit is currently
not operating under low noise
restrictions.
H6P ON: Unit is currently
operating under low noise
restrictions.
Example: 7‑LEDs display – Mode1
(in case of RXYSQ8)
You can read out setting [1‑5] (= the total number of connected
indoor units) as follows:
# Action Button/display
1 Start from the default
situation.
2 Select mode 1.
3 Select setting 5.
("X×" depends on the setting
that you want to select.)
(= binary 5)
4 Display the value of setting 5.
(there are 8 indoor units
connected)
(= binary 8)
5 Quit mode 1.
Example: 7‑segments display – Mode1
(in case of RXYSQ10+12)
You can read out setting [1‑10] (= the total number of connected
indoor units) as follows:
# Action Button/display
1 Start from the default
situation.
2 Select mode 1.
 Loading...