SETUP
10
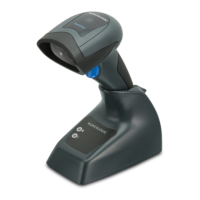
QUICKSCAN™ 2500
CONNECTING THE HOST INTERFACE
The reader kit you ordered to match your interface should provide a compatible cable
for your installation. If this is not so, contact "
Technical Support" on page xiv.
The reader can communicate using the interfaces illustrated on
page 22.
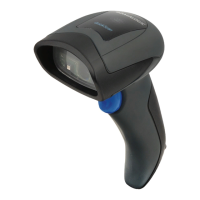
For corded versions, connect the reader cable by inserting the cable into the handle as
shown in
Figure 3.
To remove the interface cable from the reader, first locate the hole on the back of the
handle. Next, take a paper clip and modify it as shown in the
Figure 3. Insert the end of
the paper clip into the hole and press it to push on the clip that holds the connector. As
you apply pressure, pull out the cable.
When reinserting the cable, make sure the connector clip is on the same side as the
reader release hole. Insert the cable, it should click when it is fully inserted.
Figure 3. Cable Connection/Disconnection at the Reader
RS-232 Serial Connection (QuickScan™ QD2590 only)
Turn off power to the terminal/PC and connect the reader to the terminal/PC serial port
via the RS-232 cable as shown in Figure 4. If the terminal will not support POT (Power
Off the Terminal) to supply reader power, use the approved power supply (AC Adapter).
Plug the AC Adapter barrel connector into the socket on the RS-232 cable connector and
the AC Adapter plug into a standard power outlet.
RS-232:
The reader can communicate with a standard or Wincor-Nixdorf (W-N) RS-232
host.
RS-232 OPOS:
This interface is used for OPOS/UPOS/JavaPOS systems.
NOTE: We recommend the use of a perfectly straight new paper clip to
make the operation easier (see the figure below).
Cable Connector
Paper clip
Available only for QuickScan
™
QD2590
RS-232

 Loading...