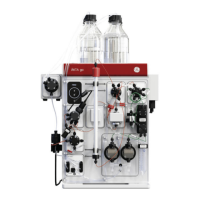
4.2.2 Install waste tubing
Introduction
The table below lists the waste tubing of the instrument and where it is located. Make
sure that the waste tubing is connected to the correct positions on the modules.
Location of tubingTubing connectionsModule
Front of the ÄKTA go instrument.Waste ports W1 and W2Injection valve
Front of the ÄKTA go instrument.Waste port WOutlet valve
Prepare waste tubing
Follow the instructions below to prepare the waste tubing.
CAUTION
Fasten the waste tubing. Make sure that tubing is securely fas-
tened to the waste ports W, W1, and W2.
CAUTION
Make sure that the waste vessel will hold all the produced volume
of the run. For ÄKTA go, a suitable waste vessel should typically
have a volume of 2 to 10 liters.
CAUTION
Cut injuries. The tubing cutter is very sharp and must be handled
with care to avoid injuries.
NOTICE
The highest level of liquid in the waste vessel must be lower than
the Waste port W on the Outlet valve of the ÄKTA go instrument.
46 ÄKTA go Operating Instructions 29360951 AC
4 Installation
4.2 Hardware installation
4.2.2 Install waste tubing

 Loading...