X
GEM-P9600 Installation Instructions
L
NAPCO Security Systems
WI742D 5/03
!
Page 24
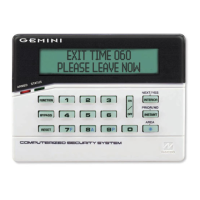
Arming in STAY MODE
STAY MODE provides partial protection by allowing free movement within the premises, while still protecting the perimeter
zones. Exit/Entry doors are provided with Exit/Entry delays. A "Classic" series keypad will display "
SYSTEM ARMED
" with a Bypass
Icon and a RED LED that remains ON, while a GREEN LED blinks. With "K Series" keypads such as the GEM-K1CA and the
GEM-K2AS, pressing
P
bypasses all interior zones simultaneously, and arms the panel in "STAY MODE". The keypad will
display "
ARMED STAY
". If
P
is pressed (hold for 2 seconds) when the panel is already armed in STAY MODE, the panel will
enter "Instant Mode" and eliminate the entry time delay period.
Instant Arming
INSTANT ARMING allows exit/entry zones to immediately go into alarm when violated, with no Exit/Entry time delay. This
feature can be used to provide instant protection while you or someone else is on the premises. With the "Classic" keypads, to
arm "Stay" and obtain Instant Arming, press
E and F, then enter your user code and press
D
. With the "K Series"
keypads, enter your user code and press
P. Then press and hold P until keypad beeps. Instant Arming will be auto-
matically reset on disarming.
Auto Arming (Not for UL Installations)
AUTO ARM allows the User to automatically arm the system at a specified time of the day and on specific days of the week.
Schedule a specific closing time on any/all day(s) of the week. After a specific Fail-to-Close Window Start Time, if the user has
not Armed the system during the Window Length, and the system has been instructed to "Fail-to-Close' and 'Auto Arm if not
closed at end of Window" then the system will arm, providing a 15 minute warning.
CAUTION
: If Automatic Interior Bypass is
selected, panel will Auto Arm in STAY Mode.
Delaying an Auto Arm (Not for UL Installations)
During the 15 minute pulsating sounder warning of an Auto Arm, a User can press the
R
or
A
button, until "TO DE-
LAY AUTO ARM / PRESS 1-4 / N" is displayed. Enter the number of hours to delay arming, followed by the
U or D button. If
"
DELAY AUTO ARM Y/N
" is displayed, press the "NEXT/YES" button. The sounder can be silenced by pressing the
C
button
during the 15 minute interval, but will come back on in the last 1 minute. This feature may be canceled by arming and disarming
the keypad.
EZ Arm (Easy Arm)
EASY ARM provides one button arming for non-security critical premises. Select Easy Arming for each Keypad, with op-
tional reporting of Easy Arm Closings as User 35. Disarming still requires a valid user code.
!
To arm, press the
D
button for "Classic" keypads;
!
To arm, press and hold P
or
Q
for 3 seconds for "K Series" keypads.
Keyswitch Arming
KEYSWITCH ARMING allows a zone input to be used to arm/disarm. The area will arm/disarm when the zone is momen-
tarily shorted through a Momentary Switch. An end-of-line resistor must be used. Select Keyswitch Arm to optionally report as
User 36.
Remote Arming (Not for UL Installations)
REMOTE ARMING allows computer software control of arming/disarming of the system for non-security critical installations.
Select Remote Arm to optionally report as User 34.
Priority Arming
A 2-second tone and "
CAN'T ARM SYSTEM/ZONE FAULTED
" displayed when attempting to arm indicates a priority condition; that is, a
problem exists on at least one zone that has been designated as a Priority Zone, or a system trouble exists. The trouble(s) must
be corrected before the panel can be armed. The display will read "
ZONE FAULTED
", then automatically scroll through all unsecured
zones. If a system trouble is indicated, it will display the system trouble.
Area Arming/Manager's Mode
In a partitioned system, any of eight secured areas may be armed (or disarmed) from the Manager's Mode (if enabled). The
Manager's Mode, is a low-security mode of operation. It provides quick access to other areas without having to go to another
keypad of another area.
!
To arm or disarm the alternate area (for "Classic" keypads):
1. Press a button between
1 and 8 representing the alternate area.
2. Press the
G button, then the
U
or
D
button.
BASIC OPERATION
 Loading...