13-3
OPERATOR MAINTENANCEUSER HANDBOOK
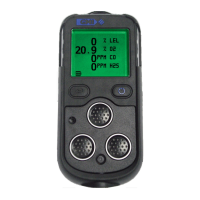
5) Hold the probe adaptor then attach dust lter holder to the
adaptor by turning in a clockwise direction until secure.
Note: Care must be taken not to overtighten the dust lter
holder.
6) Switch the instrument ON then check that a sample / ow
fault is displayed when the probe inlet is blocked (with a
nger for example) while the pump is running. If fault is not
displayed, check tightness of all ttings.
13.2.2 Hydrophobic Filter
Note: When replacing the hydrophobic lter, it is essential to also
replace the dust lter.
CAUTION: When replacing the hydrophobic filter, the
pump must not be running and care must be
taken to ensure any dust / dirt falls away
from the instrument and does not enter the
owpath.
1) Remove then discard the dust lter, as detailed in section
13.2.1 paragraphs 1 and 2.
2) Hold the hydrophobic lter bulb then turn the probe adaptor
in a counter clockwise direction to remove adaptor, as
illustrated in Fig. 13.2.
3) Hold the probe lter bulb then turn the hydrophobic lter
bulb in a counter clockwise direction to release the bayonet
connection and remove lter.
HYDROPHOBIC FILTER BULB
(Part No. 67213)
PROBE FILTER BULB
PROBE ADAPTOR
PROBE WASHER
(Part No. 12379)
Fig. 13.2 Hydrophobic Filter Bulb Removal
 Loading...