2-8
Installing the Switch 408
Installation Procedures
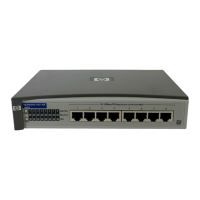
3. Mount the Switch
After you have verified that the switch passes its self test, you are
ready to mount the switch in a stable location. The Switch 408 can be
mounted in these ways:
■ on a horizontal surface
■ in a rack or cabinet, or on a wall (requires optional bracket kit)
Horizontal Surface Mounting
Attach the supplied rubber feet to the bottom of the switch, then place
the switch on a table or other horizontal surface. Use a sturdy surface
in an uncluttered area. You may want to secure the networking cables
and switch power cord to the table legs or other part of the surface
structure to help prevent people from tripping over the cords.
Rack or Wall Mounting
Using the optional bracket kit (5183-7210), two Switch 408 units can
be mounted together in any EIA-standard 19-inch telco rack or in an
equipment cabinet such as a server cabinet. The switch brackets can
also be used to mount the switch on a wall or under a horizontal
surface. Installation instructions are included with the bracket kit.
Note
Make sure the air flow is not restricted around the sides of
the switch.
Caution
For safe operation, please read the Installation Precautions
on page 2-3 before mounting the switch.
 Loading...