Step 1 Testmode STOP state [ t s m e ]
Step 2
Press the ENTER button three times.
RESULT sub-menu [ _ R S T _ Y O B I _ ]
Step 3 Press once the MD PLAY button. Indication of measurement value [ R F G : _ _ _ ]
Step 4 Press once the ENTER button. Indication of measurement value [ R C G : _ _ _ ]
Step 5 Press once the ENTER button. Indication of measurement value [ R T G : _ _ _ _ _ ]
Step 6 Press once the ENTER button. Indication of measurement value [ G T G : _ _ _ _ _ ]
Step 7 Press once the ENTER button. Indication of measurement value [ P C H : _ _ _ _ ]
Step 8 Press once the ENTER button. Indication of measurement value [ G C H : _ _ _ _ ]
Step 9 Press once the ENTER button. Indication of measurement value [ S A G : _ _ _ ]
Step 10 Press once the ENTER button. Indication of measurement value [ S B G : _ _ _ ]
Step 11 Press once the ENTER button. Indication of measurement value [ S E G : _ _ _ ]
Step 12 Press once the ENTER button. Indication of measurement value [ S F G : _ _ _ ]
Step 13 Press once the ENTER button. Indication of measurement value [ H A O : _ _ _]
Step 14 Press once the ENTER button. Indication of measurement value [ H B O : _ _ _]
Step 15 Press once the ENTER button. Indication of measurement value [ H E O : _ _ _]
Step 16 Press once the ENTER button. Indication of measurement value [ H F O : _ _ _]
Step 17 Press once the ENTER button. Indication of measurement value [ L A O : _ _ _]
Step 18 Press once the ENTER button. Indication of measurement value [ L B O : _ _ _]
Step 19 Press once the ENTER button. Indication of measurement value [ L E O : _ _ _]
Step 20 Press once the ENTER button. Indication of measurement value [ L F O : _ _ _]
Step 21 Press once the ENTER button. Indication of measurement value [ T C O : _ _ _ _]
Step 22 Press once the ENTER button. Indication of adjustment error sequence No. [ Y O B : _ _ _ _]
Step 23 Press once the ENTER button. Indication of adjustment status [ D I F : _ _ _ _]
Step 24 Press once the ENTER button. Indication of pre-adjustment not completed (00)/completed (4B) [ A D J : _ _ _ _]
Step 25 Press once the MD STOP button. RESULT sub-menu state [ _ R S T _ Y O B I _ ]
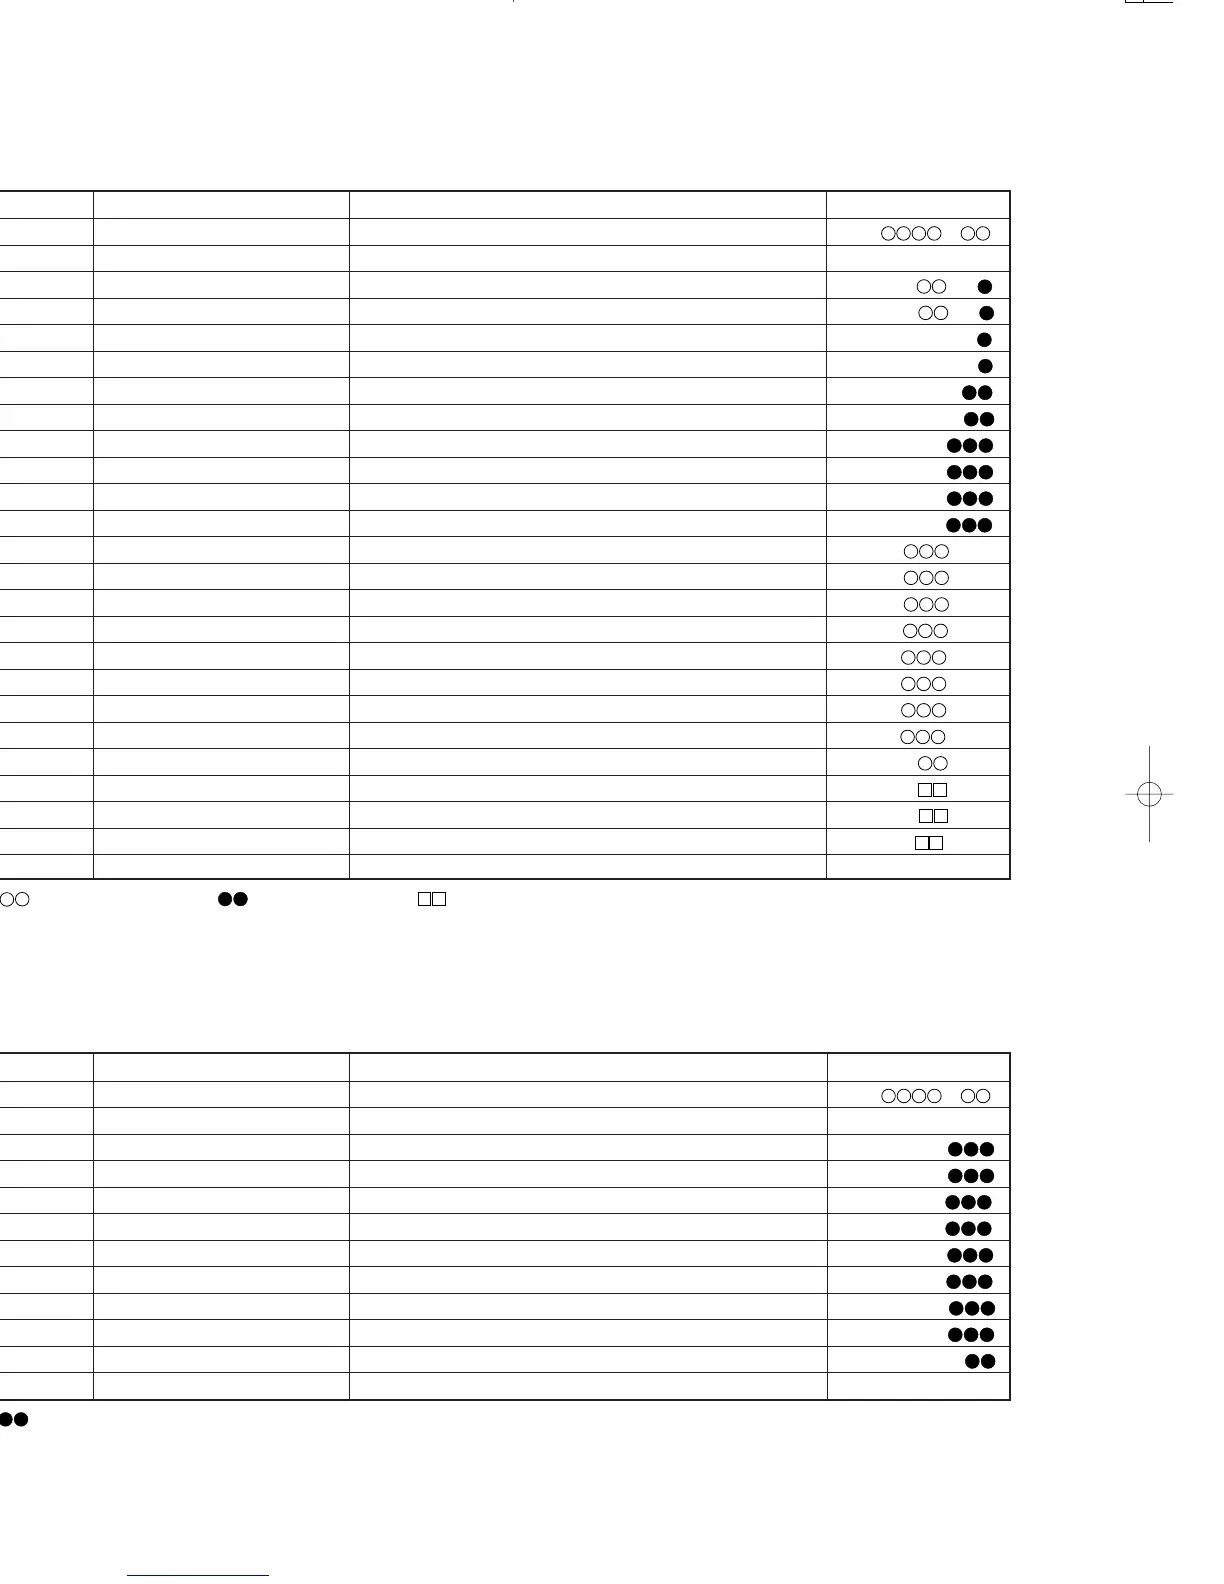
3. RESULT sub-mode
Step No.
Setting Method
Remarks Display
• : Measurement value, : Adjustment value, : Other various informations
• ressing the REC button causes reversing.
• When the jog key is turned upward while the setting is displayed, the setting increases, and a new setting is stored in RAM.
• When the jog key is turned downward while the setting is displayed, the setting increases, and a new setting is stored in RAM.
Step 1 Testmode STOP state [ t s m e ]
Step 2
Press the ENTER button four times.
RESULT menu [ _ R S T U L T _ _ _ ]
Step 3 Press once the MD PLAY button. Indication of set value [ H A G : _ _ _ ]
Step 4 Press once the ENTER button. Indication of set value [ H B G : _ _ _ ]
Step 5 Press once the ENTER button. Indication of set value [ L A G : _ _ _ ]
Step 6 Press once the ENTER button. Indication of set value [ L B G : _ _ _ ]
Step 7 Press once the ENTER button. Indication of set value [ P E G : _ _ _ ]
Step 8 Press once the ENTER button. Indication of set value [ P F G : _ _ _ ]
Step 9 Press once the ENTER button. Indication of set value [ G E G : _ _ _ ]
Step 10 Press once the ENTER button. Indication of set value [ G F G : _ _ _ ]
Step 11 Press once the ENTER button. Indication of set value [ G C G : _ _ _ _ ]
Step 12 Press once the MD STOP button. RESULT menu state [ _ R E S U L T _ _ _ ]
4. RESULT mode (final adjustment)
Step No.
Setting Method
Remarks Display
• : Measurement value
• ressing the REC button causes reversing.
• When the jog key is turned upward while the setting is displayed, the setting increases, and a new setting is stored in RAM.
• When the jog key is turned downward while the setting is displayed, the setting increases, and a new setting is stored in RAM.
 Loading...