22
SECTION FIVE
Installation
Installation Timer Location
Select a location near a standard electrical outlet. Avoid using an outlet con-
trolled by an On/Off switch.
The timer should not be exposed to the weather or operated at temperatures
below 32°or above 122°Fahrenheit. (0° c + 50° c)
Installation works best in a garage or protected area. The timer should not be
mounted outdoors.
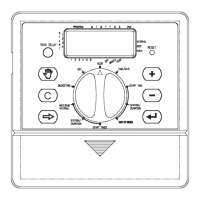
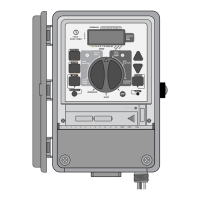
Mounting the Timer
Screw a No. 8 screw at eye level leaving the screw head extended out from
the wall about 1/8 inch. Use expanding anchors in plaster or masonry if neces-
sary.
Slip the keyhole in the back of the timer over the extended screw.
Screw a No. 8 screw through each of the two holes at the bottom of the timer
box into the wall [See Figure 15].
Wiring the Electric Valves
If the distance between the timer and valves is less than 700 feet (210 M), use
WaterMaster sprinkler wire or 20-gauge (AWG) plastic jacketed thermostat
wire to connect the timer to the valves. If the distance is over 700 feet (210 M),
 Loading...