12
Section 3 - Disassembly and Reassembly
Required Tools and Materials
• Phillips head driver bit #U51B, magnetized.
• Wooden chuck #U51, to hold driver bit #U51B.
• Thin-blade “stiletto” style tool.
• Flat blade jeweler’s screwdrivers.
• Small tweezers or forceps.
• Curved jaw pliers with jaws taped (for removing Lenses).
• Low wattage pencil-tip soldering iron.
• Loctite for securing mounting screws and springs.
• Black fabric adhesive tape 10mm wide, for securing wires.
• Silicon grease for lubricating Aperture mechanism.
Removing and Replacing Components
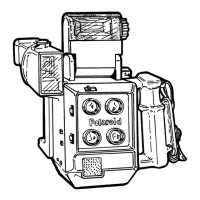
Removing Lenses, Tape Measure, Shutter and Aperture Assemblies (Figure 3-1)
1. Unscrew the four portrait Lenses (use padded-jaw pliers, if finger torque is
insufficient). Replace the Lens Caps on the Lenses to protect them against direct
and scratches.
2. Lift out the Decoration Plate.
3. Peel off the cemented-on Bottom Rubber from the Bottom Plate and remove the
three screws holding the Bottom Plate to the Camera Body.
4. Remove Tape Measure from double-sided tape, if necessary.
 Loading...