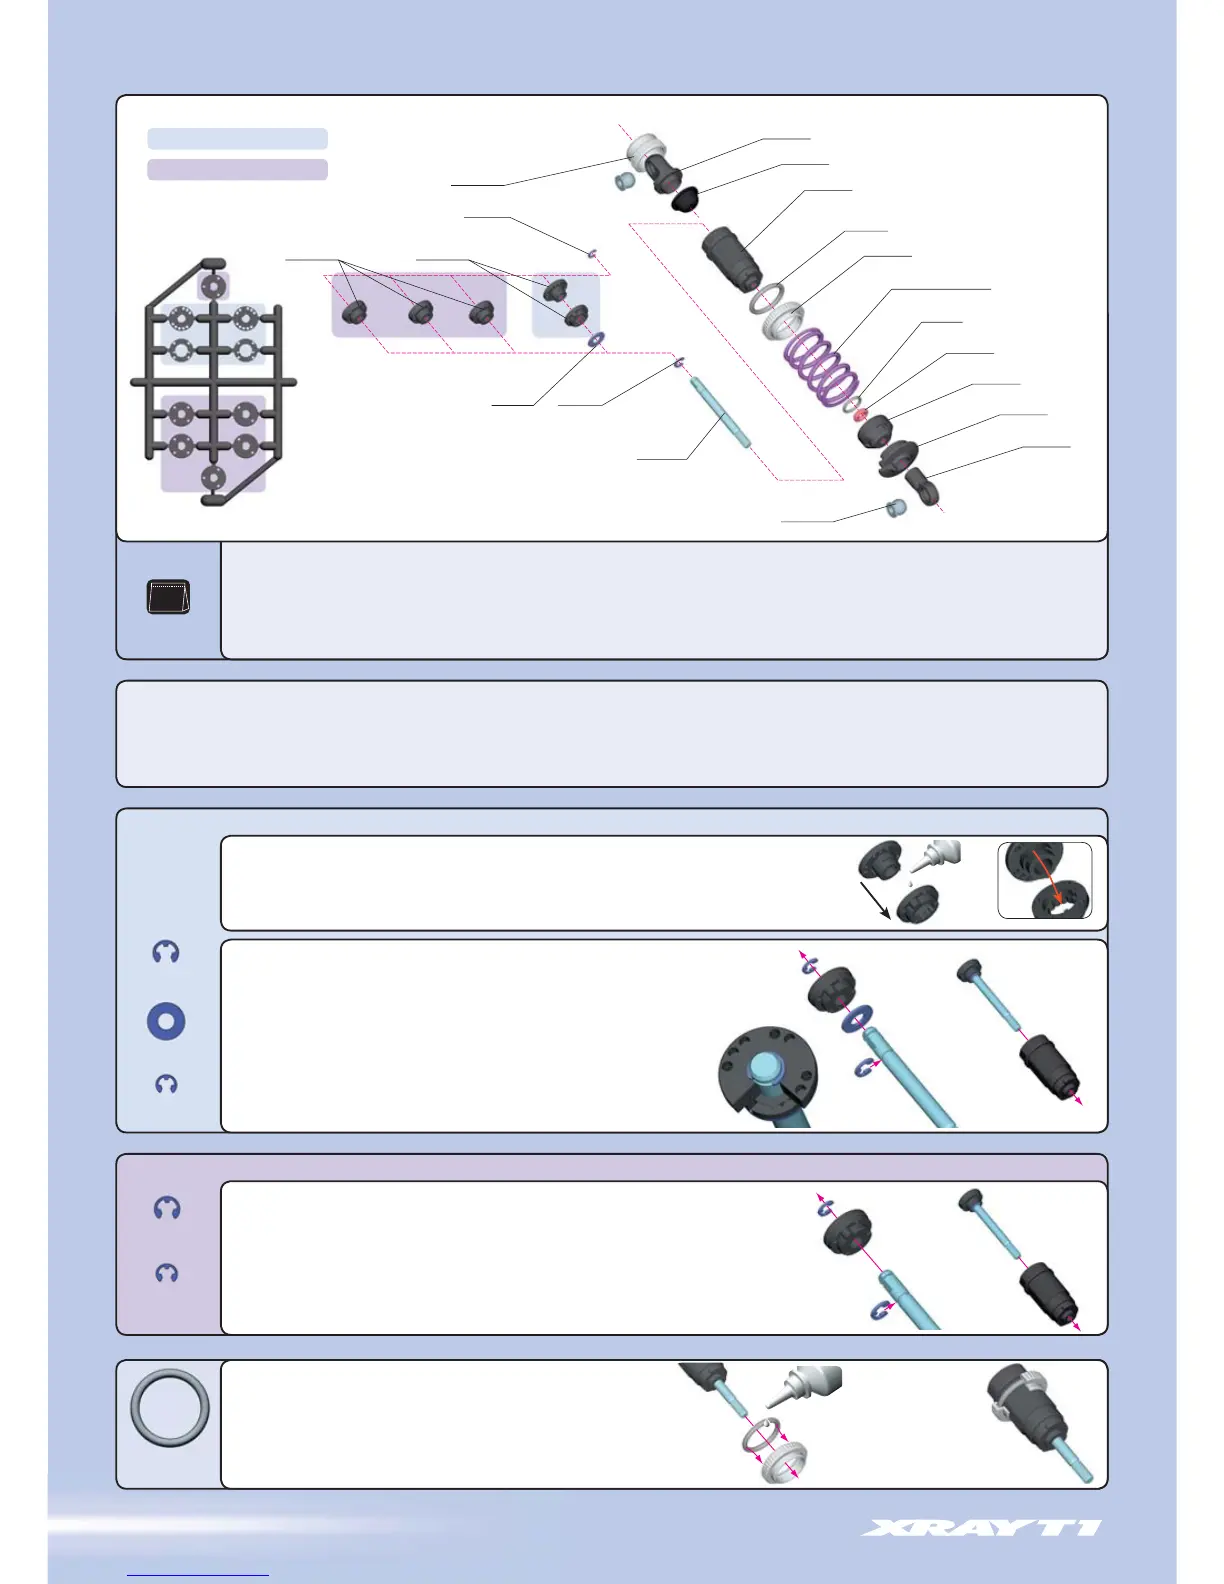
Properly functioning shocks are very important to the performance of your car. This XRAY shock set contains parts to build four externally-adjustable or non-adjustable shocks.
Both adjustable and non-adjustable shocks feature XRAY's unique keying system that positively locks the pistons to the shock rods.
Carefully cut the parts from the frames, and then VERY carefully trim any excess flash with a sharp hobby knife. We recommend you use extra-fine sandpaper to gently smooth
small flashing. The side walls of the pistons must be perfectly round and smooth for proper operation.
We recommend you build all four shocks simultaneously. Ensure you have a clean work area to build the shocks.
Assemble FOUR adjustable shock rod assemblies by performing the following steps.
1. Press a #965023 (C 2.3) E-clip into the lower groove in the shock rod.
2. Place a #961032 (S 3.2) washer onto the shock rod atop the C-clip.
3. Press the piston assembly onto the shock rod, aligning flat in pistons
with flat on the shock rod.
4. Press a #965019 (C 1.9) E-clip into the upper groove in the shock rod.
5. Apply a drop or two of shock oil to the piston rod assembly,
and then insert the shock rod assembly into the shock body.
Cutaway view of
assembled adjustment collar
Perform the following steps for all four shocks.
1. Lubricate the inner edge of a #970121 (O12.1x1.6) O-ring with
a drop or two of shock oil. Insert it into the groove of a #308040
threaded collar.
2. Carefully thread the collar onto the shock body as shown.
Be careful not to cross-thread the collar on the shock body.
965019
C 1.9
965023
C 2.3
961032
S 3.2
965019
C 1.9
965023
C 2.3
Apply a drop or two of shock oil to the piston pieces. Press upper piston (A) into lower piston (B)
as shown. The upper piston with holes (A) has a small tab that must exactly fit into one of the
notches in lower piston (B).
A
A
B
B
Assemble FOUR non-adjustable piston rod assemblies by performing the following steps.
Use the 3-hole non-adjustable pistons.
1. Press a #965023 (C 2.3) E-clip into the lower groove in the shock rod.
2. Press a 3-hole piston onto the shock rod, aligning flat in piston with flat on the shock rod.
3. Press a #965019 (C 1.9) E-clip into the upper groove of the shock rod.
4. Apply a drop or two of shock oil to the piston rod assembly, and then insert the shock rod
assembly into the shock body.
ADJUSTABLE PISTONS
NON-ADJUSTABLE PISTONS
ADJUSTABLE PISTONS
NON-ADJUSTABLE PISTONS
308035
970121
O 12.1x1.6
Cutaway view of
adjustable piston
30 3240 BALL UNIVERSAL 5.8 MM HEX (4+4)
30 8035 NYLON PISTONS ADJUSTABLE + NON-ADJUST. (SET 2+6)
30 8040 SHOCK ADJ. NUT ALU + O-RING (4+4)
30 8080 SHOCKABSORBER MEMBRANES (4)
30 8310 NYLON FRAME SHOCK PARTS 4-STEP
30 8350 SHOCK CAP-NUT ALU (2)
30 8360 HARDENED PISTON RODS FOR KEYED PISTONS (2)
30 8380 ADDITIONAL XRAY ULTIMATE RACING SPRINGS (20)
30 8390 XRAY SELECTED ULTIMATE RACING SPRINGS (24)
96 1032 WASHER S 3.2 (10)
96 5019 E-CLIP 1.9 (10)
96 5023 E-CLIP 2.3 (10)
97 0050 O-RING 5x1 (10)
97 0121 O-RING 12.1x1.6 (10)
97 1031 SILICONE O-RING 3.1x1.6 (10)
07
BAG
 Loading...