902305
SH M3x5
309319
SHIM 6x9x2
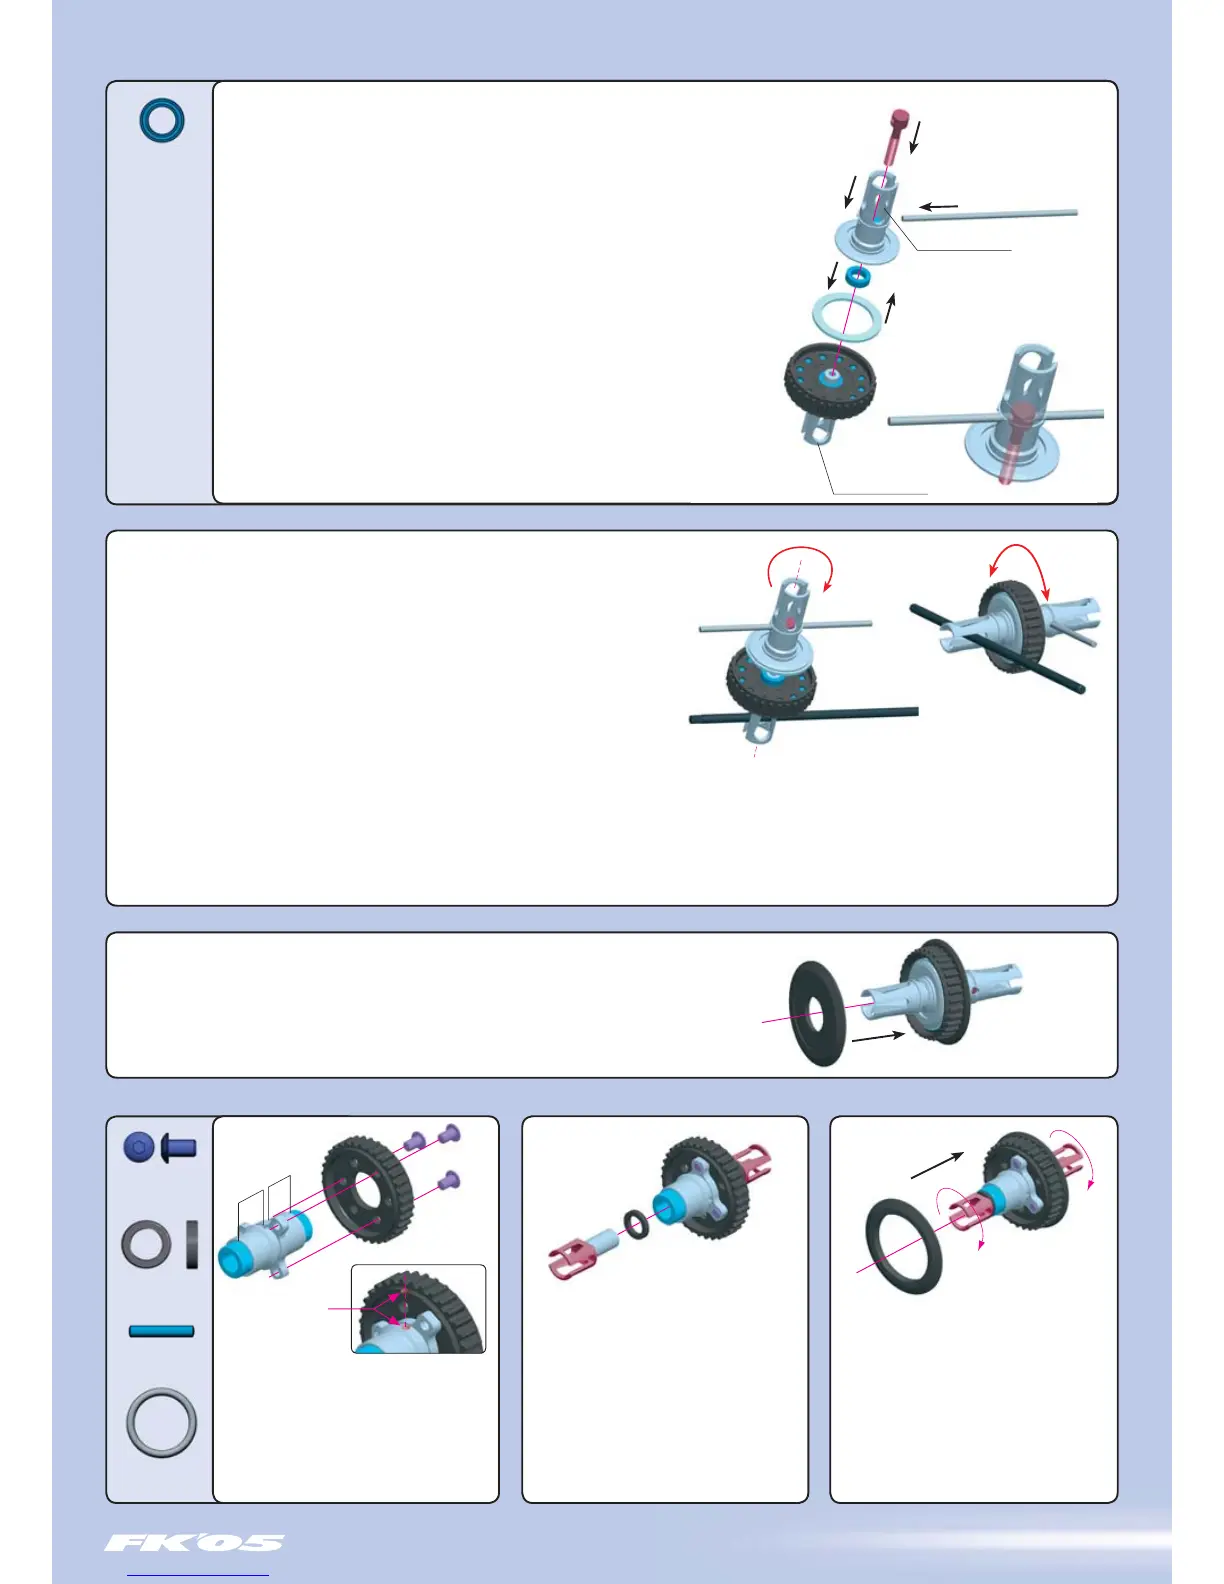
To check the differential:
Slide two wrenches into the slots on both sides of the diff shafts. Hold both
wrenches in one hand and try to turn the pulley; it should take some force to
get the pulley to slip between the two outdrives. Then remove both wrenches
and rotate one of the diff shafts while holding the pulley stationery. The action
should feel smooth.
To tighten the differential:
Insert a small Allen wrench into the aligned holes in the setscrew and long
diff shaft. Turn the long diff shaft 1/16 to 1/8 of a turn clockwise to tighten.
Remove the Allen wrench and recheck the diff.
DO NOT TIGHTEN THE DIFF COMPLETELY
THE DIFF MUST BE BROKEN IN PROPERLY !
The ball differential is pre-assembled at the factory.
Follow these steps if you need to clean or rebuild the ball differential.
1. Hold the short diff shaft with the installed pulley facing up. Place a #930508 (BB 5x8)
ball-bearing on the center stub, atop the other bearing.
2. Put a very thin coat of grease on the side of a #305082 diff washer, and place it on
the long diff shaft. The washer should seat centered on the long diff shaft, and the layer
of grease will hold it in place.
3. Insert the #305040 diff screw into the top of the long diff shaft as shown, and align
the holes in the screw with the holes in the diff shaft. Slide a small Allen wrench through
the aligned holes in both pieces. The end of the diff screw should protrude from the
center of the diff shaft.
4. Hold the lower diff half upward as shown, and lower the long diff shaft with the screw
pointing down onto the short diff shaft. Carefully thread the diff screw into the center of
the short diff shaft. Keep tightening until the diff washer just touches the diff balls, and
then tighten another 1/4 turn or until you feel some resistance. Remove the Allen wrench.
ALWAYS HOLD THE DIFFERENTIAL VERTICAL DURING ASSEMBLY, SO THE
PARTS STAY IN ALIGNMENT AND THE DIFF BALLS DO NOT FALL OUT.
IMPORTANT: When you build the differential, do not tighten it fully initially; the differential needs to be broken in properly. When you build the diff
tighten it very gently. When you put the diff in the car and complete the assembly, run the car for a few minutes, tighten the diff a little bit, and then
recheck the diff. Repeat this process several times until you have the diff tightened to the point you want it.
Final adjustments should ALWAYS be made with the diff in the car and on the track.
Cutaway view
LONG DIFF SHAFT
SHORT DIFF SHAFT
Attach the #305150 pulley to the #305102
front axle using three #902305 (SH M3x5)
screws.
Attach pulley to SHORT side of front axle,
opposite to side with hole through axle (for
locking pin).
Slide two pulley covers onto the ends of the
front axle. Squeeze the covers firmly until
they both "snap" over the pulley; it may take
a bit of effort to do this.
Verify that the outdrives rotate in the
direction shown.
See page 22 for front Multi-Diff™ settings.
To loosen the differential:
Same as tightening the differential, except turn the long diff shaft counter-clockwise to loosen.
Slide #309319 spacer onto #305131
outdrive shaft.
Apply one-way lube to outdrive shaft, then
slide into one-way bearing in end of front
axle.
Repeat for other side.
Slide two Labyrinth Dust Covers onto the ends of the diff shafts; the smooth
sides of the covers face outward, away from the pulley. Squeeze the covers
firmly until they both "snap" onto pulley; it may take a bit of effort to do this.
Once snapped on, the covers seat perfectly.
FRONT MULTI-DIFF
™ (not included in US kits)
981212
P 2x12
970100
O 10x1.5
DETAIL
NOTE ORIENTATION
Hole on the pulley and on
the axle must be aligned.
 Loading...