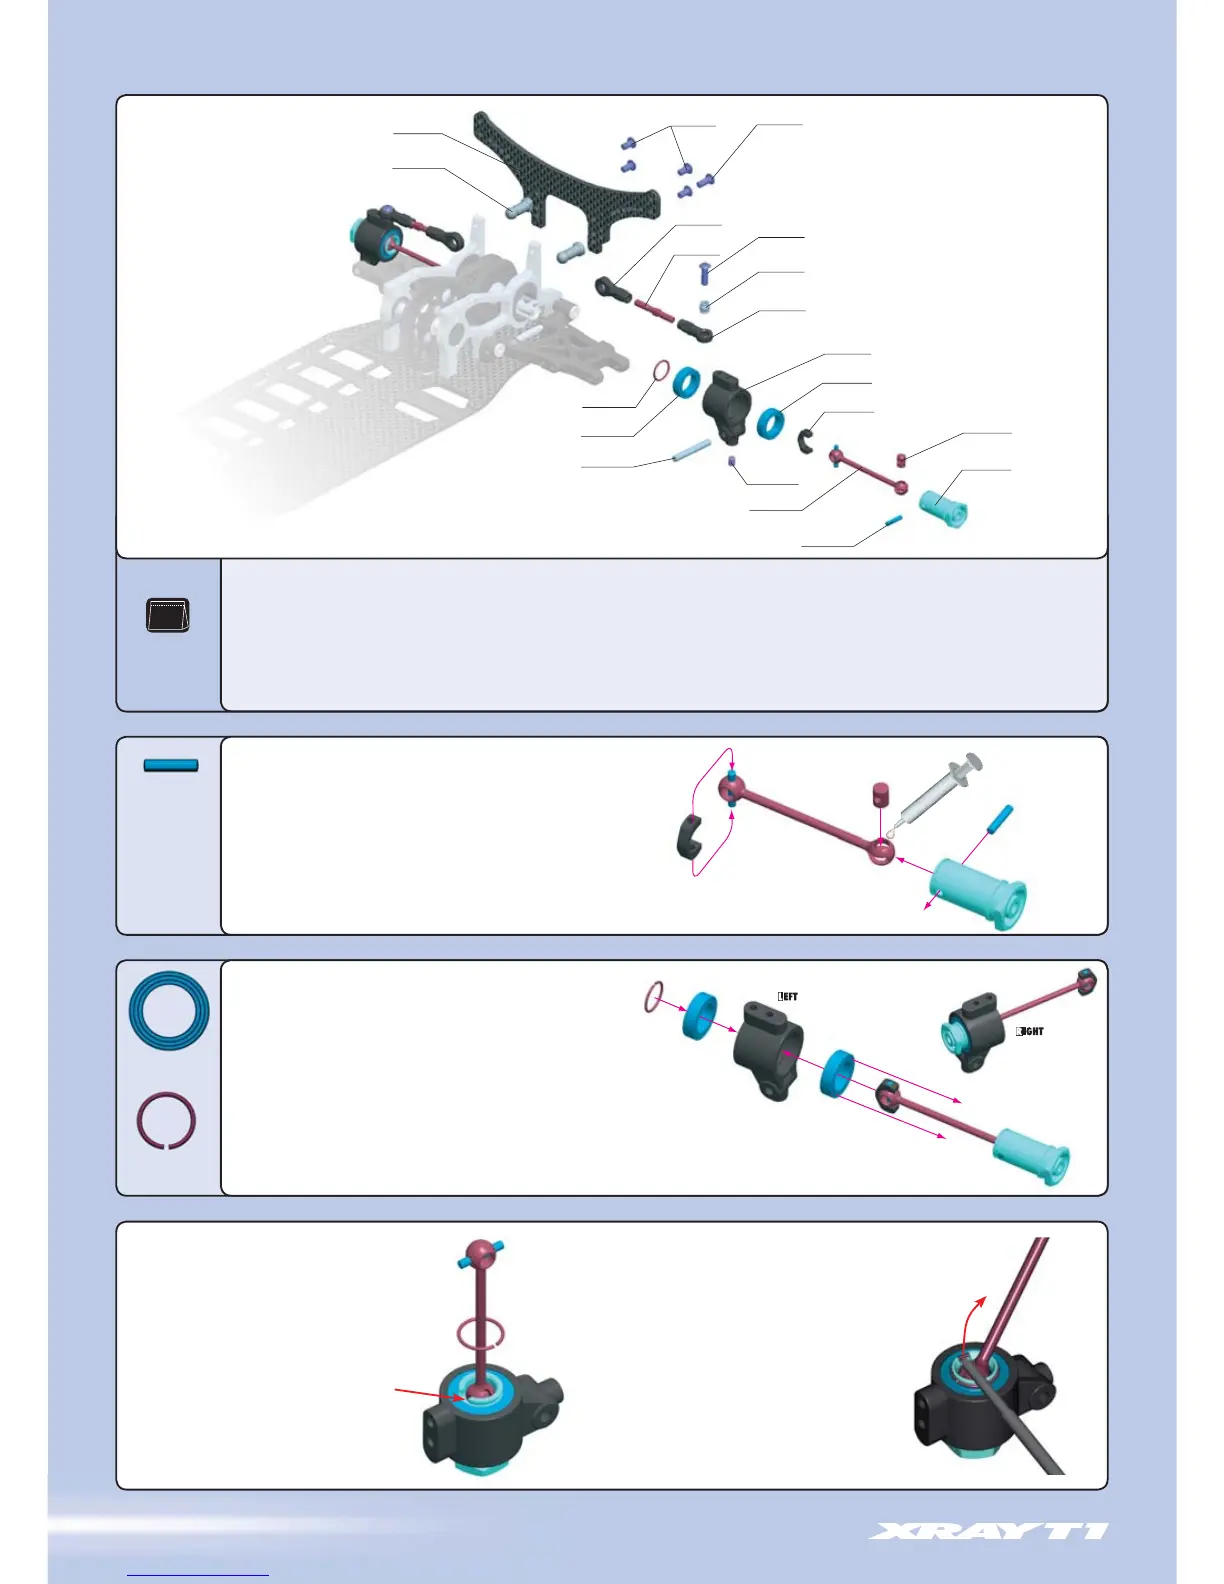
3. REAR SUSPENSION
981210
P 2x10
941015
BB 10x15
309425
C 10
G
R
EA
SE
Note the orientation of the parts!
REMOVAL
967100
C 10
30 2615 ADJ. TURNBUCKLE L/R 30 MM - SPRING STEEL (2)
30 2662 BALL JOINT 5 MM - OPEN (6)
30 3031 ROLL CENTER ALU HOLDER - SET (2)
30 3093 SHOCK TOWER REAR - FACTORY KIT
30 3220 BALL JOINT 5.8 MM (4)
30 3350 COMPOSITE UPRIGHT REAR FOR C-HUB SUSPENSION
30 5230 DRIVE SHAFT COUPLING - SPRING STEEL (2)
30 5240 DRIVE SHAFT REPLACEMENT PLASTIC CAP 3 MM (4)
30 5311 WHEEL AXLE - 22 MM - INTEGR. HEX HUB - (FACTORY KIT) (2)
30 5321 DRIVE SHAFT - 51 MM - SPRING STEEL - (FACTORY KIT) (2)
30 7320 REAR PIVOT PIN FOR C-HUB - SPRING STEEL (2)
30 7454 PIVOT BALL 5.0 MM DOUBLE BEVEL SHOULDERS (10)
90 1305 HEX SCREW SB M3x5 (10)
90 2306 HEX SCREW SH M3x6 (10)
90 2308 HEX SCREW SH M3x8 (10)
90 2310 HEX SCREW SH M3x10 (10)
94 1015 HIGH-SPEED BALL-BEARING 10 x 15 x 4 RUBBER SEALED (2)
96 7100 O-CLIP 10 (10)
98 1210 PIN 2x10 (10)
Build TWO axles by performing the following steps.
1. Lightly grease a #305230 coupling and insert it into the drive shaft
joint.
2. Lightly grease the drive shaft end and slide it into the #305311 wheel
axle. Align the holes in the coupling with the holes in the wheel axle.
3. Insert a #981210 (P 2x10) pin through the aligned holes in the
coupling and wheel axle. Make sure the pin is evenly spaced on both
sides of the wheel axle.
4. Install the #305240 plastic cap onto the drive shaft pins.
Build TWO rear uprights by performing the following steps.
1. Slide a #941015 (BB 10x15) ball-bearing onto the wheel axle.
2. Insert the wheel axle through the rear upright until the bearing
seats in the rear upright. Note the orientation of the parts in the
image.
3. Slide another #941015 (BB 10x15) ball-bearing onto the wheel
axle. Press the bearing into the rear upright, making sure it seats
properly.
4. Secure the wheel axle in the rear upright by installing
a #967100 snap ring in the groove of the wheel axle.
TO INSTALL A SNAP RING:
Place the hex portion of the wheel axle flat on a table.
Put one end of the snap ring into the groove on the
opposite side of the axle cutout, and use a slotted
screwdriver to work the clip into the groove.
INSTALLATION
TO REMOVE A SNAP RING:
Place the hex portion of the wheel axle flat on a table.
Insert a small screwdriver in the axle cutout and pry it
off, taking care not to let it fly off the workbench.
Use proper eye protection.
Groove
03
BAG
 Loading...