VX-6R/E OPERATING MANUAL 63
timer expiration at the power level stored in that memory channel; it is NOT necessary for
the incapacitated person to press the PTT switch.
In the Continuous mode, when the VX-6R/E receives the CTCSS tone pair which is stored
in the Receiving Pager Code Memory (configured via Set Mode Item 45: PAG.CDR) on
the frequency which is stored in Memory Channel “EAI” for more than five seconds, the
radio will automatically transmit (with maximum microphone gain) continuously, until the
EAI timer expiration, at the power level stored in that memory channel; it is NOT necessary
for the incapacitated person to press the PTT switch.
Furthermore, if your call sign is stored in the radio and enabling the CW identifier via Set
Mode Item 14: CW ID, the radio will transmit your callsign on the air when the EAI feature
is first engaged by the remote page, and every 10 minutes thereafter. The “callsign” ID can
be changed to any desired sequence of characters, such as a name. After sending the
callsign or name, the radio will repeatedly transmit three tones for a user-defined period of
time (between 1 and 30 minutes). The callsign or name will be transmitted every 10 minutes.
The Emergency Automatic ID (EAI) Feature requires that you (1) store the CTCSS Tone
Pair into the Receiving Pager Memory (see page 60 for procedure), and (2) store the desired
UHF coordination frequency into Memory Channel “EAI” (see page 34 for procedure).
Selecting the EAI mode and its Transmit Time
1. Press the
[
F/W
]
key, then press the
[
0
(
SET
)]
key to enter the Set mode.
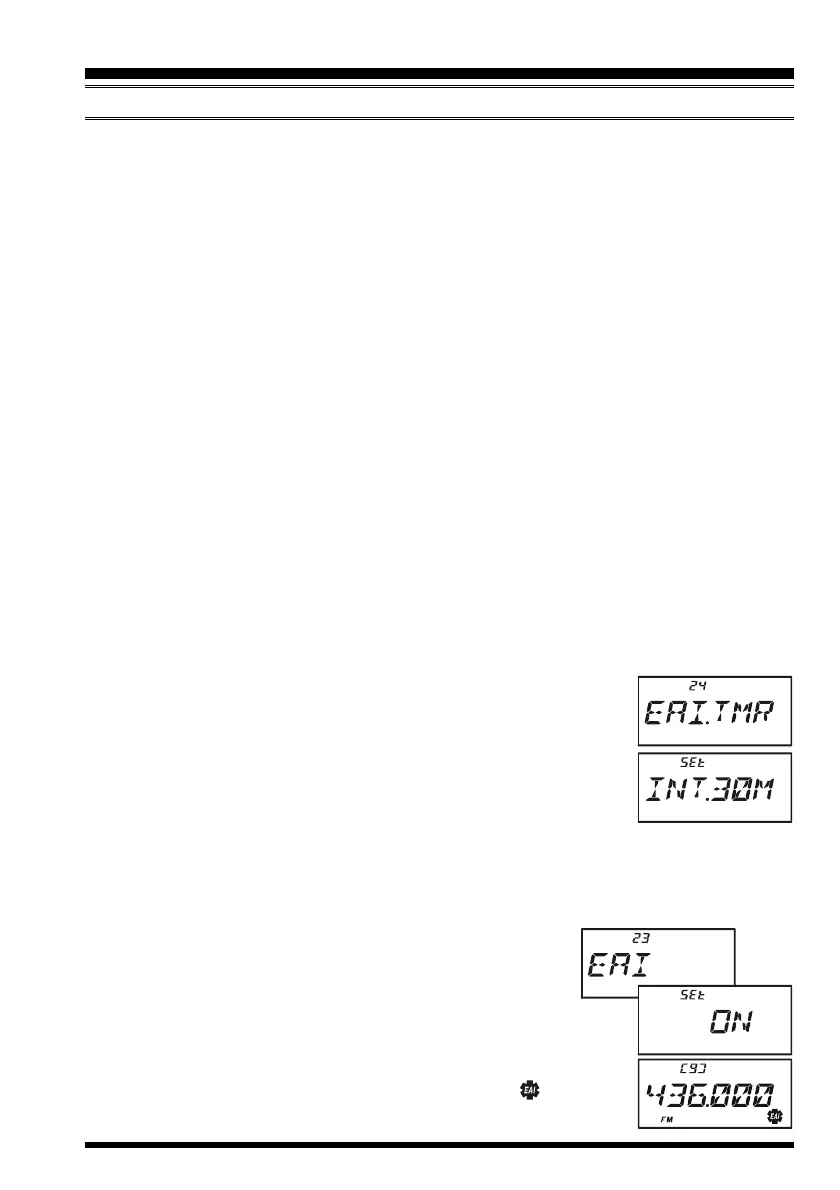
2. Rotate the DIAL knob to select Set Mode Item 24: EAI.TMR.
3. Press the
[
0
(
SET
)]
key momentarily to enable adjustment of this
Set Mode Item.
4. Rotate the DIAL knob to select the desired EAI mode (Interval
EAI “INT”or Continuous EAI “CON”) and its transmit time (1-
10
, 15, 20, 30, 40, and 50 minutes).
5. Press the PTT switch to save the new setting and exit to normal operation.
Activating the EAI feature
1. Press the
[
F/W
]
key, then press the
[
0
(
SET
)]
key to enter the Set mode.
2. Rotate the DIAL knob to select Set Mode Item 23: EAI.
3. Press the
[
0
(
SET
)]
key momentarily to enable adjustment
of this Set Mode Item.
4. Rotate the DIAL knob to select “ON” (thus activating the EAI
feature).
5. Press the PTT switch to save the new setting and exit from the
Set mode. When the EAI feature is activated, the “ ” icon will
appear at the bottom right on the LCD.
EMERGENCY FEATURE
EMERGENCY AUTOMATIC ID
(
EAI
)
FEATURE
 Loading...