E-12
Part 3 Inputting Characters and Symbols
This part of the manual tells you how to input characters. To make things easier
to understand, we call everything you input a character, regardless of whether it
is actually a letter, number, or symbol. Explanations here all use the default
settings that are in effect from the initial power-on screen.
For information on using other character fonts, styles, effects and sizes, see page
E-17
.
Important!
• You can input up to 100 characters per label. Further input becomes impossible
after you input the 100th character.
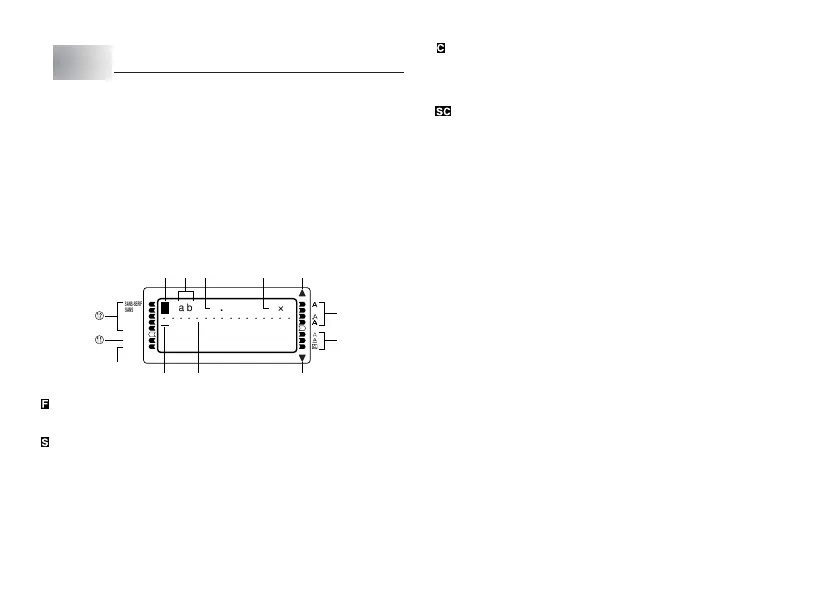
Display Symbols and Indicators
Before getting into actual input, you should first become acquainted with the
symbols and indicators used on the Label Printer display.
0
0c
m4
4
´
.
··
·
··
·
······ ····
F ab
SANS-SERIF
SANS-S ITC
SANS-S RND
ROMAN
ROMAN ITC
VERTICAL
MIRROR
12 5
5
6
89
3 4
0
7
1 Function/Shift/Code indicator
appears when you press the FUNC key. Pressing a key while this indicator is
on the display causes the function marked above, below, or next to that key to
be executed.
appears when you press the SHIFT key. While this indicator is on the display,
the keyboard is shifted, so the letter keys input the opposite of their current
uppercase/lowercase setting. The number keys input the punctuation symbols
marked in the upper right corners of the keys. The keyboard automatically unshifts
(and the shift indicator disappears) as soon as you input a character.
appears when you press the CODE key. While this indicator is on the display,
number keys input the accents marked above them and the U, O, P, A, S, J, K,
L, Z, C, and N keys input the special characters marked in their lower right
corners. The keyboard automatically returns to normal (and the code indicator
disappears) as soon as you input an accent.
appears when both the SHIFT and CODE keys are pressed.
2 CAPS On/Off indicator
“AB” indicates uppercase input, while “ab” indicates lowercase input.
3 Tape length
This value shows the length that the tape will be printed.
4 Character size indicator
This indicator shows the size of the character where the cursor is currently
located.
5 Scroll indicators
These indicators appear when there is data above or below the currently dis-
played screen.
6 Style indicators
These indicators point to the character style that is currently in use. You can
select between normal, bold, outline, shadow, and raidsed.
7 Effect indicators
These indicators point to the character effect that is currently in use. You can
select between shading, underline, and box.
8 Character position marks
These marks show where characters will appear as you input them. This part of
the display is always blank when you turn power on.
9 Cursor
The cursor shows the next input position. Any character you input appears at
the point where the cursor is located.
 Loading...