25
Memory/Add
switch
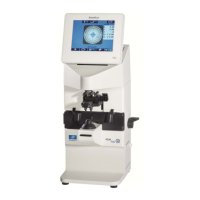
6.2 Measurement of Single Lens
(1) Place the lens on the lens stand.
Lower the lens holder softly on the lens.
The screen as shown on the right appears.
(2) Bring the cross cursor to the alignment mark by
moving the lens. The message “Alignment OK”
appears on the screen when alignment completes.
If the lens is the cylindrical one, rotate the lens
to fit the axis direction.
(3) Move the lens until the alignment mark and
cross cursor overlap. When they overlap, the
message “Marking OK” appears to indicate that
the marking is ready to be carried out.
S, C, A and prism value are stored by pressing
the Memory/Add switch.
The color of the measurement value area is
reversed, and the values are fixed.
※ In case of setting “Auto Memory” on the
Setup screen as “On”, the measurement
values are stored in memory automatically
after the message “Marking OK” appears.
In case of deleting the data stored in
memory, touch
In case of printing it out, touch
.
Do not give strong impact to a lens when lowering the lens holder.
When rising the lens holder, make sure that it is moved to the top and locked.
The alignment mark represents the optical center of the lensmeter and the
cross cursor represents the optical center of the lens.
Cross cursor
Alignment mark
NOTE
 Loading...