– 11 –
WARNING :
Turn OFF the power before start-
ing the work so as to prevent
accidents caused by abrupt start
of the sewing machine.
注意 :
为了防止缝纫机的意外起动 , 请
关掉电源之后再进行操作。
WARNUNG :
Schalten Sie vor Beginn der Arbeit
die Stromversorgung aus, um durch
plötzliches Anlaufen der Nähmaschine
verursachte Unfälle zu verhüten.
AVERTISSEMENT :
Couper l’alimentation de la machine
(position OFF) avant de commencer
l’opération an de prévenir les acci-
dents éventuels causés par un démar-
rage soudain de la machine à coudre.
AVISO :
Desconecte la corriente eléctrica an-
tes de comenzar el trabajo para evitar
accidentes causados por un arranque
brusco de la máquina de coser.
AVVERTIMENTO :
Prima di effettuare le seguenti opera-
zioni, posizionare l’interruttore su
OFF (SPENTO) onde evitare incidenti
causati dall’avviamento accidentale
della macchina per cucire.
UYARI:
Makinenin aniden çalışması sonucu
ortaya çıkabilecek yaralanmaları
önlemek için, her türlü çalışma
öncesi makinenin şalterini KAPATIN.
Предупреждение:
Выключите электропитание перед
началом работы, чтобы предотвратить
несчастные случаи, вызванные
неожиданным запуском швейной
машины.
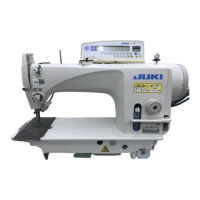
Use the specied needle for the
machine. Use the proper needle in
accordance with the thickness of thread
used and the kinds of the materials.
1)
Turn the handwheel until the
needle bar reaches the highest
point of its stroke.
2) Loosen screw
2
, and hold needle
1
with its indented part
A
facing
exactly to the right in direction
B
.
3) Insert the needle fully into the hole
in the needle bar in the direction
of the arrow until the end of hole is
reached.
4) Securely tighten screw
2
.
5) Check that long groove
C
of the
needle is facing exactly to the left
in direction
D
.
(Caution) When polyester lament
thread is used, if the indented
part of the needle is tilted
toward operator's side, the loop
of thread becomes unstable.
As a result, hangnail of thread
or thread breakage may occur.
For the thread that such
phenomenon is likely to occur, it
is effective to attach the needle
with its indented part slightly
slanting on the rear side.
请使用各规格指定使用的缝纫机
机针。同时,还请根据使用的缝
纫机线的粗细以及布料的种类,
选择使用适当的缝纫机机针。
1) 转动飞轮 , 把针杆升到最高处。
2) 拧松机针固定螺丝
2
, 手拿机
针把机针
1
凹部
A
横向转
到
B
的方向。
3) 把机针插到针杆孔的深处。
4) 拧紧机针固定螺丝
2
。
5) 确认针的长孔
C
在左横向
D
的方向。
( 注意 ) 使用聚酯长丝机线时 , 如
果机针凹部朝向面前倾向的话 ,
容易发生线环不稳定或断线的
现象。使用这类机线时 , 请把
机针稍稍向后倾斜安装 , 就可
以有效地防止这些现象。
iVerwenden Sie die vorgeschriebene
Nadel für die Maschine. Verwenden Sie
die korrekte Nadel entsprechend der
Dicke des verwendeten Fadens und
des Stofftyps.
1) Das Handrad drehen, bis die
Nadelstange den höchsten Punkt
ihres Hubes erreicht.
2) Die Feststellschraube
2
lösen, und
die Nadel
1
so halten, daß ihre
Hohlkehle
A
genau nach rechts in
Richtung
B
zeigt.
3) Die Nadel in Pfeilrichtung bis
zum Anschlag in die Bohrung der
Nadelstange einführen.
4) Die Schraube
2
fest anziehen.
5) Sicherstellen, daß die lange Rinne
C
der Nadel genau nach links in
Richtung
D
zeigt.
(Vorsicht) Bei Verwendung von
Polyester-Filamentgarn wird
die Fadenschleife instabil,
wenn die Hohlkehle der Nadel
zur Bedienerseite geneigt
wird. Infolgedessen kann es
zu Ausfransen des Fadens
oder Fadenbruch kommen.
Daher ist es für Garn, das
zu solchen Störungen neigt,
empfehlenswert, die Nadel so
anzubringen, daß die Hohlkehle
leicht zur Rückseite gedreht ist.
Utiliser l'aiguille spéciée pour
la machine. Utiliser une aiguille
appropriée pour la grosseur du l
utilisé et le type de tissu.
1) Remonter la barre à aiguille au
maximum en tournant le volant.
2) Desserrer la vis
2
et présenter
l’aiguille
1
avec son creux
A
tourné exactement vers la droite
B
.
3) Introduire l’aiguille jusqu’au fond
dans la barre à aiguille dans le
sens de la èche.
4) Serrer la vis
2
à fond.
5) S'assurer que la longue rainure
C
de l’aiguille est tournée
exactement vers la gauche
D
.
(Attention) Lors de l'utilisation de
l de lament de polyester,
si la saignée de l'aiguille est
inclinée vers le côté opérateur,
la boucle du l sera irrégulière.
Le l risquera alors de
pelucher ou de se casser. Pour
un l susceptible de présenter
de tels problèmes, on pourra
poser l’aiguille avec son creux
légèrement tourné vers l’
arrière.
Utilice la aguja especicada para la
máquina. Utilice la aguja apropiada
de acuerdo con el espesor del hilo
utilizado y tipo de material.
1) Gire el volante hasta que la barra
de aguja llegue al punto más alto
de su recorrido.
2) Aoje el tornillo
2
, y sostenga la
aguja
1
con su parte indentada
A
mirando exactamente hacia la
derecha en la dirección
B
.
3) Inserte completamente la aguja en
el agujero en la barra de aguja en
la dirección de la echa hasta que
llegue al n del agujero.
4) Apriete con seguridad el tornillo
2
.
5) Compruebe que la ranura larga
C
de la aguja queda mirando
exactamente hacia la izquierda en
la dirección
D
.
(Precaución) Cuando use hilo
de lamento poliester, si la
porción indentada de la aguja
está inclinada hacia el lado
de la operadora, el bucle del
hijo deviene inestable. Como
esultado, se podrá producir
enredo o rotura del hilo.
Para hilos susceptibles de este
fenómeno, es efectivo colocar
la aguja con su parte indentada
parcialmente en posición
oblicua en su lado posterior.
Usare l'ago specicato per la
macchina. Usare l'ago opportuno
secondo lo spessore del lo usato e il
genere di materiale.
1) Girare il volantino per sollevare
la barra ago no al punto più alto
della sua corsa.
2) Allentare la vite
2
, e tenere l’ago
1
con la sua parte incava
A
volta
esattamente verso destra, nel
senso
B
.
3) Inserire l’ago a fondo nel foro
nella barra ago, nel senso della
freccia, nché il fondo del foro sia
raggiunto.
4) Stringere la vite
2
saldamente.
5) Assicurarsi che la scanalatura
lunga
C
dell’ago sia volta
esattamente verso sinistra, nel
senso
D
.
(Attenzione) Quando il lo di
lamento è usato, se la parte
incava dell’ago è inclinata
verso il lato dell’operatore, la
curva del lo diventa instabile.
Di conseguenza, potrebbe
vercarsi la pipita del lo o la
rottura del lo. Per il lo con il
quale è possibile che si presenti
tale fenomeno, è efcace
attaccare l’ago con la sua parte
incava leggermente inclinata sul
lato posteriore.
O makine için tanımlanan iğneyi
kullanın. Kullanılan iğne kalınlığı ve
malzeme cinsine uygun iğne kullanın.
1) İğne mili hareket mesafesinin en
üst noktasına gelinceye kadar,
volan kasnağı çevirin.
2) Vidayı
2
gevşetin ve iğneyi
1
kanallı yüzü
A
dik olarak tam
B
yönüne bakacak şekilde tutun.
3) İğneyi ok yönünde ve yuvanın
tabanına oturuncaya kadar iğne
milinin kanalına ok yönünde ve
tamamen geçirin.
4) Vidayı
2
sağlam biçimde sıkın.
5) İğneyi kontrol edin ve iğnedeki
uzun kanalın
C
tamamen sol
tarafa
D
baktığından kesinlikle
emin olun.
(Dikkat) Polyester âman iplik
kullanırken, iğnenin kanallı
bölümü kullanıcının tarafına
doğru eğildiği takdirde; iplik
ilmeği dengesiz hale gelir.
Sonuç olarak iplik şeytan
tırnağı olur veya iplik kopmaları
görülür. İplikle ilgili bu tür
sorunlar ortaya çıktığı takdirde,
iğnenin kanallı tarafının hafçe
arkaya dönük şekilde takılması,
sorunun çözümü açısından
etkin sonuçlar verir.
Используйте для машины иглу по
назначению. Используйте иглу в
соответствии с толщиной ткани и видом
материала.
1) Поворачивайте маховик до тех пор,
пока игольница не достигает самой
высокой точки своего хода.
2) Ослабьте винт
2
и держите иглу
1
,
направив ее зубчатую часть
A
строго
направо в направлении
B
.
3) Вставляйте иглу полностью в отверстие
в игольнице в направлении, указанном
стрелкой, пока не достигните конца
отверстия.
4) Надежно затяните винт
2
.
5) Убедитесь, что длинный желобок
C
иглы, смотрит строго налево в
направлении
D
.
(Предупреждение) Когда используются
полиэфирные нити, если зубчатая
часть иглы наклонена к рабочему
месту, нитяная петля становится
неустойчивой. В результате может
образоваться нитяная заусеница
или произойти обрыв нитки. Чтобы
не допускать этого, эффективно
прикрепить иглу с ее зубчатой частью,
немного наклоненной к тыльной
стороне.
1
2
C
D
B
A
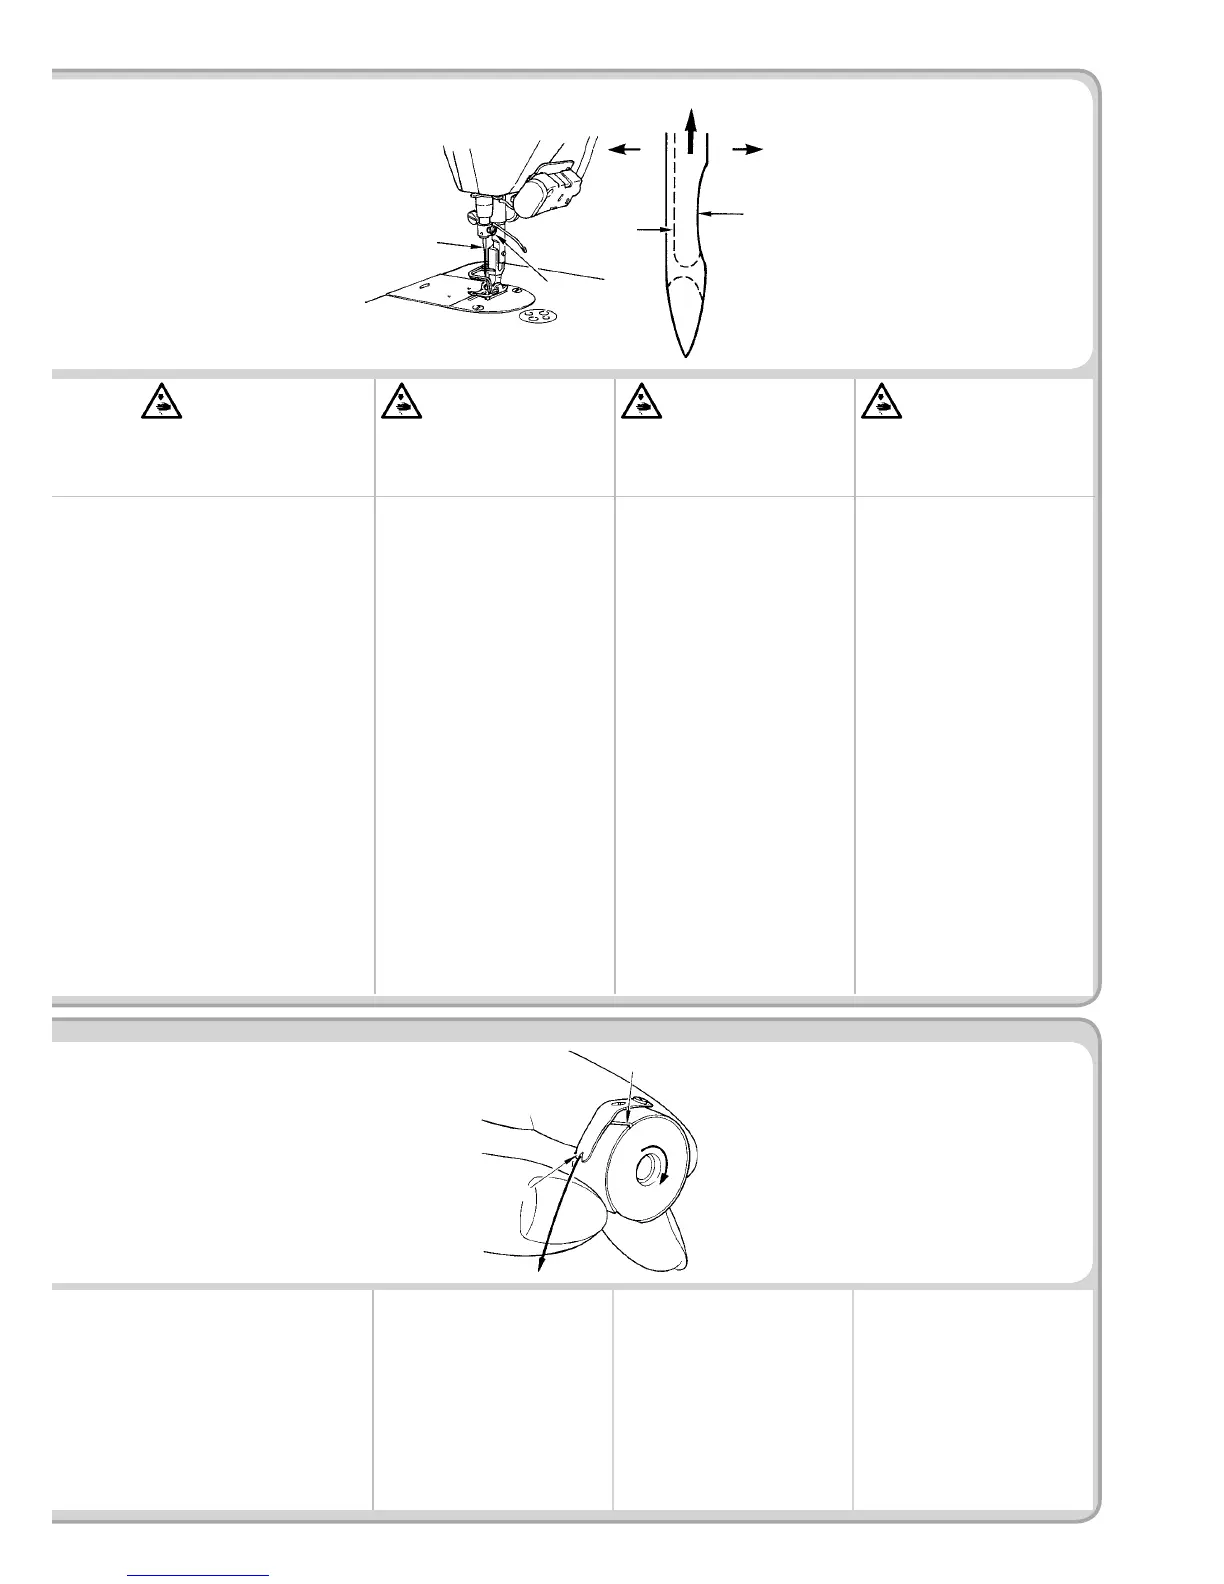
1) Install the bobbin in the bobbin
case so that the thread wound
direction is clockwise.
2) Pass the thread through thread slit
A
, and pull the thread in direction
C
. By so doing, the thread will
pass under the tension spring and
come out from notch
B
.
3) Check that the bobbin rotates in
the direction of the arrow when
thread is pulled.
1) 手拿梭心 , 让线往左绕的方
向 , 把它放入梭壳。
2) 把线穿过梭壳的穿线口
A
, 然
后把线往
C
方向拉 , 从线张
力弹簧下面的穿线口
B
拉出
来。
3) 拉底线 , 确认梭心是否按箭头
方向转动。
1) Die Spule ist so in die
Spulenkapsel einzusetzen, daß sie
sich beim Ziehen des Fadens nach
rechts dreht.
2) Den Faden durch den Fadenschlitz
A
führen und in Richtung
C
ziehen.
Dadurch wird der Faden unter die
Fadenspannungsfeder und aus der
Kerbe
B
herausgeführt.
3) Sicherstellen, daß sich die Spule
in Pfeilrichtung dreht, wenn der
Faden gezogen wird.
1) Poser la canette dans la boîte à
canette en la tenant de manière
que le l soit enroulé vers la droite.
2) Faire passer le l dans la fente
A
et le tirer dans le sens
C
.
Le l passe alors sous le ressort
de tension et sort par l’encoche
B
.
3) S’assurer que la canette tourne
dans le sens de la èche lorsqu’on
tire le l.
1) Instale la bobina en la cápsula
de canilla de modo que el hilo se
bobine hacia la derecha.
2) Pase el hilo por la rendija
A
de
hilo, y tire del hilo en la dirección
C
.
De este modo, el hilo pasará por
debajo del muelle tensor y saldrá
por la muesca
B
.
3) Compruebe que la bobina gira en
la dirección de la echa cuando se
tira del hilo.
1) Installare la bobina nella capsula
in modo che la direzione di
avvolgimento del lo sia in senso
orario.
2) Far passare il lo attraverso la
fenditura di lo
A
, e tirare il lo nel
senso
C
.
Con questa operazione, il lo
passerà sotto la molla di tensione
e verrà fuori dalla tacca
B
.
3) Controllare che la bobina giri nel
senso della freccia quando il lo
viene tirato.
1) Masurayı, iplik saat yönünde
dönecek şekilde mekiğe yerleştirin.
2) İpliği
A
kanalından geçirin ve
C
yönüne doğru çekin. Bunu
yaparken ipliği tansiyon yayının
altından alarak geçirin ve yarıktan
B
dışarı çıkartın.
3) Masura ipliği çekildiği zaman,
masuranın ok işareti yönünde
dönüp dönmediğini kontrol edin.
1) Установите катушку в шпульный
колпачок так, чтобы направление
намотки нитки было по часовой
стрелке.
2) Пропустите нитку через разрез
для нитки
A
и натяните нитку в
направлении
C
. При этом нитка
пройдет под пружиной растяжения и
выйдет из паза
B
.
3) Убедитесь, что катушка вращается в
направлении стрелки при натяжении
нитки.
A
B
C
 Loading...