– 19 –
1) Insert the bobbin deep into the
bobbin winder spindle
1
until it will
go no further.
2) Pass the bobbin thread pulled out
from the spool rested on the right
side of the thread stand following the
order as shown in the gure on the
left. Then, wind clockwise the end
of the bobbin thread on the bobbin
several times.
(In case of the aluminum bobbin,
after winding clockwise the
end of the bobbin thread, wind
counterclockwise the thread coming
from the bobbin thread tension
several times to wind the bobbin
thread with ease.)
3) Press the bobbin winder trip latch
2
in the direction of
A
and start the
sewing machine. The bobbin rotates
in the direction of
C
and the bobbin
thread is wound up. The bobbin
winder spindle
1
automatically as
soon as the winding is nished.
4) Remove the bobbin and cut the
bobbin thread with the thread cut
retainer
3
.
5) When adjusting the winding amount
of the bobbin thread, loosen
setscrew
4
and move bobbin
winding lever
2
to the direction of
A
or
B
. Then tighten setscrew
4
.
To the direction of
A
: Decrease
To the direction of
B
: Increase
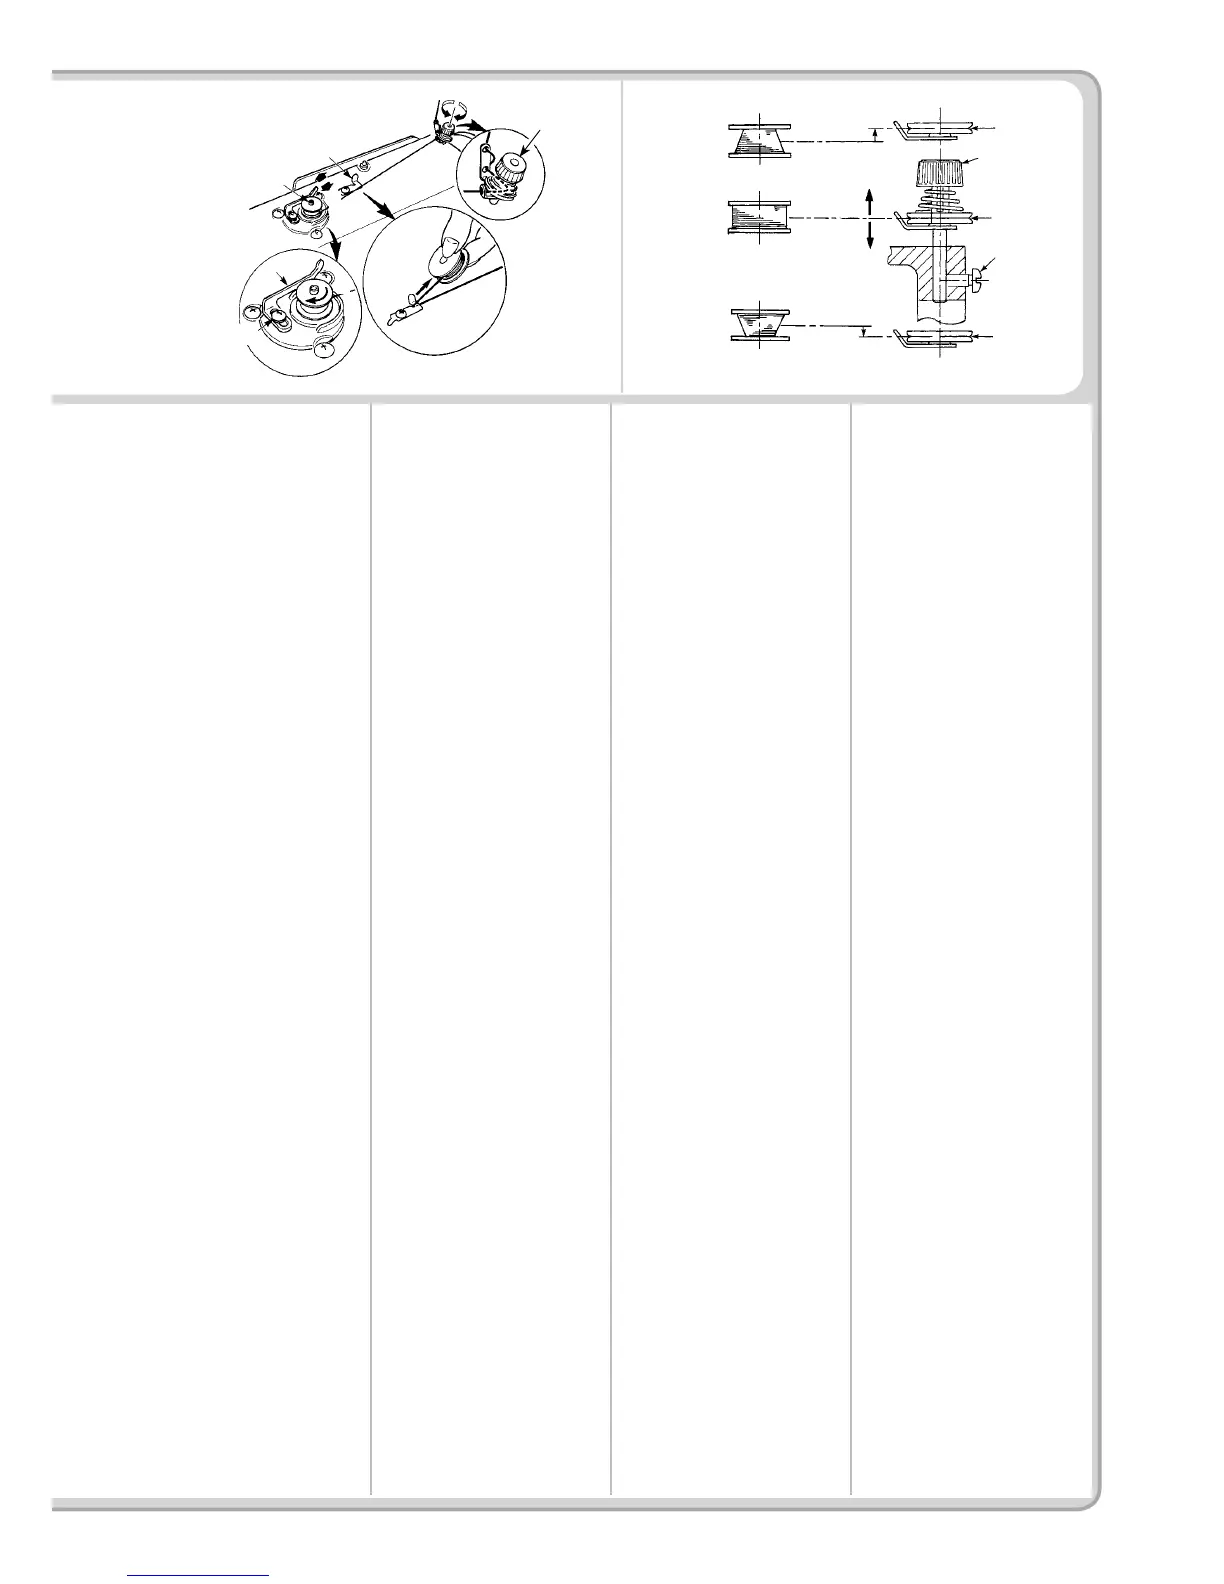
6) In case that the bobbin thread is not
wound evenly on the bobbin, remove
the handwheel, loosen screw
5
and
adjust the height of bobbin thread
tension
8
.
• It is the standard that the center of
the bobbin is as high as the center
of thread tension disk
6
.
• Adjust the position of thread
tension disk
6
to the direction of
D
when the winding amount of the
bobbin thread on the lower part
of the bobbin is excessive and to
the direction
E
when the winding
amount of the bobbin thread on
the upper part of the bobbin is
excessive.
After the adjustment, tighten screw
5
.
7) To adjust the tension of the bobbin
winder, turn the thread tension nut
7
.
(Caution)
1. When winding the bobbin thread,
start the winding in the state that
the thread between the bobbin and
thread tension disk
6
is tense.
2. When winding the bobbin thread
in the state that sewing is not
performed, remove the needle
thread from the thread path of
thread take-up and remove the
bobbin from the hook.
3. There is the possibility that
the thread pulled out from the
thread stand is loosened due to
the inuence (direction) of the
wind and may be entangled in
the handwheel. Be careful of the
direction of the wind.
1) 把梭心推到卷线轴
1
的最里
面。
2) 把线架右侧的卷线如图所示
穿线 , 并把线端向右缠绕数
圈。
( 铝旋梭时 , 把线端向右缠绕
后 , 再把线张力盘过来的线向
左缠绕数圈后 , 就容易绕线
了。)
3) 把卷线拨杆
2
推到
A
方向 ,
转动缝纫机。梭心向
C
方向
转动 , 线卷绕到梭心上。
卷绕结束后卷线轴
1
自动停
止。
4) 取下梭心 , 用切线保持板
3
切断机线。
5) 调整底线卷线量时,请拧松
固定螺丝
4
,把卷线杆
2
移
动到
A
方向或
B
方向,然后
再拧紧固定螺丝
4
。
A
方向 : 变少
B
方向 : 变多
6) 如果底线不能均匀地卷绕到
梭芯时,请卸下飞轮,拧松
螺丝
5
,调整卷线张力器
8
的高度。
· 梭芯的中心和线张力盘
6
的中心高度一样时为标准
位置。
· 梭芯下部卷绕得多时,请
把线张力盘
6
的位置向
D
方向调整,而梭芯上部
卷绕得多时,请把线张力
盘
6
的位置向
E
方向调
整。
调整后,请拧紧螺丝
5
。
7) 调整底线卷绕张力时 , 请转动
线张力螺母
7
进行调整。
(注意)
1. 卷绕底线时 , 请在梭芯和线张
力盘
6
之间拉线的状态开始
绕线。
2. 不进行缝制的状态 , 卷绕底线
时 , 请把上线从挑线杆线道上
卸下来 , 从旋梭里把梭芯卸下
来。
3. 线架装置引出的线受到风吹影
响 ( 风向 ) 会出现悬垂 , 而卷
绕到皮带轮上。因此请注意风
向等。
1) Die Spule bis zum Anschlag auf die
Spulerspindel
1
schieben.
2) Den Spulenfaden von der Garnrolle
auf der rechten Seite des Garnstän-
ders abziehen und gemäß der linken
Abbildung einfädeln. Dann das Ende
des Spulenfadens um mehrere Um-
drehungen im Uhrzeigersinn auf die
Spule wickeln.
(Im Falle einer Aluminiumspule ist der vom
Spulenfadenspanner kommende Faden
nach dem Aufwickeln des Fadenendes im
Uhrzeigersinn um mehrere Umdrehungen
entgegen dem Uhrzeigersinn zu wickeln,
um das Aufwickeln des Spulenfadens zu
erleichtern.)
3) Die Spulerauslöseklinke
2
in Rich-
tung A drücken, und die Nähmaschine
einschalten. Die Spule dreht sich in
Richtung C, und der Spulenfaden
wird aufgewickelt. Die Spulerspindel
1
bleibt automatisch
stehen, sobald die
Bewicklung beendet ist.
4) Die Spule abnehmen, und den
Spulenfaden mit der Schneide des
Fadenhalters
3
abschneiden.
5) Um den Spulenfaden-Wickelbetrag
einzustellen, die Befestigungs-
schraube
4
lösen, und den Spuler-
Auslösehebel
2
in Richtung D oder
E schieben. Dann die Befestigungs-
schraube
4
anziehen.
Richtung
A
: Verringern
Richtung
B
: Vergrößern
6) Falls die Spule nicht gleichmäßig mit
dem Spulenfaden bewickelt wird, das
Handrad abmontieren, die Schraube
5
lösen, und die Höhe der Spulenfa-
denspannscheiben
8
einstellen.
• Bei der Standardeinstellung liegt die
Mitte der Spule auf gleicher Höhe mit
der Mitte der Fadenspannungsschei-
be
6
.
• Die Position der Fadenspan-
nungsscheibe
6
in Richtung
D
einstellen, wenn der Spulenfaden-
Wickelbetrag im unteren Teil der
Spule zu groß ist, und in Richtung
E
, wenn Spulenfaden-Wickelbe-
trag im oberen Teil der Spule zu
groß ist.
Nach der Einstellung die Schraube
5
festziehen.
7) Zum Einstellen der Spulenfadenspan
-
nung die Fadenspannermutter
7
drehen.
(Vorsicht)
1. Achten Sie beim Bewickeln der Spu
-
le darauf, daß der Faden zwischen
Spule und Fadenspannungsscheibe
6
zu
Beginn des Wickelvorgangs
straff ist.
2. Wenn Sie eine Spule bewickeln,
ohne daß ein Nähvorgang durch-
geführt wird, entfernen Sie den
Nadelfaden vom Fadenweg des
Fadenhebels, und nehmen Sie die
Spule aus dem Greifer heraus.
3. Es besteht die Möglichkeit, dass
sich der vom Garnständer heraus-
gezogene Faden durch Windein-
uss (Richtung) lockert und sich im
Handrad verfängt. Achten Sie daher
auf die Windrichtung.
1) Enfoncer complètement la canette sur
l’axe du bobineur
1
.
2) Faire passer le l de la bobine située
sur le côté droit du porte-bobines
dans l’ordre indiqué sur la gure ci-
contre.
Enrouler ensuite l’extrémité du l
de canette de plusieurs tours sur la
canette dans le sens des aiguilles d’
une montre.
(Dans le cas d’une canette en alumi
-
nium, après avoir enroulé l’extrémité
du l de canette dans le sens des
aiguilles d’une montre, enrouler de
plusieurs tours en sens inverse le l
en provenance du bloc-tension de l
de canette. Ceci facilitera le bobinage
de la canette.)
3) Pousser le loquet de déclenchement
du bobineur
2
dans le sens A et
mettre la machine en marche.
La canette tourne dans le sens C et
le l de canette est bobiné. L’axe du
bobineur
1
s’arrête automatiquement
à la n du bobinage.
4) Retirer la canette et couper le l de
canette avec le crochet coupe-l
3
.
5) Pour régler la quantité de bobinage
de l de canette, desserrer la vis de
xation
4
et déplacer le levier de
bobinage
2
dans le sens D ou E.
Serrer ensuite la vis de xation
4
.
Dans le sens
A
: diminution
Dans le sens
B
: augmentation
6) Si le l de canette n'est pas bobiné
uniformément sur la canette, déposer
le volant, desserrer la vis
5
et régler
la hauteur du bloc-tension de l de
canette
8
.
• L'axe de la canette doit se trouver
en standard au même niveau que
l'axe du disque de tension du l
6
.
• Si la quantité de l de canette
bobinée au bas de la canette est
excessive, déplacer le disque de
tension du l
6
vers
D
. Si elle est
excessive en haut de la canette,
déplacer le disque vers
E
.
Après le réglage, resserrer la vis
5
.
7) Pour régler la tension du bobineur,
tourner l’écrou de tension du l
7
.
(Attention)
1. Avant de commencer le bobinage
de la canette, s’assurer que le l
est bien tendu entre la canette et le
disque de tension
6
.
2. Lorsqu’on bobine une canette alors
que l’on ne coud pas, retirer le l d’
aiguille du trajet du l du releveur
de l et enlever la canette du cro-
chet.
3. Il se peut que le l tiré depuis le
porte-bobines se détende sous l’
effet d’un courant d’air (direction) et
qu’il s’emmêle dans le volant. Faire
attention à la direction des courants
d’air.
1) Inerte la bobina bien dentro del huso
1
bobinador de bobina todo lo que
pueda entrar.
2) Pase el hilo de bobina extraído
desde el carrete que descansa en
el lado derecho del pedestal de hilo
siguiendo el orden que se muestra en
la gura de la izquierda. Entonces,
bobine varias veces hacia la derecha
el extremo del hilo de bobina en la
bobina.
(En el caso de una bobina de alumi
-
nio, después de bobinar hacia la de-
recha el extremo del hilo de bobina,
bobine varias veces hacia la izquierda
el hilo que viene desde el tensor de
hilo para bobinar con facilidad el hilo
de bobina.)
3) Presione el cerrojo
2
de disparo del
bobinador de bobina en la dirección de A
y ponga en marcha la máquina de coser.
La bobina gira en la dirección de C y
así se bobina el hilo de bobina. Cuan-
do se termina el bobinado el huso
1
se para automáticamente.
4) Extraiga la bobina y corte el hilo de bobina
con el retenedor
3
de cortar hilo.
5) Para ajustar la cantidad de bobinado
del hilo de la bobina, aoje el tornillo
de jación
4
y mueva la palanca
2
de bobinado de la bobina en dirección
D o E. Luego, apriete el tornillo de
jación
4
.
A la dirección de
A
: Disminuir
A la dirección de
B
: Aumentar
6) En caso de que el hilo de la bobina
no esté bobinado uniformemente
en la bobina, retire el volante, aoje
el tornillo
5
, y ajuste la altura de la
tensión
8
del hilo de la bobina.
• El ajuste estándar es cuando el
centro de la bobina se encuentra
a la misma altura que el centro del
disco
6
de tensión del hilo.
• Ajuste la posición del disco
6
de
tensión del hilo en la dirección
D
cuando la cantidad de bobinado
del hilo de la bobina es excesiva
en la parte inferior de la bobina, y
en dirección
E
cuando la cantidad
de bobinado del hilo de la bobina
es excesiva en la parte superior
de la bobina.
Después del ajuste, apriete el tornillo
5
.
7) Para ajustar la tensión del bobinador de
bobina, gire la tuerca
7
tensora de hilo.
(Precauciones)
1.Cuando bobine hilo de bobina, co-
mience el bobinado en el estado en
que esté tenso el hilo entre el disco
6
tensor de hilo y de bobina.
2.Cuando bobine hilo de bobina en el
estado en que no se ejecuta cosido,
retire el hilo de aguja de la trayecto-
ria del hilo del tirahilo y extraiga la
bobina del gancho.
3.Existe la posibilidad de que el hilo
que se extrae del soporte de hilo
quede ojo debido a la inuencia
(dirección) del viento por lo que es
posible que se enrede en el volante.
Ponga cuidado en la dirección del
viento.
1) Inserire la bobina nell’albero dell’
avvolgibobina
1
il più possibile.
2) Fare passare il lo della bobina
estratto dal rocchetto posto sul lato
destro del portalo seguendo l’ordine
come mostrato nella gura sulla sini-
stra. Avvolgere quindi in senso orario
l’estremità del lo della bobina intorno
alla bobina diverse volte.
(In caso della bobina di alluminio,
dopo aver avvolto in senso orario l’
estremità del lo della bobina, av-
volgere in senso antiorario il lo che
viene dal regolatore di tensione del
lo diverse volte per avvolgere il lo
della bobina con facilità.)
3) Premere il chiavistello a scatto dell’
avvolgibobina
2
nel senso A ed
avviare la macchina per cucire.
La bobina gira nel senso C e il lo
della bobina viene avvolto. L’albero
dell’avvolgibobina
1
si ferma automa-
ticamente non appena l’avvolgimento
è nito.
4) Rimuovere la bobina e tagliare il lo
della bobina con la piastra di soste-
gno taglialo
3
.
5) Per regolare la quantità di avvolgi
-
mento del lo della bobina, allentare
la vite di ssaggio
4
e spostare la
leva di avvolgimento della bobina
2
nel senso D o E. Stringere quindi la
vite di ssaggio
4
.
Nel senso
A
: Diminuzione
Nel senso
B
: Aumento
6) Nel caso che il lo della bobina non
venga avvolto uniformemente sulla
bobina, rimuovere il volantino, allenta-
re la vite
5
e regolare l'altezza della
tensione del lo
8
.
• Per quanto riguarda la regolazione
standard, il centro della bobina
è alto come il centro del disco di
tensione del lo
6
.
• Spostare la posizione del disco
di tensione del lo
6
nel senso
D
quando la quantità di avvolgimento
del lo della bobina sulla parte in-
feriore della bobina è eccessiva e
nel senso
E
quando la quantità di
avvolgimento del lo della bobina
sulla parte superiore della bobina
è eccessiva.
Al termine della regolazione, stringere
la vite
5
.
7) Per regolare la tensione dell’avvolgibo-
bina, girare il dado di tensione del lo
7
.
(Attenzione)
1
. Quando si avvolge il lo della
bobina, iniziare l’avvolgimento nello
stato in cui il lo tra la bobina e il
disco di tensione del lo
6
sia teso.
2. Quando si avvolge il lo della bobina
nello stato in cui la cucitura non
viene effettuata, rimuovere il lo dell’
ago dal percorso di lo del tiralo e
rimuovere la bobina dal crochet.
3. C’è la possibilità che il lo tirato
fuori dal portalo venga allentato
a causa dell’inuenza (direzione)
del vento ed è possibile che il lo
venga impigliato nel volantino. Fare
attenzione alla direzione del vento.
1) Masurayı, daha ileri gitmez hale
gelinceye kadar, masura sarma
ünitesinin miline
1
tamamen geçirin.
2) Masura ipliğini, çizimde gösterilen
şekilde iplik çardağının sağ tarafına
yerleştirilmiş olan iplik tansiyonu
kontrol elemanından geçirerek
dışarı alın ve ipliği masuraya
saat yönünde bir-kaç tur sarın.
(Masuranın alüminyum olması
durumunda; masura ipliğinin ucunu
saat yönünde bir-kaç tur sardıktan
sonra, masura ipliğinin sarılmasını
kolaylaştırmak için; masura ipliği
tansiyon elemanından gelen ipliği
saat yönünün tersine sarın.)
3) Masura sarma ünitesi denge
mandalını
2
A yönüne bastırın ve
dikiş makinesini çalıştırın.
Masura C yönünde dönmeye başlar
ve masura ipliği sarılır. Sarma işlemi
sona erdiği anda, masura sarma mili
1
otomatik olarak devreden çıkar.
4) Masurayı çıkartın ve sabit iplik kesme
bıçağından
3
yararlanarak masura
ipliğini kesin.
5)
Bobindeki ipliğin sarım miktarını
ayarlarken, setuskur vidasını
4
gevşetin ve bobin sarım kolunu
2
D ya da E yönünde hareket ettirin.
Ardından setuskur vidasını
4
sıkın.
A
Yönüne : Azalır
B
Yönüne : Artar
6) İplik bobin üzerine düzgün şekilde
sarılmamışsa kasnağı çıkarın,
setuskur vidasını
5
çıkarın ve
bobin iplik gericisinin
8
yüksekliğini
ayarlayın.
• Bobin merkezinin standart
yüksekliği, iplik germe diskinin
6
merkez yüksekliği kadardır.
• Germe diskinin
6
konumunu,
bobinin alt kısmında sarılı iplik
miktarı aşırı ise
D
yönünde
ayarlayın, üst kısmında sarılı
iplik miktarı aşırı ise
E
yönünde
ayarlayın.
Ayar yaptıktan sonra vidayı
5
sıkın.
7) Masura sarma tansiyonunu ayarlamak
için, iplik tansiyon somununu
7
çevirin.
(Dikkat)
1. Masura ipliğini sararken, sarma
işlemini masura ipliği masuranın orta
kısmında ve iplik tansiyon diski
6
gergin durumdayken başlatın.
2. Dikiş dikilmediği sırada masura
ipliğinin sarılması gerektiği zaman;
iğne ipliğini iplik vericiden yolundan
çıkartın ve mekiği çağanozdan
dışarı alın.
3. İplik çardağından gelen ipliğin
sarma etkisiyle (yön nedeniyle)
gevşemesi ve çardaktan dışarı
çekilmesi sonucu, volan kasnağa
sarılması ihtimali vardır. Sarma
yönüne dikkat edin.
1) Вставьте катушку в шпиндель устройс-
тва для намотки катушки
1
глубоко до
упора.
2) Пропустите катушечную нитку, вытя
-
нутую из шпульки, расположенной на
правой части подставки для ниток, в
последовательности, показанной на
рисунке слева. Затем несколько раз на-
мотайте по часовой стрелке на катушку
конец катушечной нитки.
(В случае с алюминиевой катушкой,
намотав по часовой стрелке конец
катушечной нитки, отмотайте против
часовой стрелки катушечную нитку
несколько раз так, чтобы она легко
отматывалась).
3) Нажмите защелку устройства для
намотки катушки
2
в направлении А и
запустите швейную машину. Катушка
вращается в направлении C, и кату-
шечная нитка будет перематываться.
Шпиндель устройства для намотки
катушки
1
автоматически остановит-
ся, как только перемотка закончится.
4) Снимите катушку и отрежьте катушеч
-
ную нитку режущим стопором нитки
3
.
5) Для регулировки толщины намотки нити
на шпульке ослабьте установочный
винт
4
и переместите рычаг намотки
2
в направлении D или E. Затем
затяните установочный винт
4
.
В направлении
A : Уменьшение
В направлении
B : Увеличение
6) В случае неравномерной намотки нити
на шпульку снимите маховик, ослабьте
винт
5
и подрегулируйте уровень
натяжения нити шпульки
8
.
• В норме центр шпульки находится
на одной высоте с центром диска
натяжения нити
6
.
• Сдвиньте диск натяжения нити
6
в направлении D при излишнем
количестве витков в нижней части
шпульки и в направлении E - при
излишнем количестве витков в
верхней части шпульки.
После регулировки затяните винт
5
.
7) Чтобы регулировать натяжение
устройства для намотки катушки,
поверните нитенатяжную гайку
7
.
(Предупреждение)
1. При намотке катушечной нитки,
запустите намотку в состоянии, при
котором нитка между катушкой и
нитенатяжным диском
6
натянута.
2. При намотке, когда катушечная нитка
находится в состоянии, при котором
шитье не производится, перетащите
игольную нитку от линии движения
нитки нитепритягивателя и снимите
катушку с челнока.
3. Существует возможность того, что
нитка, вытянутая от подставки для
ниток ослабевает из-за влияния (на-
правления) вращения и может намо-
таться на маховик. Будьте осторожны
с направлением вращения.
D
E
B
3
1
2
6
7
6
5
6
A
4
C
8
 Loading...