2-10
n
INSTALLATION ANd OperATINg INSTrucTIONS
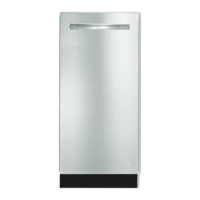
'UDLQ3XPS0RXQWLQJ7DE6ORW
'UDLQ3XPS,QVWDOOHG
$OLJQWKHVFUHZKROHVDWWKHUHDURIWKHSXPS8VHWZR
ą[
³⁄₈VFUHZVVXSSOLHG6HHk3DUWV/RFDWLRQVy
LOOXVWUDWLRQ
&RQQHFWGUDLQWXEHWRLFHPDNHUELQRXWOHW⁵⁄₈,'XVLQJ⁷⁄₈
DGMXVWDEOHFODPSVXSSOLHG6HHk'UDLQ7XEHyLOOXVWUDWLRQ
&RLOLFHPDNHUSRZHUFRUGLQWRDFPGLDPHWHUFRLO
:UDSHOHFWULFDOWDSHDURXQGWKHSRZHUFRUGLQVHYHUDO
SODFHVWRNHHSWKHFRUGLQDFRLO/RFDWHFRLOHGSRZHUFRUG
EHWZHHQWKHGUDLQSXPSDQGVLGHRIHQFORVXUHDQGSOXJLQWR
WKHUHFHSWDFOHRIWKHGUDLQSXPS6HHk3DUWV/RFDWLRQVy
LOOXVWUDWLRQ
$WWDFKWKHGUDLQSXPSSRZHUFRUGWRLFHPDNHUXQLWEDVH
ZLWKFODPSDQGVFUHZUHPRYHGLQ6WHSWKDWZDVXVHGWR
DWWDFKLFHPDNHUSRZHUFRUG6HHk3DUWV/RFDWLRQVy
LOOXVWUDWLRQ
3ODFHQHZUHDUSDQHOVPDOORQHIRULFHPDNHUVODUJH
RQHIRUDJDLQVWWKHEDFNRIWKHLFHPDNHU5RXWHWKH
YHQWWXEHDQGGUDLQSXPSGLVFKDUJHWXEHWKURXJKFXWRXWVLQ
WKHUHDUSDQHO
6HFXUHUHDUSDQHOZLWKRULJLQDOVFUHZV6HHk5HDU3DQHOy
LOOXVWUDWLRQ
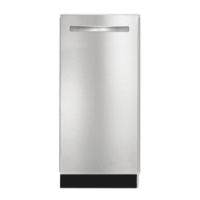
6HFXUHYHQWWXEHWREDFNRILFHPDNHUXVLQJFODPSVDQG
WKUHH[
³⁄₈VFUHZVVXSSOLHG6HHk9HQW7XEHy
LOOXVWUDWLRQ
9HQW7XEH
127('RQRWSLQFKNLQNRUGDPDJHWKHYHQWWXEH&KHFNWKDW
LWLVQRWGDPDJHGRUSLQFKHGRUNLQNHGEHWZHHQWKHFDELQHW
DQGWKHLFHPDNHU
$WWDFK
¹⁄₂
,'[IWPGUDLQWXEHWRSXPSGLVFKDUJH
WXEH6HHk3DUWV/RFDWLRQVyLOOXVWUDWLRQ
&RQQHFWLFHPDNHUWRZDWHUVXSSO\DQGLQVWDOOLFHPDNHUDV
VSHFLILHGE\WKHSURGXFWLQVWDOODWLRQLQVWUXFWLRQV
&KHFNDOOFRQQHFWLRQVIRUOHDNV
3OXJLQLFHPDNHURUUHFRQQHFWSRZHU
7XUQRQLFHPDNHU
:DLWIRUULQVLQJF\FOHDSSUR[LPDWHO\PLQXWHVWREHVXUH
WKHLFHPDNHULVRSHUDWLQJSURSHUO\
$ 0RXQWLQJWDEVORW
$ 'UDLQSXPSLQVWDOOHG
$ 9HQWWXEH
% &ODPSVDQGVFUHZV
A
B
Electrical Shock Hazard
Plug into a grounded 3 prong outlet.
Do not remove ground prong.
Do not use an adapter.
Do not use an extension cord.
Failure to follow these instructions can result in death,
fire, or electrical shock.
WARNING
Ice Maker Operation
Scan the code at left with your mobile device, or visit
https://jennair.custhelp.com
for
recommendations that may help you avoid a service call.
Problem Solver
Electrical Shock Hazard
Plug into a grounded 3 prong outlet.
Do not remove ground prong.
Do not use an adapter.
Do not use an extension cord.
Failure to follow these instructions can result in death,
fire, or electrical shock.
WARNING
PROBLEM RECOMMENDED SOLUTIONS
Ice Maker Will Not Operate Check that it is plugged into a grounded 3 prong outlet.
Check that the control is turned on.
Replace the fuse or reset the circuit breaker.
NOTE: If problems continue, contact an electrician.
Room temperature must be above 55°F (13°C). Otherwise, bin thermostat may sense cold room temperature
and shut off even though the bin is not full of ice. The ice maker may not restart once it does shut off.
If there was a large amount of water added to the ice maker, wait a few minutes for the drain pump to clear. If
there is still water in the bin, check to see whether the drain hose is kinked.
For models with drain pumps, check that the drain hose is not damaged, or kinked or pinched between cabinet
and ice maker. Use only Whirlpool approved drain pump kit, Part Number 1901A.
Ice Maker Seems Noisy Water overflowing the reservoir is normal. This overflow helps to purge minerals that were removed from the
water during the ice making process.
If there is a “whooshing” sound, check the following things:
■ Make sure that the water supply is hooked up and turned on.
■ Make sure that the drain cap is tight and the water drain pan pump is securely attached to the water pan.
If there is ice between the evaporator plate and the cutting grid, check that the ice maker is level. If the ice
maker is level, and the problem persists, run a cleaning cycle.
If the ice maker is connected to a water supply pressure in excess of 60 psi, you may hear a loud sound during
water filling associated with the flow of water through the inlet valve. Call a licensed, qualified plumber to
determine the best method to reduce the supply water pressure (50 psi is recommended).
 Loading...