−47−−46−
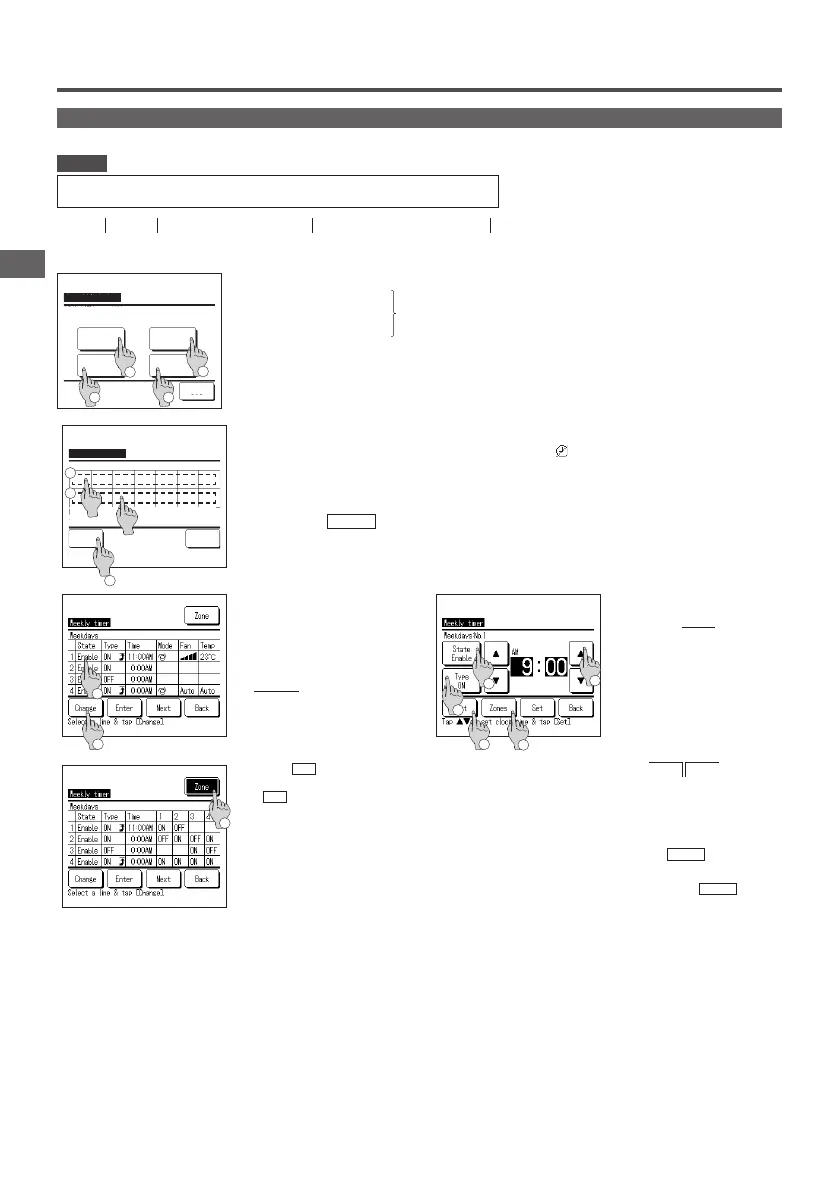
Weekly timer
· The Clock setting must be made when the weekly timer is used.
· The weekly timer can be set from the main R/C only.
Advice
1
Tap the
Menu
button on the TOP screen and select
Useful functions
⇒
Weekly timer
.
Enter the administrator password if the administrator password input screen is displayed.
■There are cases that the Input password screen is displayed by the Permission/Prohibition setting.
2
When the screen to select the setting range, select a day of the week to be set.
①
Weekdays : Monday - Friday
②
Sat. Sun : Saturday, Sunday (
☞
5 )
③
All days : Monday - Sunday
④
Each day : Moves to the day of the week setting screen. (
☞
3 )
You can set four on timer and off timer operations for each day of the week.
Weekly timer
Each day
Back
Select the item.
Sat, SunWeekdays
All days
3
1
2
4
3
When a desired day of the week
①
is tapped on the display, contents of current setting for the day are displayed.
(☞
5
)
4
For the holiday setting, tap the block
②
under the day to switch between “ ” (the holiday setting) and “(Blank)” (reset).
Timer does not operate on the day set as holiday.
Two or more holidays can be set.
■To enable the timer on the day set as holiday, it is necessary to reset the holiday setting.
When tapping
③
All Disable button, the timer does not operate on all days of the week.
When the timer is used, be sure not to set “All Disable".
5
Screen to check contents of current
setting is displayed.
When the contents are changed or
new setting is added, select a
①
setting line No. and tap the
②
Change
button.
■The ③ Zone
button is displayed when
performing zone settings. Tapping the ③
Zone
button will display the set zone
states.
2
Weekly timer
Select the day of the week.
Invalid Setting:Tap box below day of week.
If invalid is selected, timer won't start
Back
All Disable
Mon Tue Wed Thu Fri Sat Sun
3
1
6
Detail setting screen for the timer
setting contents is displayed.
①
Tap the
State
button to switch
between “State Enable” and
“State Disable”.
②
Tap the
Type
button to switch
between the “OFF timer” and the
“ON timer”.
③
Select a desired time (at 5-min
intervals) with the
▲
▼
buttons.
④
In case of “ON timer” when the
Next
button is tapped,
operating conditions at the start
of operation can be set. (
☞
7 )
⑤
The Zones
button is displayed
when performing zone settings.
Tapping the Zones
button will
display the set zone states.
(
☞
12)
1
2
3
1
2
3
5
4
PJZ012A180_EN.indd 46 2019/03/29 11:33:42
 Loading...