29
Listening in another room
Make sure that recording is not being carried out before performing the following operations.
Please refer to page 28 for connection details.
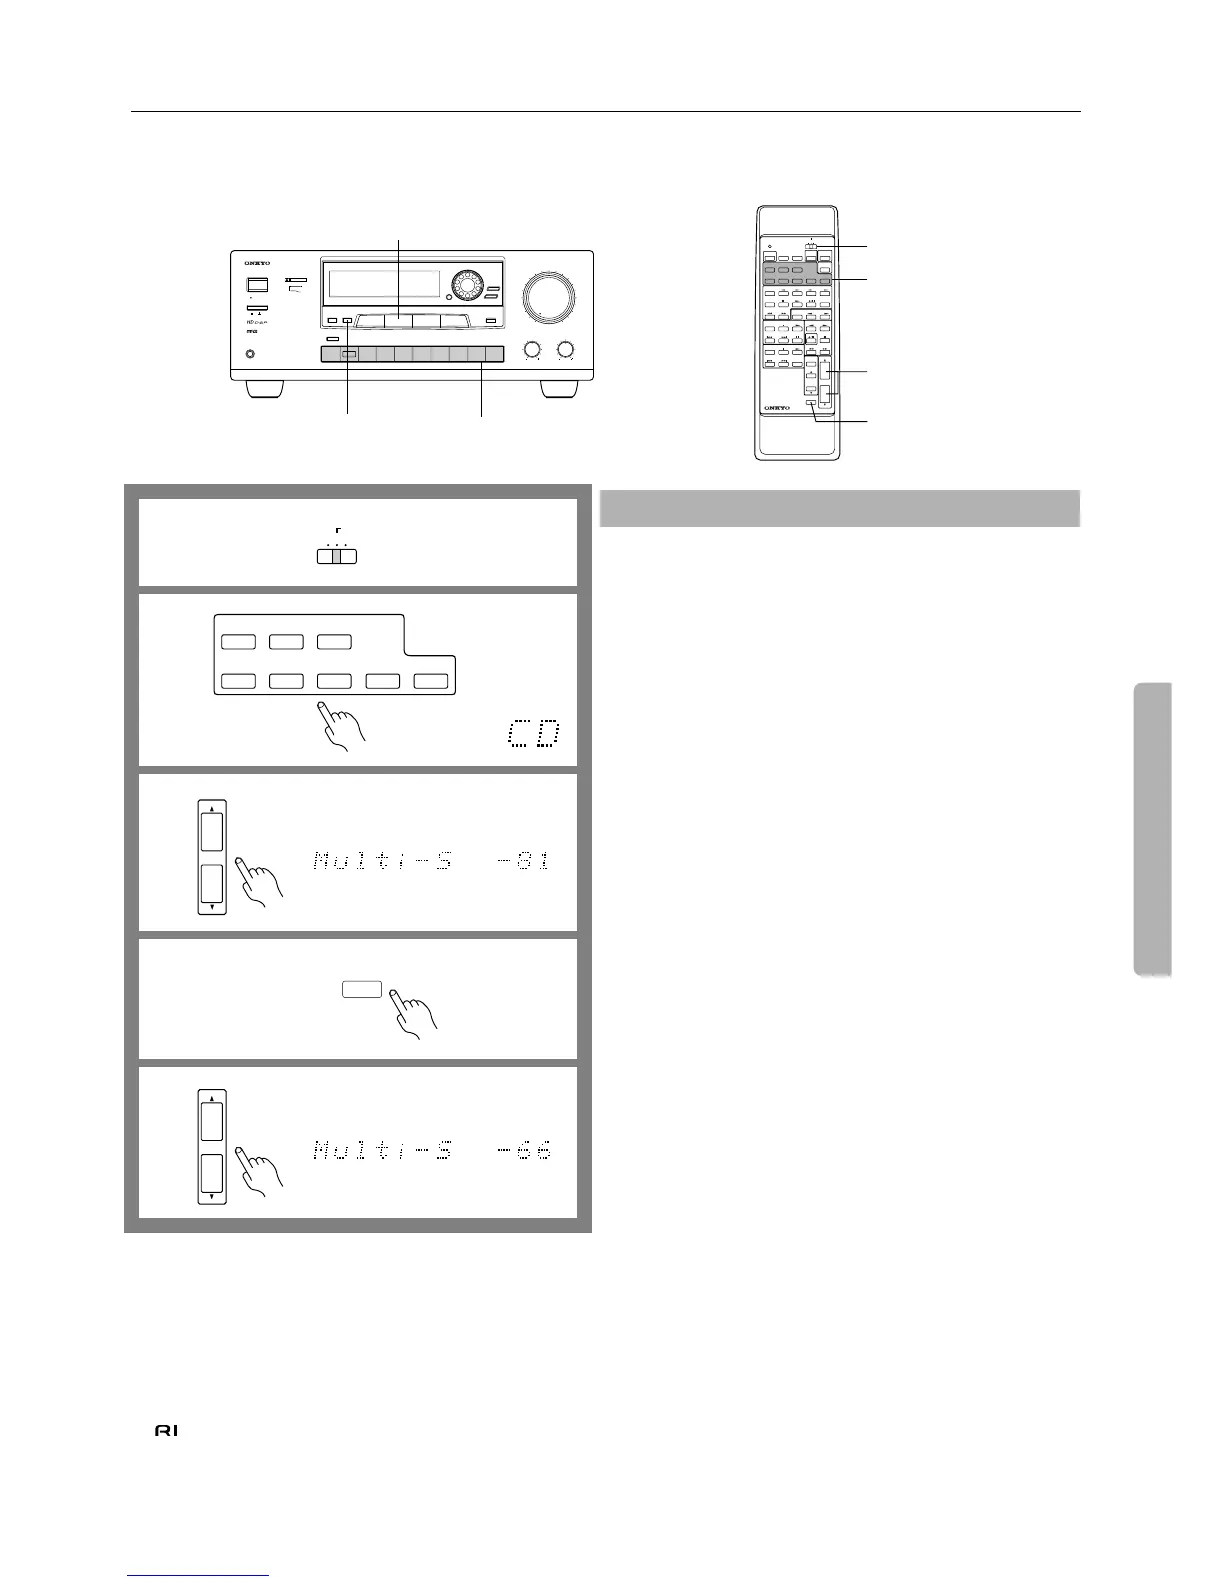
On the RC-374M remote controller, first set the A/B-SUBROOM/LEARN switch to B-SUBROOM.
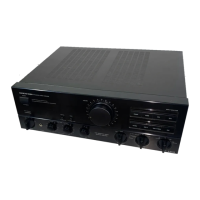
DIGITAL AUDIO
SELECTOR
SMART SCAN CONTROLLER
ENTER
SURROUND
PARAMETER
3-D BASS
MAIN
REMOTE
SPEAKERS
REC OUT
MULTI SOURCE
Re-EQ
MIDNIGHT
THEATER
C DPHONOTUNERTAPE-2
MONITOR
TAPE-1
M D
VIDEO-2
VCR-2/TV
VIDEO-1
VCR-1
DVDINPUT
SELECTOR ®
MULTI-CH
INPUT
MASTER VOLUME
TREBLEBASS
AUDIO VIDEO CONTROL AMPLIFIER
A-DS650
MAXMIN
SYSTEM
POWER
ON
PHONES
STAND-BY
OFF
MULTIPLE SOURCE
REMOTE SYSTEM
HIGH DEFINITION
Re-EQ
TM
DOLBY SURROUND
PRO
•
LOGIC
SPEAKERS/
REMOTE
B-SUBROOM
MULTI SOURCE
Input selectors
SOURCE
SELECTOR
/REMOTE
SPEAKER
POWER
SLEEP
DVD
VIDEO-1
VIDEO-2
TAPE-1 TUNER PHONO C D
SOURCE SELECTOR
DVD
SUBTITLE
ON/OFF
PAUSE
/STEP
DISC
GROUP
VOLUME
TAPE
DIMMER
TAPE-2
POWER
POWER
VOLUME
C H
TV/VCR
MUTING
/REMOTE
SPEAKER
LEVEL
REMOTE CONTROLLER
CH SEL
TEST
TONE
SENDING/
LEARNING
LEARN
SUBROOM
PRESET
AB
PROGRAMMABLE AREA TV/VIDEO
TUNER
CD
MULTI-CH
INPUT
RC-374M
SUR
MODE
VOLUME
π/†
Using the remote controller:
In the main room:
1. Set the A/B-SUBROOM/LEARN selector switch to B-SUB-
ROOM.
2. Press the SOURCE SELECTOR button for the desired source.
The MULTI-SOURCE indicator lights up and the display indicates
the input source.
•
You cannot select MULTI-CH INPUT.
3. Press the VOLUME
π
or
†
button to set the MULTI SOURCE
level to its minimum (between –81 and –79 dB).
MULTI-S and the level are indicated on the display for three seconds.
4. Press the REMOTE SPEAKER selector button.
The REMOTE indicator lights up.
You can perform steps 1 and 2 on the amplifier instead of the
remote controller.
1. Press the MULTI SOURCE button.
The REC OUT indicator turns off and the MULTI-SOURCE
indicator flashes for eight seconds.
2. While the MULTI-SOURCE indicator is flashing, press the
input selector button to select the desired source.
•
If you press the input selector button while the indicator is turned
off, the main room source will change.
In the sub-room:
5. Direct the remote controller toward the Remote Sensor.
The remote controller can be used from the sub-room to select the
source, adjust the volume, and turn on or off the sub-room speakers.
6. Adjust the level using the VOLUME
π
and
† buttons on the
remote controller.
•
Press the REMOTE SPEAKER button to lower the volume tempo-
rarily in the sub-room.
•
The sub-room output level ranges from the minimum of (– ∞ dB),
–81, ... –1, to the maximum of (+18 dB).
•
If the MULTI SOURCE function is turned on while a Surround
mode is selected, the Surround mode automatically switches to
STEREO.
•
If the MULTI SOURCE function is turned on while the multi-chan-
nel input mode is selected, the multi-channel input mode automati-
cally turns off and the sound signals (audio signal of the selected
video input) are heard from the speakers.
NOTE:
•
Before turning off the remote (sub-room), please lower the volume
level to prevent high volume output for the next application or use.
• If you set the A/B-SUBROOM/LEARN selector switch on the
remote controller to A and adjust the VOLUME control knob, the
volume level of the speakers in the main room — not in the sub-
room — will change.
•
We recommend that you turn off SPEAKERS MAIN to save elec-
tricity if you are not using the A-DS650 in the main room.
•
You cannot select MULTI-CH INPUT in the sub-room.
•
If someone in the main room changes Surround mode while you are
listening in the sub-room, the sub-room sound will be muted.
Listening in another room
LEARN
SUBROOM
AB
DVD
VIDEO-1
VIDEO-2
TAPE-1 TUNER PHONO C D
SOURCE SELECTOR
TAPE-2
VOLUME
dB
IPM
VOLUME
dB
IPM
/REMOTE
SPEAKER
REC OUT
MULTI-
SOURCE
1
2
3
4
5
If the remote controller is used from the sub-
room, but the components cannot be con-
trolled, check the following.
•
Use the buttons and switches on the component in the main
room to check whether it is working properly.
Then, use the remote controller to check whether the com-
ponent is working properly. If it is not, refer to page 30.
• When operating a component that does not display Onkyo’s
mark, check that the emitter is directed toward that
component.
•
Check that the components are correctly connected.
 Loading...