Publication: AMEN00064 2019‑03‑07 9
Rite‑Hite
®
Installation/Service/Owner’s Manual Revolution
®
HVLS Fan • Rogue
®
HVLS Fan
INSTALLATION
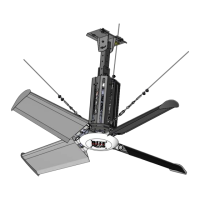
Step 3 – Motor Bracket
The motor bracket attaches to the extension tube with (2)
1/2in x 4‑1/2in Grade 8 bolts, washers, and locknuts.
1. Position the motor bracket so that 1 angle is on each
side of the extension tube.
2. Insert the bolts through the holes in the angles at the
top of the motor bracket and through the extension
tube and back through the second angle.
3. Tighten both locknuts securely.
When an extended down tube is used:
The smaller square tubing (3in x 3in [75mm x 75mm]) will
telescope inside the larger square tubing (3.5in x 3.5in
[90mm x 90mm]). The brackets on the top of the motor
bracket are bolted in slots to allow the larger tube to bolt
to the top of the motor. The 3in x 3in [75mm x 75mm] tube
should always bolt to the ceiling bracket.
When fan assembly is mounted directly to the ceiling
bracket (without an extension tube):
Use (4) 1/2in x 1‑1/2in Grade 8 bolts (supplied by others)
to attach the ceiling bracket.
 Loading...