30
Creating Sounds
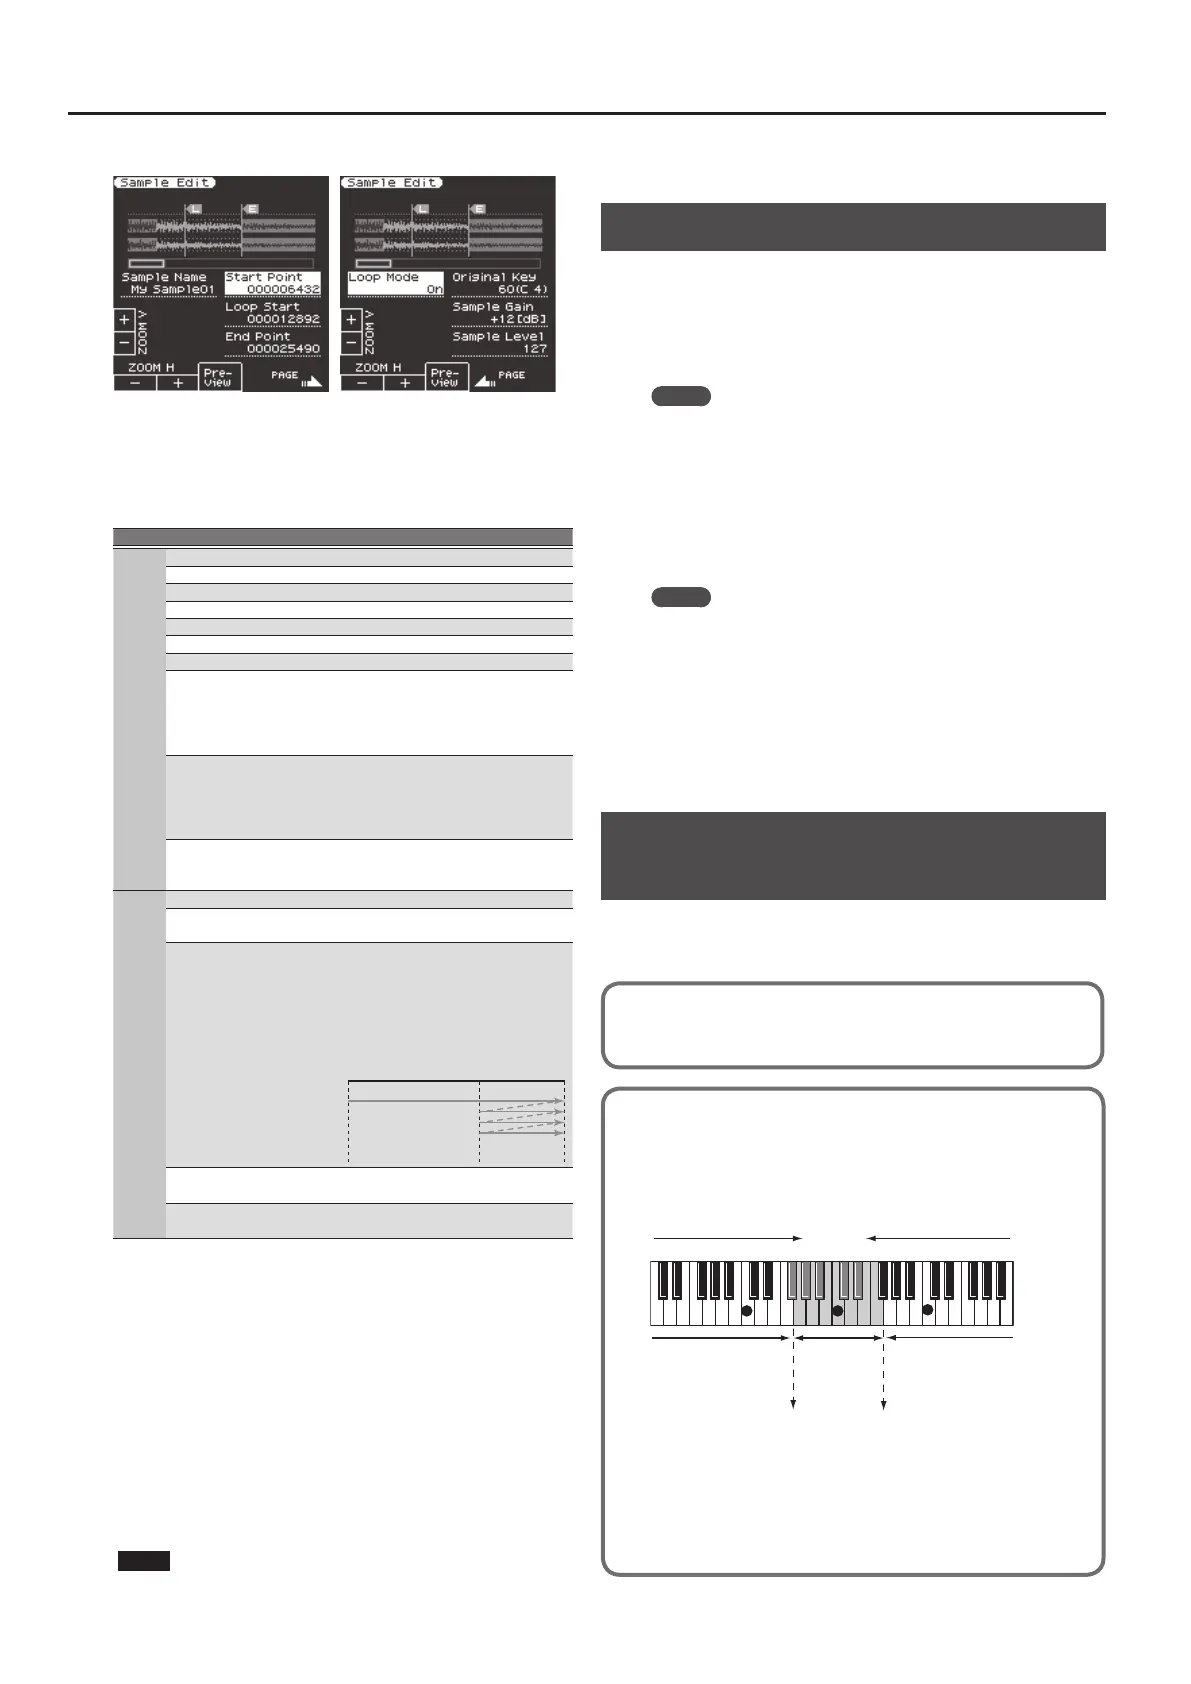
The Sample Edit screen appears.
6. Edit the sample.
Use the direct buttons to select the parameter that you want to edit.
Use the Value [-] [+] buttons to edit the value. Alternatively, you can
use the [Balance/Value] knob (when the Value function is active /
LED unlit) to edit the value.
Page Button Explanation
1
[F1] (Zoom H -) Zooms-out horizontally.
[F2] (Zoom H +) Zooms-in horizontally.
[F3] (Preview) Auditions the currently-edited sample.
[F5] (Page+) Moves to the next page.
[L3] (Sample Number) Displays the sample number.
[L4] (Zoom V +) Zooms-in vertically.
[L5] (Zoom V -) Zooms-out vertically.
[R3] (Start Point)
This is the playback start point. By
editing this you can skip an unwanted
portion at the beginning of the
waveform so that the sample starts at
the right moment.
[R4] (Loop Start)
This is the point at which repeated
playback (the second and subsequent
plays) will start. Set this if you want to
loop from a point that is dierent than
the start point.
[R5] (End Point)
This is the playback end point. By
editing this you can omit an unwanted
portion at the end of the sample.
2
[F5] (Page -) Moves to the previous page.
[R3] (Original Key)
Species the note number that plays
the sample at its original pitch. C0–B8
[L3] (Loop Mode)
Turns loop playback on/o.
If the loop start position has been
specied
After the Sample played back from
START to END, it will then be repeatedly
played back in the forward direction,
from the LOOP to END.
[R4] (Sample Gain)
Adjusts the gain of the sample.
0, +6, +12 dB
[R5] (Sample Level)
Adjusts the volume of the sample.
0–127
7. To save the sample, press the [Write] button.
A screen appears in which you can name the sample.
&
“Assigning Names” (p. 16)
If you decide to cancel, press the [Exit] button.
8. Press the [F5] (Exec) button.
9. Use the direct buttons and function buttons to select
the save-destination.
10. Press the [Enter] button.
A conrmation message appears.
11. To save, select “ Ye s .”
If you want to change the save-destination, select “No” to return to
the page where you can specify the save-destination.
NOTE
If a sample already exists in the save-destination, the previous
sample is deleted.
If you want to keep that sample, use the UST Export or UDK
Export function to save it (p. 32, p. 34).
Deleting a Sample
1. Press the [Sampling] button.
The Sampling Menu screen appears (you can also access this via the
Menu).
2. Press the [R1] (Sample List) button.
The Sample List screen appears.
MEMO
By using the direct buttons to select a sample and pressing the
[F3] (Preview) button, you can audition that sample.
3. Press the [Option] button.
The Sample Option screen appears.
4. Use the direct buttons to select “Delete.”
5. Use the direct buttons to select the sample that you
want to delete.
MEMO
You can select multiple samples.
If you choose [F1] (Select All), all samples are selected. Press the
button again to clear the selection.
6. Press the [Enter] button.
A conrmation message appears.
7. Use the function buttons to select “YES.”
The sample is deleted.
If you decide not to delete, select “NO.”
Creating a Multisample
(Create Multisample)
A “multisample” is a set of dierent samples assigned to each note
of the keyboard. One multisample lets you assign up to 128 samples
that are split (divided) across the notes of the keyboard.
You can’t listen to a multisample unless it’s assigned to a tone. When creating a
multisample, you start by selecting multiple samples to create the multisample,
and then assign the multisample to a tone for use.
If, for example, only one note (e.g., the sound of the C4 key) is sampled from
a wide-ranging instrument such as a piano, and assigned to the entire range
of keys, it will sound unnatural when played signicantly below or above its
original pitch. If the instrument is sampled at several dierent pitches and
assigned to dierent ranges of the keyboard, this unnatural eect can be
minimized.
128 split
(128 key)
sample No.0001
original key
C3
sample
No.0002
original key
C4
sample No.0003
original key
C5
7
: original key
split point split point
In the Create Multisample function, the split points are automatically
determined according to the original key of each sample.
Before you begin this process, you should set the original key of each sample to
the range where you want it to be assigned.
 Loading...