d. ADJUST—CH 1 GAIN, 5 mV adjustment, through
the upper 5 mV access hole at left side of cabinet for
4 divisions of amplitude.
e. CHECK—All settings of CH 1 VOLTS/DIV for ac-
curacy, within 3%, using the settings listed in Table 5-2.
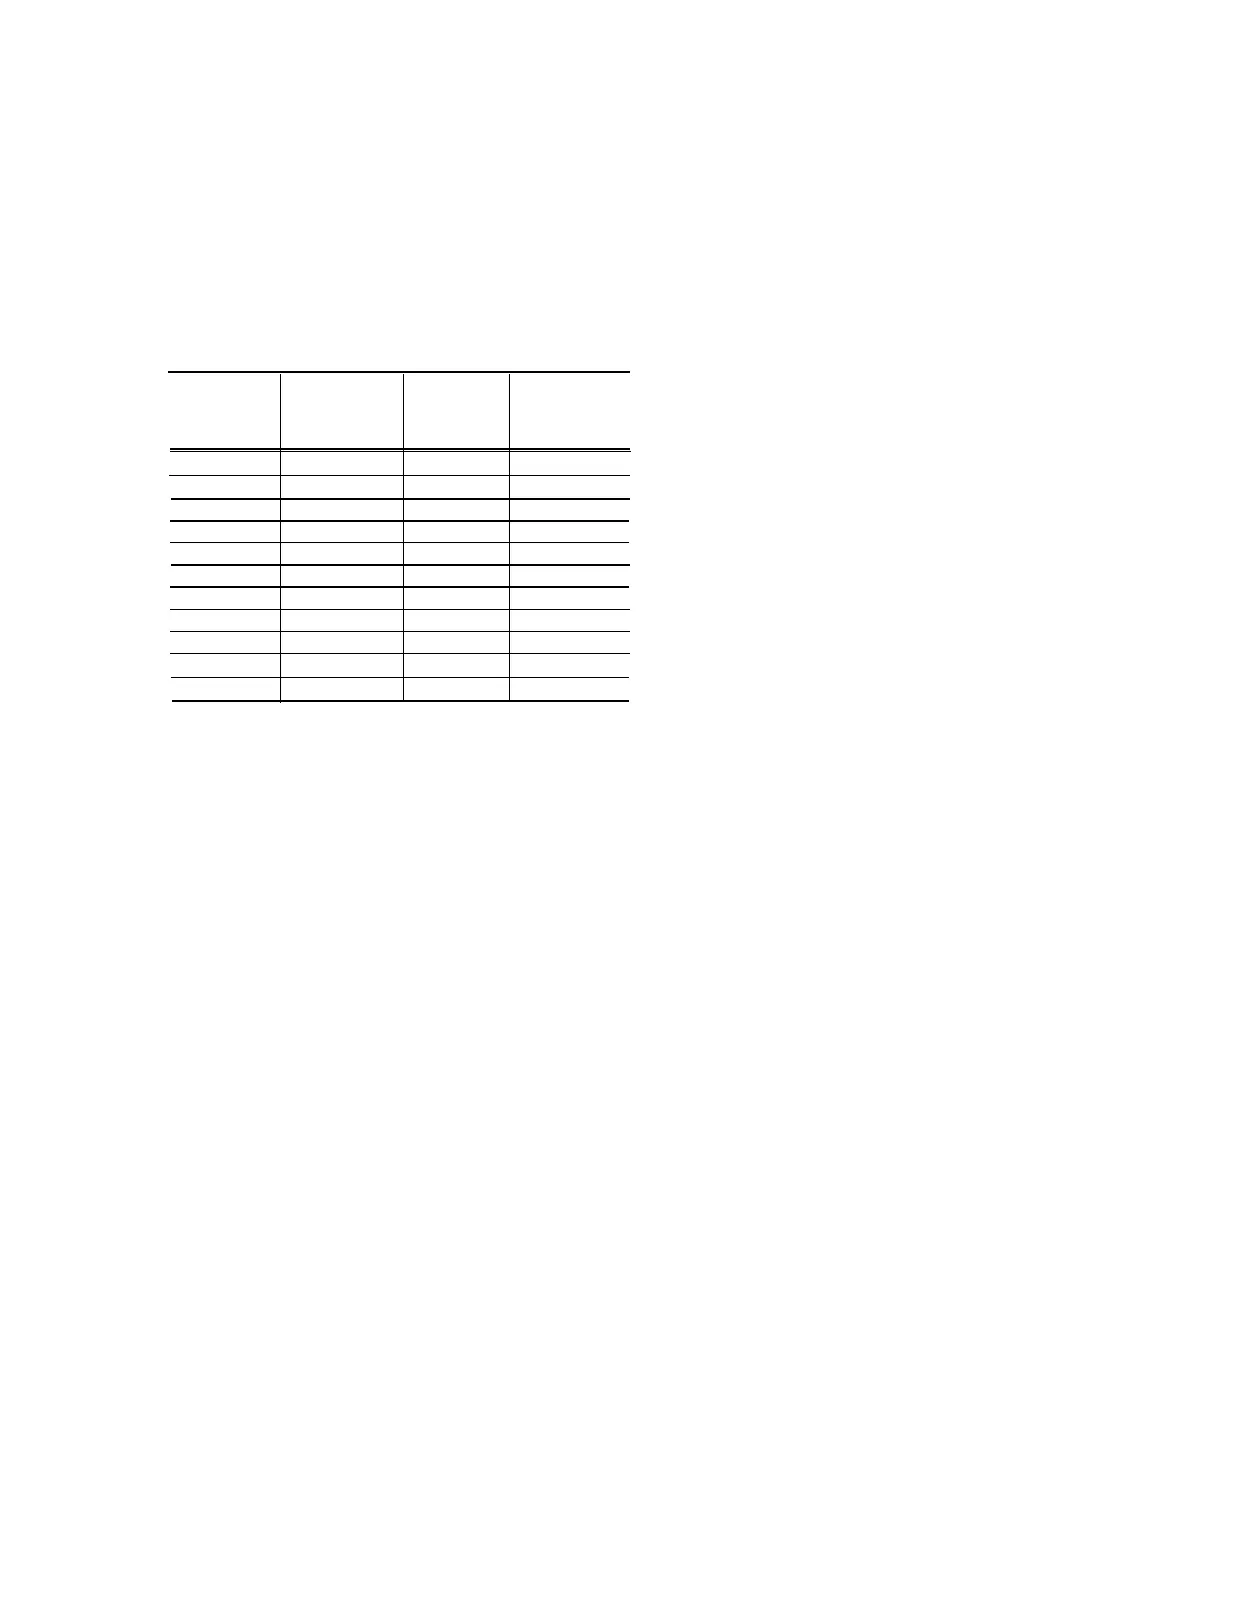
TABLE 5-2
Vertical Deflection Accuracy
VOLTS/DIV
Amplitude
Vertical
Maximum
Switch
Calibrator
Deflection
Error for 3%
Setting
Output
in Divisions
Accuracy
2 mV
10 millivolts 5 ±0.15 div
5 mV
20 millivolts
4
Previously set
10 mV
50 millivolts
5
±0.15 div
20 mV
0.1 volt
5
±0.15 div
50 mV
0.2 volt
4
±0.12 div
0.1 V
0.5 volt
5
±0.15 div
0.2 V
1 volt
5
±0.15 div
0.5 V
2 volts
4
±0.12 div
1 V
5 volts
5
±0.15 div
2 V
10 volts 5
±0.15 div
5 V
20 volts 4
±0.12 div
f. Set VERT MODE to CH 2, set amplitude calibrator for
a 20 millivolt output and move signal cable to CH 2 input.
g. CHECK—The display for 4 divisions of amplitude.
h. ADJUST—CH 2 GAIN, 5 mV adjustment, through
the lower 5 mV access hole at left side of cabinet for
4 divisions of amplitude.
i. CHECK—All settings of CH 2 VOLTS/DIV for ac-
curacy, within 3%, using the settings listed in Table 5-2.
4. CHECK CH 2 and CH 1 VAR VOLTS/DIV Range
a. Set the amplitude calibrator to 50 millivolts and set
CH 1 and CH 2 VOLTS/DIV to 10 mV.
b. Turn CH 2 VAR VOLTS/DIV fully counterclockwise.
c. CHECK—That the CH 2 UNCAL light turns on when
the CH 2 VAR VOLTS/DIV control is out of calibrated
detent.
d. CHECK–That display amplitude reduces to
2 divisions or less.
TM 11-6625-2735-14-1
e. Return CH 2 VAR VOLTS/DIV to calibrated detent.
f. Set VERT MODE to CH 1 and move signal cable to
CH 1 input.
g. Turn CH 1 VAR VOLTS/DIV fully counterclockwise.
h. CHECK—That the CH 1 UNCAL light turns on when
the CH 1 VAR VOLTS/DIV control is out of calibrated
detent.
i. CHECK—That display amplitude
reduces to
2 divisions or less.
j. Return CH 1 VAR VOLTS/DIV to calibrated detent.
5. Check ADD Mode Operation
a. Set VERT MODE to ADD and set CH 1 and CH 2
VOLTS/DIV to 5 mV.
b. Remove the test signal cable from CH 1 input.
Connect to the cable: a BNC female-to-BNC female
adapter, a BNC T-connector, two 18-inch 50-ohm BNC
cables and connect the cables to CH 1 and CH 2 inputs.
c. Set the amplitude calibrator for a 10 millivolt output
and center the display on graticule using equal settings of
CH 1 and CH 2 POSITION controls.
d. CHECK—For a display of 4 divisions, within 3%
(0.12 division).
e. Press INVERT pushbutton.
f. CHECK—That display amplitude reduces to ap-
proximately 0.
g. Return INVERT pushbutton to normal (button out).
h. Disconnect all test equipment.
6. Check ALT Mode Operation
a. Set VERT MODE to ALT, set 100 OR 20 MHz BW
control to full bandwidth position and set A TRIGGER
LEVEL fully clockwise.
5-7

 Loading...


