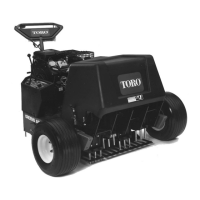
17
Aeration Stop Button
The red button (Fig. 8) stops the water injection system.
The system continues for a few seconds after the button is
pressed.
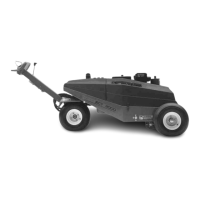
Parking Brake
Push the lever (Fig. 8) toward the machine to engage the
parking brake. A warning buzzer will sound if you attempt
to move the machine with parking brake engaged.
Fuel Shut-Off Valve
The fuel shut-off valve is located under the fuel tank. Close
the valve when storing or transporting (trailering) the
machine.
Operating Precautions
Follow these precautions when operating the aerator:
• Before aerating, inspect the work area for debris and
obstacles. Determine the best direction and pattern to
operate the machine. Always maintain awareness of
what lies ahead in the direction of forward travel.
• If the machine starts to vibrate abnormally, shut the
engine off. Remove the key from the ignition switch to
prevent the possibility of accidental starting. Check the
machine for damaged parts. Repair any damage before
restarting the engine and operating the machine
• Only use the aerator in daylight or when there is good
artificial light. Watch for holes or other hidden hazards.
Do not transport the machine close to a sand trap, ditch,
creek, or other hazard.
• To prevent roller marks, always raise the machine to the
transport position when parked on a green.
• Do not operate the water injection system on concrete
or asphalt because water jets will permanently damage
these surfaces. Do not run over the hose as damage will
occur.
• Do not operate the aerator with the roller or injection
system over the edge of anything that could be hit,
damaged, or injured by high velocity water blasts.
• Water jets from the injection system should not damage
irrigation heads on one pass of the machine. Do not
allow multiple shots from the injection system to hit
irrigation heads as damage will occur.
• Use a good, clean, quality water supply in the system. If
good quality water is not available, additional filtration
equipment may be required. Do not use chemicals in
the water system.
• Do not allow the machine to be subject to freezing
temperatures without draining, as damage to the system
will occur.
Starting and Stopping the
Engine
1. Make sure that the wires are installed on the spark plugs
and the fuel shut-off valve is open.
2. Make sure that the parking brake is engaged.
3. Pull the choke lever out to the FULL position and move
the throttle lever to the half throttle position.
Note: When starting a warm engine, the choke may not be
necessary, but HALF throttle is.
4. Insert the key into the ignition switch and rotate it
clockwise to start the engine. Release the key when the
engine starts. Gradually return the choke lever to the
OFF position (lever all the way in) after the engine
starts and warms up.
Important To prevent overheating of the starter motor,
do not engage the starter longer than 30 seconds. After 30
seconds of continuous cranking, wait 2 minutes before
engaging the starter motor again.
Important The engine is equipped with an oil pressure
interlock switch which interrupts the engine operation if
there is not sufficient oil pressure in the engine during
starting or operation. The engine may start but will not
continue to run due to a lack of oil pressure.
5. To stop the engine, move the throttle control downward
to the SLOW position and turn the ignition key to OFF.
Remove the ignition key.
Training Period
Before aerating with the machine, it is suggested that you
find a clear area and practice starting and stopping, raising
and lowering machine, turning, etc. This training period
will be beneficial to the operator in gaining confidence in
the performance of the aerator.
Operating Procedure
1. Make sure that the wires are installed on the spark plugs
and the fuel shut-off valve is open.
2. Uncoil a garden hose, making sure that there are no
kinks or bends in the hose. Lay out the hose so that
there are no obstructions between the machine and the
area to be aerated. Turn on the water supply to purge
any air from the hose. Turn off the water.
 Loading...