M0201ABK_uc ERA® WCS and e-POI Subracks and Power Supply Unit Installation Guide
© June 2021 CommScope, Inc. Page 71
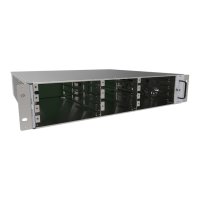
Install and Connect the Subrack Cards
b Follow the local cleaning technique to clean Optical Port 1 on the Fiber AP.
c Clean the connectors on the SMF or MMF following the fiber supplier’s recommendations.
d Install the SFP+ Module and Optical OCTIS Kit on the end of the SMF or MMF that will connect to the
Fiber AP, and then connect it to Optical Port 1 on the Fiber AP (see the preceding graphic). Refer to
the technical data sheet that ships with the OCTIS Kit for further information.
e Connect the other end of the fiber and SFP+ module to an open port on an OPT Card. (The OPT Card
should only be installed in L1, L2, L3, or L4.)
3 Complete the steps in "SFP+ Modules Tested for use with ERA” on page 62.
Connect the CAT Cards
This procedure tells you how to connect an AP to a CAT Card installed in a Classic CAN or a TEN. Card Cards
cannot be used in a Switching CAN or WIN. In a cascaded AP configuration, you connect the CAT Card to the
Main AP.
1 Follow the steps in one of the following sections to install the CAT Cards in Slots L1 - L4 of a Classic CAN
or a TEN, as needed for this installation:
• "Slot and Card Assignment Rules for Classic CANs” on page 18
• "Slot and Card Assignment Rules for TENs” on page 21.
If installing a CAP L with the CAP L Hybrid Fiber Splice Box Kit (PN 7774354-xx), the optical fiber will be
hanging from the Hybrid Fiber Splice Box.
CAT Cards are hot swappable; you do not need to power down the CAN or TEN to install or remove an
CAT Card.
The -48 Vdc WCS subracks do not supply power over CAT6A to UAPs or Copper CAP L APs.
 Loading...