EasyManua.ls Logo

JUKI LU-2860V-7 User Manual

JUKI LU-2860V-7
172 pages
To Next Page IconTo Next Page
To Previous Page IconTo Previous Page
Page #16 background imageLoading...
Page #16 background image
– 11 –
2-10. Installing the reactor box (Only for the EU type models)
󱀆
󱢳
󱢴
1
Connect the terminals of power cord
󰿿
of the
SC-952 to reactor-box PCB asm.
󱀀
and to re-
actor box mounting plate
󱀁
.
Connect brown wire
A
to the rst connector and
blue wire
B
to the third connector respectively
from the top of terminal block on the reactor box
PCB asm. using screws. Connect green/yellow
wire
C
to reactor box mounting plate
󱀁
with
earth setscrew
󱀂
.
2) Attach cable clip
󱀃
to the power cord of SC-
952. Attach the power cord together with the
cable clip to reactor box mounting plate
󱀁
with
cable clip setscrew
󱀄
.
3) Attach cord bushes
󱀆
to input/output cables
󰿿
and
󱀅
of the reactor box. Attach both bushes in
the same manner.
4) Attach reactor box cover
󱢳
to reactor box
mounting plate
󱀁
with four reactor-box cover
setscrews
󱀇
.
At this time, x cord bushes
󱀆
attached to input/
output cables
󰿿
and
󱀅
in the concave section
on reactor box cover
󱢳
to eliminate a gap be-
tween reactor box
󱢴
and cover
󱢳
.
5) Secure reactor box
󱢴
to the undersurface of
table with four accessory wood screws
󱢵
.
6) Secure two cables
󱢸
coming from reactor box
󱢴
to the table with accessory cable clip
󱢶
and
wood screw
󱢷
.
In addition, for the models provided with the
stitch skipping detecting device and the bob-
bin-thread remaining amount detecting device,
cables coming from the stitch skipping device
control box should be secured together with the
aforementioned cables by means of the afore-
mentioned cable clip.
󱀅
󱀆
󱀆
󰿿
󱀇
󱢳
󱀁
󱀇
󱀁
󰿿
A
B
󱀄
C
󱀀
󱀂
󱀃
󱢵
󱢷
󱢶
󱢸
󱢴

Table of Contents

Question and Answer IconNeed help?

Do you have a question about the JUKI LU-2860V-7 and is the answer not in the manual?
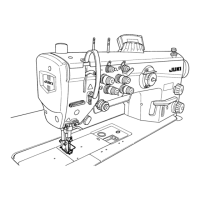
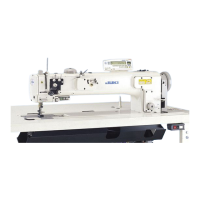
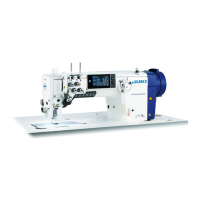
JUKI LU-2860V-7 Specifications

General IconGeneral
TypeIndustrial Sewing Machine
ModelLU-2860V-7
Stitch TypeLockstitch
Max Stitch Length5 mm
Needle Bar Stroke36 mm
LubricationAutomatic
Motor Power550 W
Motor TypeServo Motor

Summary

Installation

Installation of the Sewing Machine

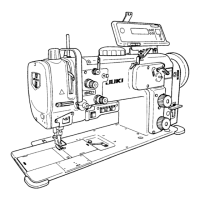
Step-by-step instructions for installing the main sewing machine unit.

Adjusting the Sewing Machine

Thread Tension

How to adjust the tension of the needle and bobbin threads.

Operation of the Sewing Machine

Resetting the Safety Clutch

How to reset the safety clutch after it has been activated.

How to Use the Operation Panel (Application)

Explanation of the Sewing Screen (When Selecting a Sewing Pattern)

Overview of the sewing screen display and its modes.

Management of Sewing Patterns

How to create, copy, and delete sewing patterns.

Sewing Patterns

Information on registering, selecting, and managing sewing patterns.

Adjustment of the Machine Head (Application)

Needle-to-Hook Relation

How to adjust the timing between the needle and the hook.

Adjusting the Timing Between the Needle and the Blade Point of Hook

Detailed procedure for setting the needle-to-hook timing.

Troubles in Sewing and Corrective Measures

Thread Breakage

Troubleshooting thread breakage issues and their causes.

Stitch Skipping

Diagnosing and resolving stitch skipping problems.

Loose Stitches

Identifying and fixing causes of loose stitches, especially in reverse feed.

Related product manuals