57
5.3.6.2. Dual Fuel - SLP98 Variable Capacity and Heat Pump
Job Name:
Indoor Unit Model:
Outdoor Unit Model:
Miscellaneous Items:
9 Install Pressure Switch in the outdoor unit per this instructions (27W13 for R410A or 21J18 for
R22)
9 Install Balance Point Sensor (10Z23) as illustrated in the kit installation instruction. Set to
desired outdoor lock out temperature for HP
9 Install Optional Defrost Tempering Sensor 67M41 (if used) per installation instructions. NOTE:
MUST be located in coil delta plate between furnace and coil
9 Install Discharge Air Sensor per installation instructions. The location of the sensor is CRITICAL
for proper system operation
Indoor Unit Setup:
9 Cut on-board link W914 DEHUM OR HARMONY (R to DS) on furnace IFC control (if not cut,
fuse will blow in Harmony III zoning system control board)
9 W2 connection from Harmony III to SLP98 is optional.
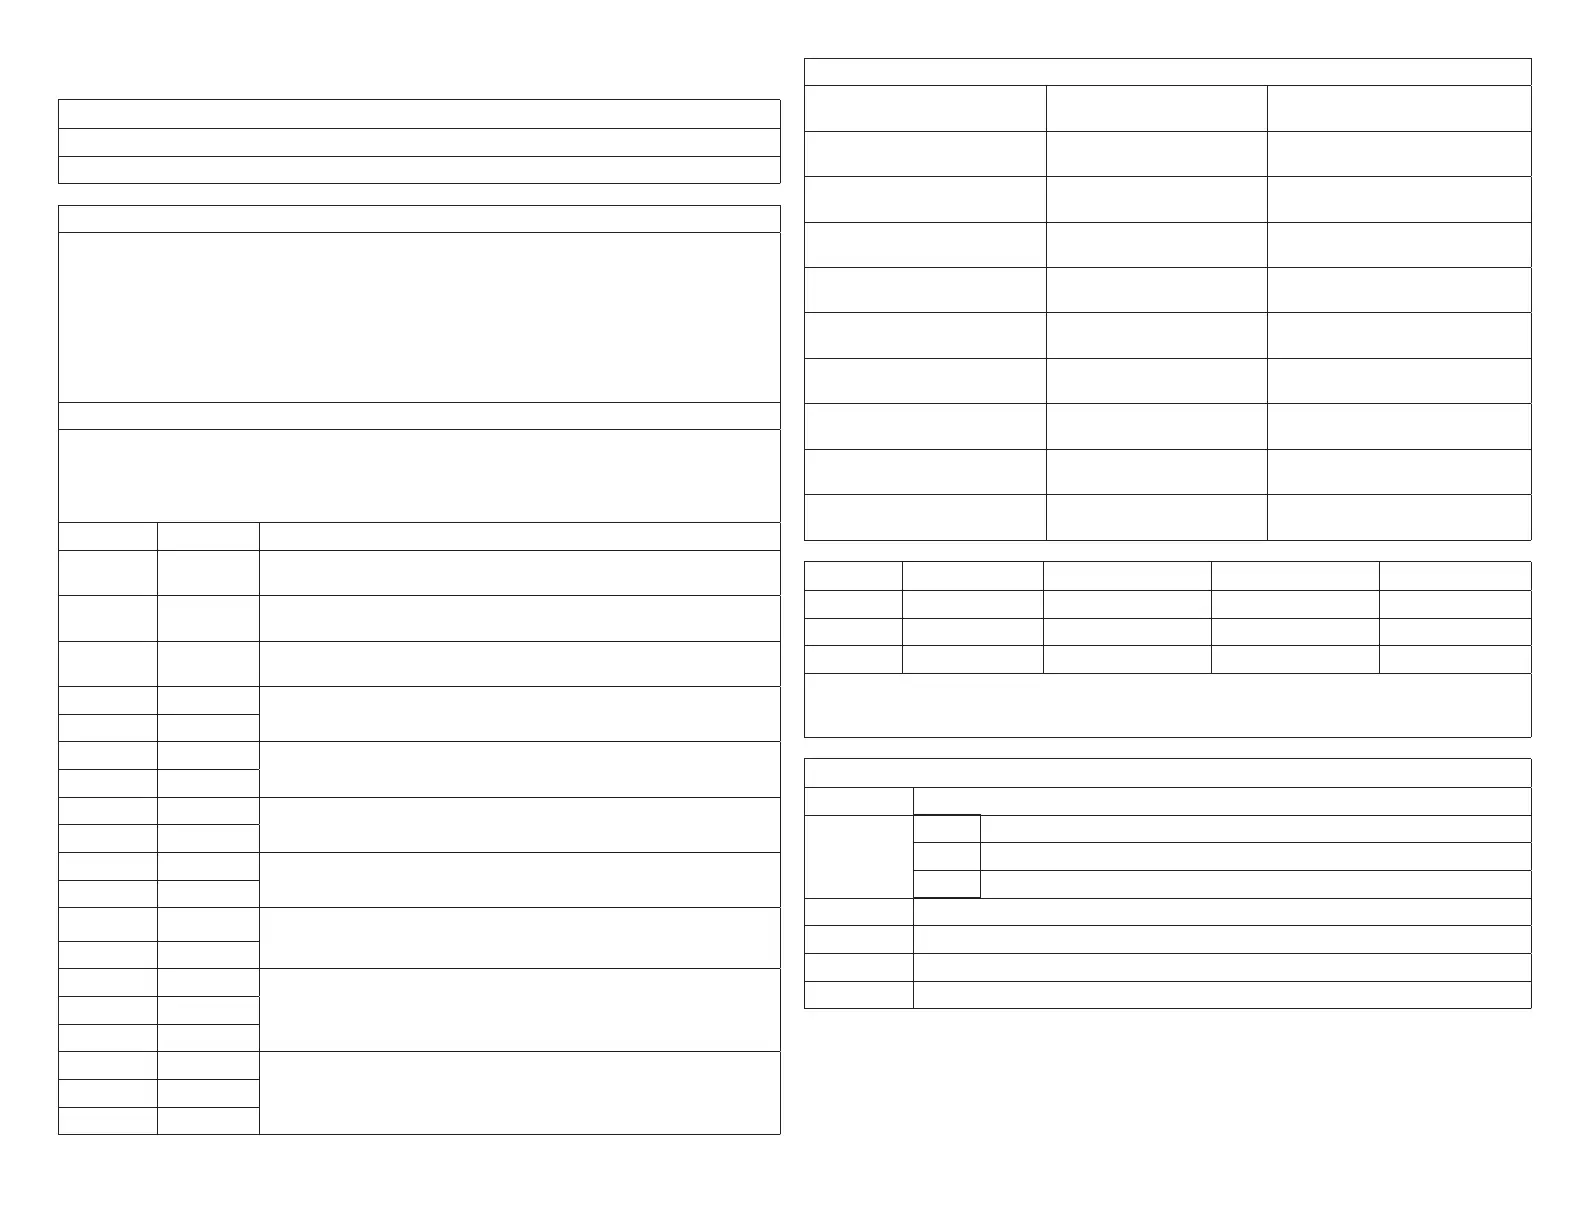
9 DIP switch settings (ON or OFF):
DIPSwitch ON or OFF Condition
1 OFF
DIP switch 1 – leave at factory setting – ignored by Harmony III zoning
system
2 OFF
DIP switch 2 – leave at factory setting – ignored by Harmony III zoning
system
3 OFF
DIP switch 3 – leave at factory setting – ignored by Harmony III zoning
system
4 ON
DIP switches 4 and 5 determine heating blower “off” delay –
recommended 180 seconds
5 ON
6 OFF
DIP switches 6 and 7 – leave at factory setting – ignored by Harmony
III zoning system
7 OFF
8
DIP switches 8 and 9 – cooling blower speed – determines maximum
system CFM – see furnace blower tables
9
10
DIP switches 10 and 11–cooling blower adjust–determines maximum
system CFM – see furnace blower tables
11
12 OFF
DIP switches 12 and 13 – leave at factory setting – ignored by
Harmony III zoning system
13 OFF
14 OFF
DIPswitches14,15,and16–setslowre,minimumcapacity,ring
rate - default setting shown and is recommended starting point.
15 OFF
16 OFF
17 OFF
DIPswitches17,18and19–setshighre,100%capacity,ringrate-
default setting shown and is recommended starting point
18 OFF
19 OFF
Panel Setup:
9 Heating staging jumper Circle one: 85 90 100 110
120 130
Recommended 120 deg-F
9 Zone 1 PIAB 140F DAS
jumper in place
Circle one: Yes No See “1.10.4. Zone 1 PIAB Jumpers
– 140ºF DAS” on page 10.
9 Cooling staging jumper Circle one: 50 55 60 Select desired discharge air temp
during cooling
9 Cont. Air Reduction jumper Circle one: 0 25 50 75 Percentageairowreductionfor
continuous fan operation
9 Heating Air Reduction
jumper
Circle one: 0 20 40 Percentageairowreductionfor
heating mode
9 SystemConguration
jumpers
Circle one: HP GAS Set to GAS
9 Stages Circle one: 2COOL
1COOL
Set to match condenser, 1 or 2
stage
9 Stages Circle one: 2HP 1HP Ignored for gas heat, non-heat
pump application
9 E-HEAT Stages Circle one: DF 1 2 3 Ignored for gas heat, non-heat
pump application
9 Desired total system CFM
with all zones calling:
Total system CFM per
tables:
Minimum CFM:
9 Zone 1 Name: Desired CFM: PIAB Setting: Actual CFM:
9 Zone 2 Name: Desired CFM: PIAB Setting: Actual CFM:
9 Zone 3 Name: Desired CFM: PIAB Setting: Actual CFM:
9 Zone 4 Name: Desired CFM: PIAB Setting: Actual CFM:
NOTE: All of the above are recommended “starting” positions for the furnace DIP switches and
Harmony III jumpers. Slight variations may be required during system start up and operation
checks.
Field Wiring Checklist
√ Indoor Unit Wiring Completed:
DS on Harmony III to DS on indoor unit connected
C on indoor unit connected to Harmony III transformer C
No connection to Y1 or Y2 on indoor unit.
√ Outdoor Unit Wiring Completed
√ Thermostat and Damper Wiring Completed
√ Discharge Sensor wired to Harmony III zoning system
√ Heat Pump Pressure Switch wired to Harmony III zoning system
 Loading...