Home
Siemens
Industrial PC
SIMATIC IPC677D
Siemens SIMATIC IPC677D User Manual
4
of 1
of 1 rating
196 pages
Give review
Manual
Specs
To Next Page
To Next Page
To Previous Page
To Previous Page
Loading...
Technica
l inform
ation
8.5
Hardw
are descr
iptions
SIMATIC IP
C677D
138
Operating Inst
ructions
,
09/2014
,
A5E
32995420
-
AC
Signal
Pin no.
Pin no.
Signal
GND
B72
A72
PCIEX16_RX_P(2)
GND
B73
A73
PCIEX16_RX_N(2)
PCIEX16_TX_P(1)
B74
A74
GND
PCIEX16_TX_N(1)
B75
A75
GND
GND
B76
A76
PCIEX16_RX_P(1)
GND
B77
A77
PCIEX16_RX_N(1)
PCIEX16_TX_P(0)
B78
A78
GND
PCIEX16_TX_N(0)
B79
A79
GND
GND
B80
A80
PCIEX16_RX_P(0)
n.c.
B81
A81
PCIEX16_RX_N(0)
n.c.
B82
A82
GND
Note
This slot ca
n als
o be use
d for PCI
e x8, x
4 and x1
mod
ules.
8.5.3
External p
orts
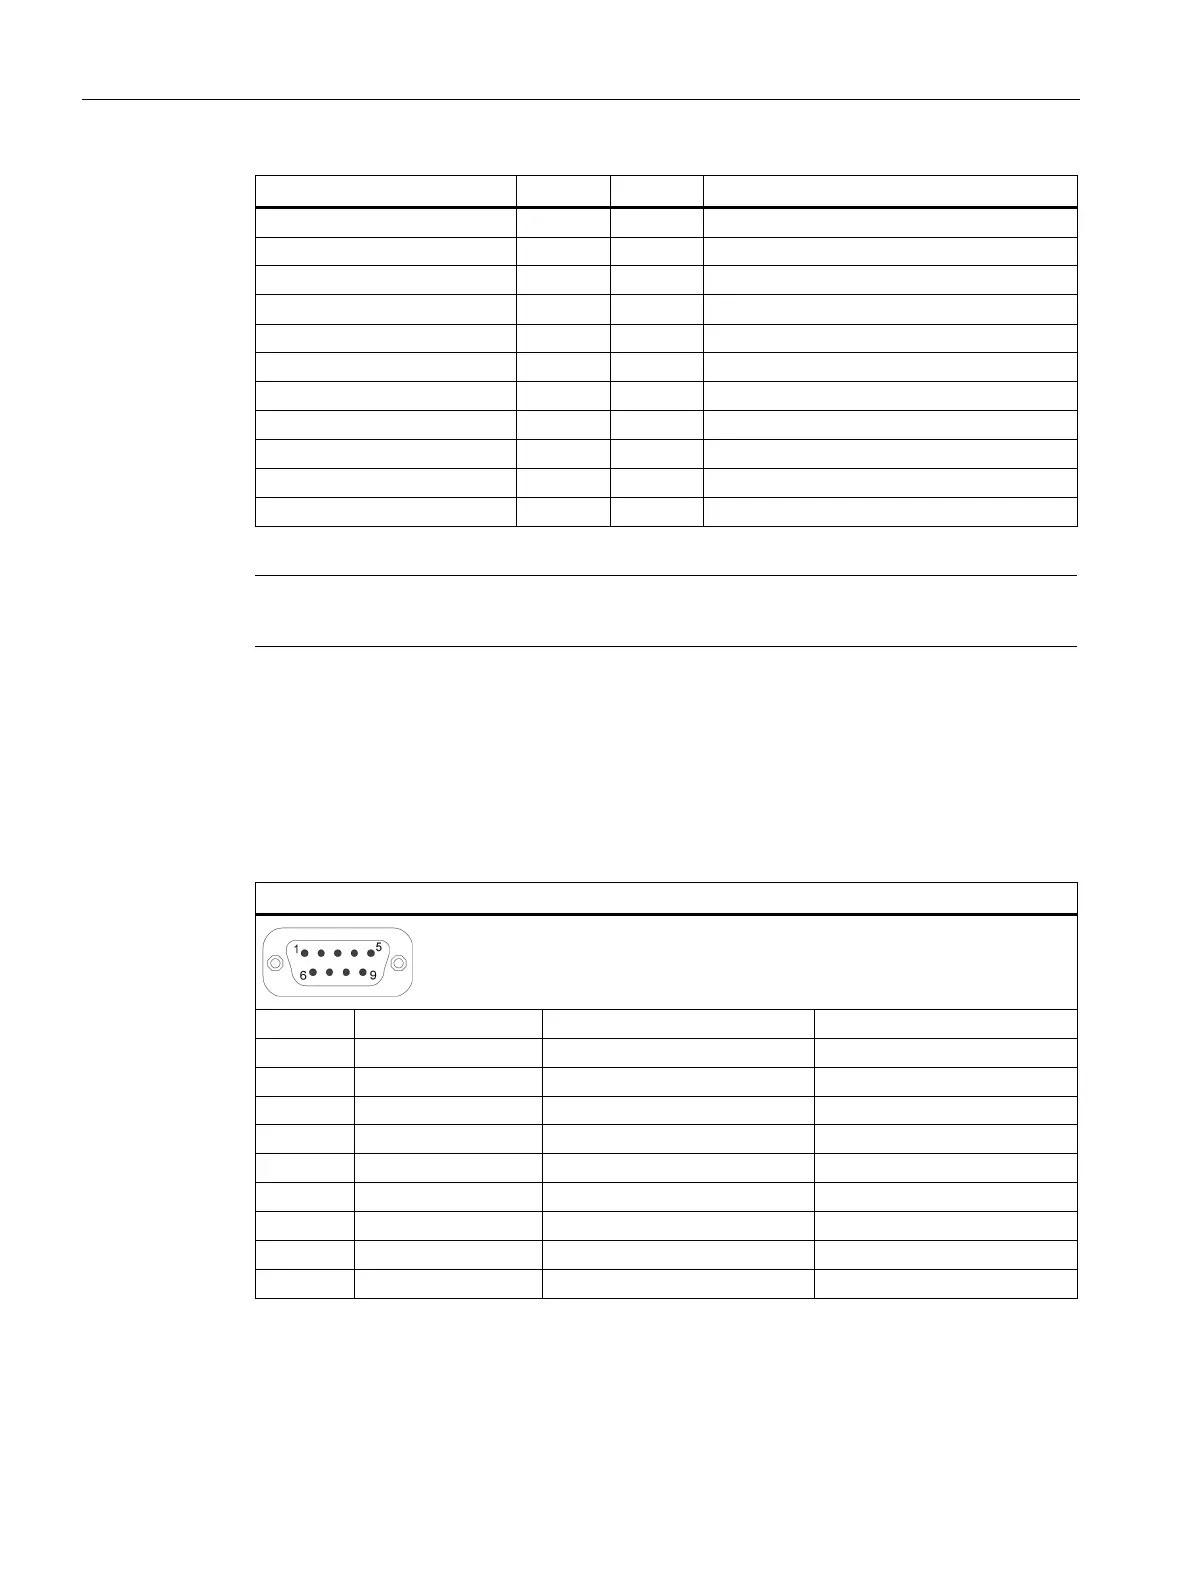
8.5.3.1
COM1/C
OM2
Serial port C
OM1, 9
-
pin (
plug) or COM2
Pin no.
Short descri
ption
Meaning
Input / output
1
DCD
Data carrier dete
ct
Input
2
RxD
Received data
Input
3
TxD
Transmit data
Output
4
DTR
D
ata termin
al
ready
Output
5
GND
Ground
-
6
DSR
Ready for operat
ion
Input
7
RTS
Request to send
Output
8
CTS
Clear to se
nd
Input
9
RI
Incoming c
all
Input
137
139
Table of Contents
Default Chapter
2
Legal Information
2
Preface
3
Table of Contents
5
1 Overview
9
Product Description
9
Applications
11
Features
11
Design of the Device
14
Operator Controls and Interfaces
14
Status Displays
16
PROFINET Status Displays
17
Accessories
18
2 Safety Instructions
19
General Safety Instructions
19
Notes on Usage
22
3 Mounting and Connecting the Device
25
Preparing for Mounting
25
Checking the Delivery Package
25
Device Identification Data
26
Permitted Mounting Positions
28
Preparing the Mounting Cutout
29
Mounting the Device
31
Installation Guidelines
31
Mounting Clips or Mounting Brackets, Position for IP65
33
Mounting the Device with Mounting Clips
34
Mounting the Device with Mounting Brackets
35
Position of the Mounting Clips for IP66
37
Connecting the Device
37
Wiring Information
37
Connecting the Equipotential Bonding Circuit
38
Connecting 100-240 VAC Power Supply
39
Connecting the 24 VDC Power Supply
41
Connecting Peripheral Equipment
43
Connecting the Device to Networks
44
Profinet
45
Connecting Ethernet/Usb Strain Relief
46
Connecting the PROFINET Strain Relief
47
4 Commissioning the Device
49
General Information on Commissioning
49
Switching on the Device
50
Windows Action Center
51
Notes on Different Device Configurations
51
RAID1 System (Optional)
51
Notes on the DVD Burner
53
Switching off the Device
53
5 Operating the Device and Device Functions
55
Operator Input Options
55
Operating a Device with Resistive Single Touch Screen
56
Operating a Device with Capacitive Multi-Touch Screen
57
IPC Wizard Functions
59
Extended Device Functions
59
Monitoring Functions
59
Overview of the Monitoring Functions
59
Temperature Monitoring/Display
60
Watchdog (WD)
61
Battery Monitoring
62
Enhanced Write Filter (EWF)
62
File Based Write Filter (FBWF)
64
Buffer Memory SRAM (Optional)
66
Active Management Technology (AMT)
66
Trusted Platform Modul (TPM)
67
6 Expanding the Device and Assigning Device Parameters
69
Opening the Device
69
Expanding Memory
70
Expansion Cards
72
Notes on the Expansion Cards
72
Removing and Installing Expansion Cards
72
Drives
74
Installation Options for Internal Drives
74
Removing and Installing the Drive Bay Module
75
Removing and Installing Hard Disks
75
Removing and Installing an SSD Drive
77
Installation Options for External Drives
78
Removing and Installing a DVD Drive
79
7 Maintaining and Servicing Your Device
81
Maintenance
81
Managing RAID Systems
81
Example for a RAID1 System During the Boot Phase of the System
81
RAID Software
82
Checking the Status of the RAID System
82
Displaying a Defective Hard Disk of a RAID System in the RAID Software
83
Special Feature: Replacing Hard Disk in the RAID System When Switched off
83
Integrating a New Hard Disk Drive in the RAID System
84
Service and Spare Parts
86
Cleaning the Device Front
88
Separating the Control Unit from the Computer Unit
89
Connecting the Control Unit with the Computer Unit
90
Removing and Installing Hardware
91
Replacing a Defective Hard Disk Drive in the RAID System
91
Removing and Installing the Hard Disk in the Removable Drive Bay
92
Replacing the Backup Battery
93
Removing and Installing the Power Supply
95
Removing and Installing the Bus Board
96
Removing and Installing the Power Supply Fan
97
Removing and Installing the Device Fan
99
Replacing the Processor
100
Installing the Software
102
Sources for Installation of the Operating System
102
Updating the Operating System
102
Installing Drivers and Software
103
Installing Windows 7
103
Setting up the Language Selection by Means of the Multilanguage User Interface (MUI)
108
Recovery DVD Languages
109
Installing the RAID Controller Software
109
Update Installation
109
Updating the Operating System
109
Installing or Updating Application Programs and Drivers
110
CP 1616 Onboard
110
Backing up Data
110
Creating an Image
110
Recycling and Disposal
110
8 Technical Information
111
Certificates and Approvals
111
Directives and Declarations
112
CE Marking
112
ESD Guideline
113
Dimension Drawings
115
Dimension Drawing of 15" Device with Capacitive Multi-Touch Screen
115
Dimension Drawing of 19" Device with Capacitive Multi-Touch Screen
116
Dimension Drawing of 22" Device with Capacitive Multi-Touch Screen
117
Dimension Drawing of 15" Device with Resistive Single Touch Screen
118
Dimension Drawing of 19" Device with Resistive Single Touch Screen
119
Dimension Drawing of 22" Device with Resistive Single Touch Screen
120
Dimensional Drawing for the Installation of Expansion Modules
121
Technical Specifications
121
General Technical Specifications
121
Electromagnetic Compatibility
122
Ambient Conditions
125
Current and Power Requirements
126
AC Voltage Supply
127
DC Power Supply
128
Hardware Descriptions
129
Motherboard
129
Structure and Functions of the Motherboard
129
Position of the Interfaces on the Motherboard
130
Internal Interfaces
131
Front Ports
132
Bus Board
133
Layout and Principle of Operation
133
PCI Slot Pin Assignment
134
Pin Assignment 12 V Power Supply Connection for Expansion Cards
136
PCI Express Slot X16 Pin Assignment
136
External Ports
138
Com1/Com2
138
Displayport
139
DVI-I
140
Ethernet
141
Usb 3.0
141
Profibus
142
Profinet
142
System Resources
143
Currently Allocated System Resources
143
System Resources Used by the BIOS/DOS
143
CP 1616 Onboard Communications Processor
149
Properties
149
Typical Communication Partners
149
Firmware Loader
151
Further Actions in STEP 7/NCM PC
153
BIOS Description
153
Overview
153
Opening the BIOS Selection Menu
154
Configuration
155
Exit Menu
157
General BIOS Setup Settings
157
BIOS Update
162
Alarm, Error and System Messages
163
Active Management Technology (AMT)
164
Introduction
164
Overview of AMT
165
Enabling Intel® AMT / Basic Configuration
166
Resetting the Intel® AMT to the Default Settings and Disabling AMT
168
Determining the Network Address
169
Forcing User Consent
169
Functional Scope in Windows
170
Windows Embedded Standard 7 Professional
170
Technical Support
173
Service and Support
173
Troubleshooting
174
A.2 Troubleshooting
174
Notes on the Use of Third-Party Modules
176
List of Abbreviations
177
Glossary
183
Index
191
Other manuals for Siemens SIMATIC IPC677D
Operating Manual
54 pages
Product Information
12 pages
4
Based on 1 rating
Ask a question
Give review
Questions and Answers:
Need help?
Do you have a question about the Siemens SIMATIC IPC677D and is the answer not in the manual?
Ask a question
Siemens SIMATIC IPC677D Specifications
General
Brand
Siemens
Model
SIMATIC IPC677D
Category
Industrial PC
Language
English
Related product manuals
Siemens SIMATIC IPC677E
158 pages
Siemens SIMATIC HMI IPC677C
282 pages
Siemens SIMATIC IPC627D
186 pages
Siemens Simatic IPC647C
246 pages
Siemens SIMATIC IPC647E
200 pages
Siemens SIMATIC IPC627E
164 pages
Siemens SIMATIC IPC427E
164 pages
Siemens SIMATIC IPC547D
138 pages
Siemens Simatic IPC547G
194 pages
Siemens SIMATIC IPC547J
198 pages
Siemens SIMATIC IPC127E
100 pages
Siemens SIMATIC IPC477E
188 pages

 Loading...