Appendix E – Upgrading/Downgrading the System
265
Hardware Reference Manual – Enova DGX 100 Series Digital Media Switchers
a. Type show aie followed by <enter> and confirm that the populated output boards all show a Switch Mode setting of
01 (switched) and not 00 (extracted) or 02 (embedded).
5. With ASB default settings applied, continue installation or operation of the Enova DGX 100 Series switcher
Upgrading DXLink Transmitter/Receiver endpoints
Upgrading DXLink Twisted Pair and DXLink Fiber endpoints requires downloading the latest firmware files and using NetLinx Studio
to transfer the files to the target endpoint. In order to be able to locate endpoints in NetLinx Studio, either change the IP Address of
the upgraded Enova DGX to the same IP Address held by the pre-upgrade Enova DGX (maintains previous configuration settings;
foregoes Auto-setup) or use the endpoint ID Pushbutton to return the endpoint to default settings (in preparation for Auto-setup).
Important Upgrade Information
CAUTION: Upgrading the firmware is a serious action in that if the upgrade fails, it can leave the device completely nonoperational.
If the upgrade fails or power is lost during upgrade, reboot the Transmitter or Receiver and attempt to upgrade the firmware again,
as the module is in an unknown state and cannot be guaranteed to be operational.
NOTE: Some older DXLink Twisted Pair Receivers are not compatible with DXLink Twisted Pair 4K Output Boards. Instructions for
identifying incompatible Receivers are available on page 95.
To upgrade the DXLink TX/RX endpoint:
1. Download and unzip the “Enova DGX 100 Series DXLink [Twisted Pair or Fiber] Firmware” .zip file:
a. Navigate to the endpoint’s product page at www.amx.com.
b. Locate the Firmware Files section on the right side of the page and select the .zip file for download.
c. Unzip and open the downloaded file folder.
2. Launch NetLinx Studio and navigate to the OnLine Tree.
3. In the OnLine Tree tab, right-click in the Workspace Bar and select Refresh System OnLine Tree.
Verify that the DXLink unit is listed in the OnLine Tree.
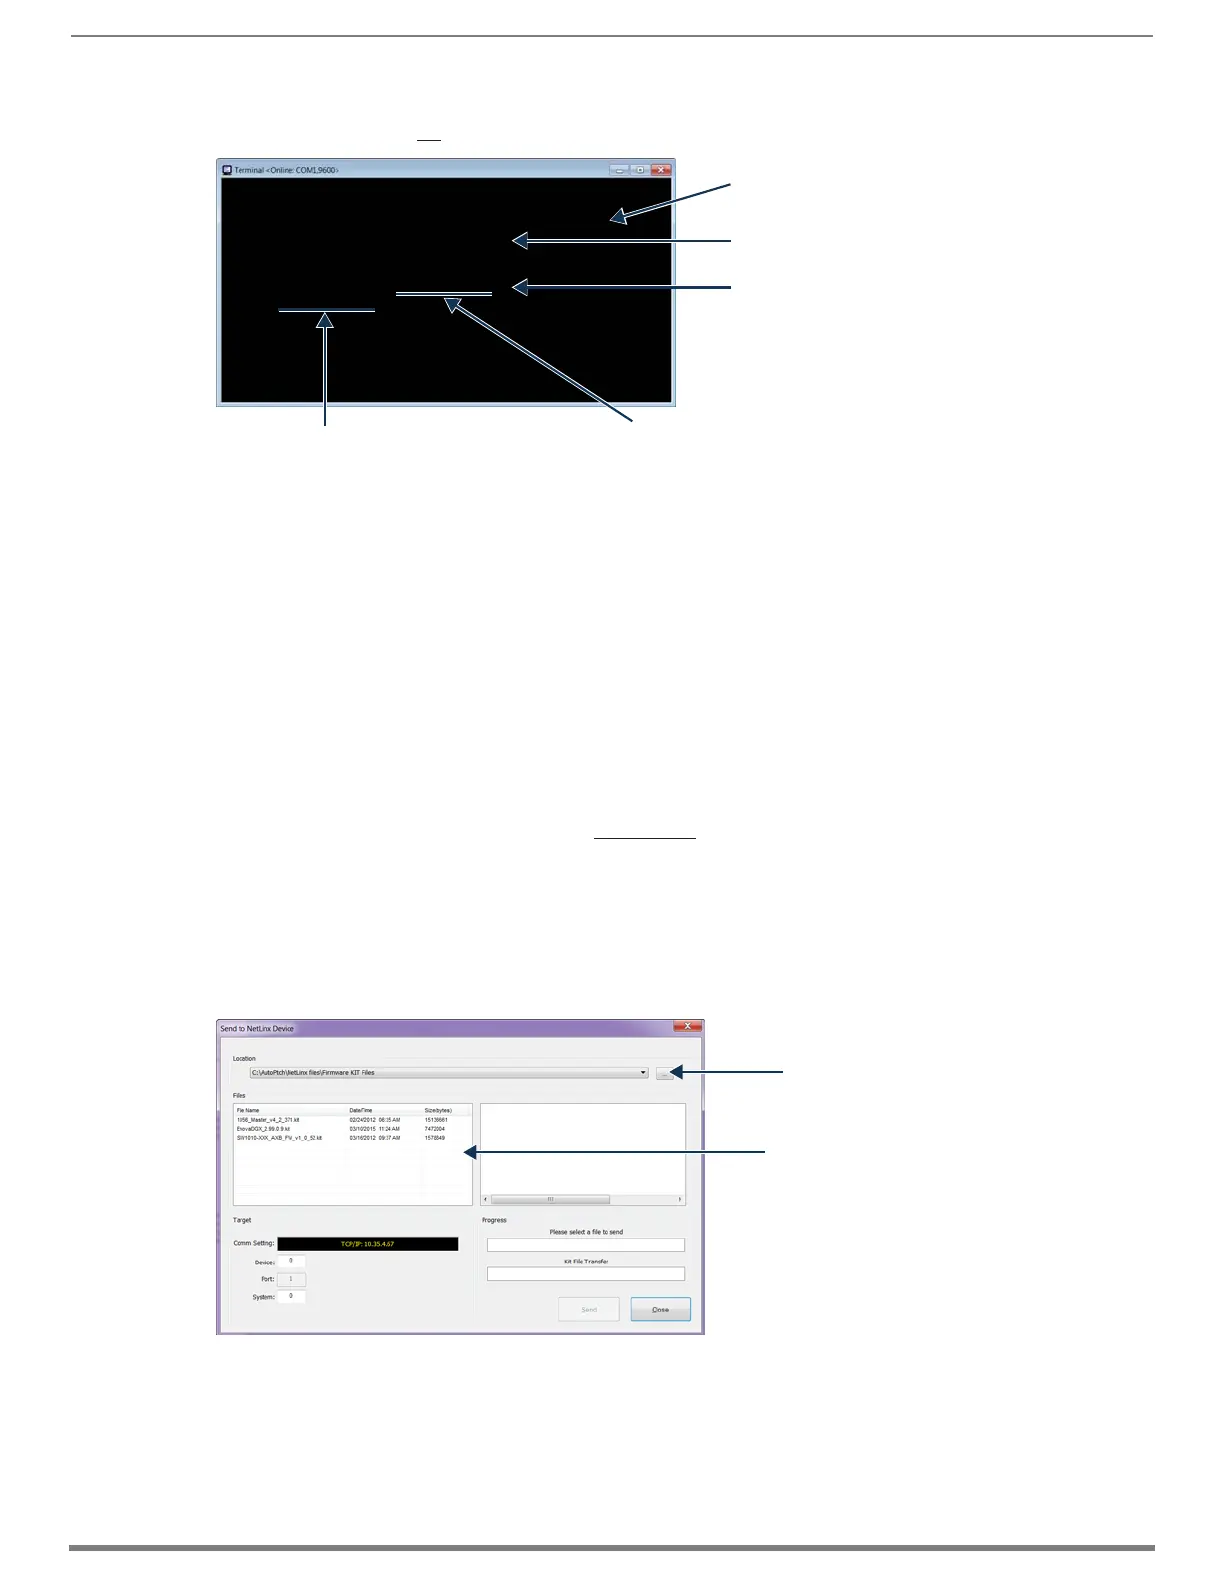
4. Select Tools/Firmware Transfers/Send to NetLinx Device.
The Send to NetLinx Device dialog box appears.
5. Click the Browse button (...) and navigate to the downloaded file.
6. Select the file for the DXLink unit (.kit file). Click Send.
7. Click Close once the download process is complete. Reboot the DXLink unit.
8. In the OnLine Tree, right-click on the switcher and select Refresh System.
(This establishes a new connection and refreshes the device list and their firmware versions in your system.)
9. Optional – Reset factory settings on DXLink Fiber Transmitters (enables access to most recent AMX-provided EDIDs).
DGX_SHELL> show aie
AIE
EXPIN (channels 1-8): 02 02 02 02 02 02 02 02
BCPU1 02 02 02 02 ( 02 02 02 02 )
BCPU2 02 02 02 02
EXPOUT (channels 1-8): 01 01 01 01 00 00 00 00
BCPU3 01 01 01 01 ( 01 01 01 01 )
BCPU4 00 00 00 00
Setting “pushed” from expansion board to MCPU
Normal setting for populated input board
Correct setting for populated output board
Settings show all zeros for unpopulated board slots
Parenthesis indicate setting “pushed” from MCPU to
populated input or output board
Select the DXLink .kit file
Browse for the downloaded (unzipped)
DXLink firmware file
 Loading...