For more information visit: www.cutler-hammer.eaton.com
Page 5-11
Effective 10/02 IL17562BH04
5.12.12 Setting P12L12 , Hour (HOUR)
Set the real-time clock hour (0 to 23) Use 13 to 23 for setting even if
the 12-hour AM/PM mode was selected above for display.
5.12.13 Setting P12L13, Minute (MIN)
Set the real-time clock minute. The minute does not update on its own
while the relay is in program mode, so make this the last setting to
adjust before exiting.
NOTE
THERE IS NO SETTING FOR SECONDS. THE CLOCK SECONDS
ARE SET TO ZERO WHEN THE USER EXITS THE PROGRAM
MODE. TO SYNCHRONIZE THE SECONDS, SET THE MINUTE
VALUE AHEAD, AND EXIT (HIT THE PROGRAM BUTTON) AS THE
NEXT MINUTE BEGINS.
5.12.14 Setting P12L14, Date Display Format (M D Y or D M Y)
Select a display of either MONTH DAY YEAR or DAY MONTH YEAR.
5.12.15 Setting P12L15, IMPACC Communications Mode (IQ2 EN
or IQ2 DIS)
To configure the MP-3000 to communicate in a manner limited to that
of the preceding IQ 1000 II product, choose IQ2 EN. This is the factory
default setting - it is needed for operation with older IMPACC host
systems. To take full advantage of MP-3000 capabilities with a newer
PowerNet host, choose IQ2 DIS. See Section 10, Data Communica-
tions, for more details. This setting has no influence on performance
or protection behavior of the protective relay itself.
NOTE
FOR THE MP-3000 TO COMMUNICATE WITH AN OLDER IMPACC
SYSTEM, THERE IS A SUBSET OF ITS SETTINGS WHICH MUST
BE SET TO WITHIN LIMITED RANGES OR SELECTIONS WHICH
THAT HOST SYSTEM RECOGNIZED. SEE SECTION 10 FOR
INFORMATION.
5.12.16 Setting P12L16, Internal Diagnostic Failure Action (RLYF
TRP, RLYF ALM. RLYF T+A)
Selects the action to take if any of the MP-3000 internal background
self-monitoring programs detect a problem with the relay. The factory
setting is to trip and alarm. However, users with critical processes may
prefer to set for alarm only so that the motor can continue to run while
maintenance personnel attend to the relay.
CAUTION
IF THE RLYF ALM SETTING IS CHOSEN, BE SURE TO CONNECT
AN EFFECTIVE ALARM TO THE ALARM RELAY OUTPUT, AND
TEST IT PERIODICALLY. OTHERWISE, THE MOTOR RUNS
WITHOUT PROTECTION IF THE RELAY SUFFERS A HARDWARE
FAILURE.
5.12.17 Setting P12L17, INCOM Trip Enabled or Disabled (INCT EN
or INCT DIS)
Selects whether or not the MP-3000 will accept and execute a motor trip
command from a remote PowerNet or IMPACC operator via data
communications. This is dictated by security concerns and operating
procedures of users who connect the MP-3000 to a facility control system.
5.12.18 Setting P12L18, Arm or Disarm Trip Relay (ARMED or
DISARMED)
This maintenance function blocks the MP-3000 trip output, while all
the tripping functions continue to operate internally. If DISARMED is
selected, the relay will still display all alarms and trips but the trip
output relay contact will remain in its non-trip state.
For safety purposes, when the unit is DISARMED, the MP-3000 scrolls
a warning message “WARNING MP-3000 WILL BE DISARMED UPON
EXIT OF PROGRAM MODE AND WILL NOT PROTECT THE MOTOR -
ENTER ARMED INTO SETTING TO PROTECT THE MOTOR”. The
default display says DISARMED, and the Protection LED turns off. Any
alarm or trip messages on the display alternate with the word
DISARMED.
In the ARMED mode, the MP-3000 works normally.
The DISARMED mode is useful for commissioning a new relay or new
settings on a running motor, when a false trip output would disrupt the
process. The user can commission the MP-3000 in the DISARMED
mode and observe its behavior, noting any trip operations or filling of
the
I2t thermal bucket without suffering the consequence of an
undesired trip. Once the user confirms that the settings are suitable,
set the MP-3000 to ARMED and true protection is enabled.
NOTE
THE ALARM, AUX1, AND AUX2 OUTPUT CONTACTS ALL
FUNCTION NORMALLY EVEN WHEN THE MP-3000 IS DISARMED.
NOTE
TO GET THE FULL USE OF THE DISARMED/ARMED CAPABILITY
OF THE MP-3000, BE SURE TO SET P12L6 TO RUN PGM (ALLOW
MP-3000 TO BE PROGRAMMED WHILE THE MOTOR RUNS), SO
THAT THE RELAY CAN BE ARMED WITHOUT STOPPING THE
MOTOR.
CAUTION
WHEN DISARMED FOR MAINTENANCE REASONS, THE MP-3000
IS NOT PROTECTING THE MOTOR. AFTER PROPER OPERATION
IS CONFIRMED, BE SURE TO SET TO ARMED. BE WATCHFUL AT
ALL TIMES FOR THE DISARMED MESSAGE ON THE DISPLAY.
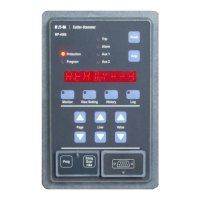
5.13 Page 13, SP TEST, Settings P13L1 to P13L8
This page is used to test the MP-3000.
5.13.1 Setting P13L1, Operating Mode (3 PHASE or 1 PHASE)
This function allows the MP-3000 to be bench-tested using a single-
phase current source (1 PHASE) if a three-phase source is unavailable
at the test bench. The phase unbalance functions cannot be tested in
1 PHASE mode, but unbalance functions are not necessary just to
determine if a particular MP-3000 sample is functioning correctly. For
three-phase testing and all normal operation, select the three-phase
mode (3 PHASE).
 Loading...