17
18
E124 28 532365 - Rev.A
P2
SLH/SLH LR
P1
SLH/SLH LR
-
+
-
RADIO
CLOCK BATTERY
BATTERY
RESET
SETUP
R2
R1
PRGRM
LCD1
POWER
SUPPLY
USB
F
XF MODULE
+
8.8.
1 2 1 2 1 23 4 5 6 7 8 11 12 13 14 15 16 17 18 19 20
DL1
DL2 DL3 DL4 DL9 DL10 DL11DL12
SW3
SW1
SW2
DL13 DL5 DL6 DL7 DL8
ALARM
RESET
DL12 DL1 DL2 DL3 DL4 DL6 DL7 DL8 DL9DL5DL13 DL10 DL11
2EASY OUT2 OUT1
LAMP
LOCK MOT1 MOT2
+
-
+
-
IN1
IN2
IN4
IN5
GND
IN3
GND
+24
FCA1
FCC1
FCC2
FCA2
GND
GND
GND
ENC1
+24
ENC2
LED R1
-
+
-
RADIO
CLOCK BATTERY
BATTERY
RESET
SETUP
R2
R1
PRGRM
LCD1
POWER
SUPPLY
USB
F
XF MODULE
+
8.8.
1 2 1 2 1 23 4 5 6 7 8 11 12 13 14 15 16 17 18 19 20
DL1
DL2 DL3 DL4 DL9 DL10 DL11DL12
SW3
SW1
SW2
DL13 DL5 DL6 DL7 DL8
ALARM
RESET
DL12 DL1 DL2 DL3 DL4 DL6 DL7 DL8 DL9DL5DL13 DL10 DL11
2EASY OUT2 OUT1
LAMP
LOCK MOT1 MOT2
+
-
+
-
IN1
IN2
IN4
IN5
GND
IN3
GND
+24
FCA1
FCC1
FCC2
FCA2
GND
GND
GND
ENC1
+24
ENC2
LED R2
Translation of the original instructions
ENGLISH
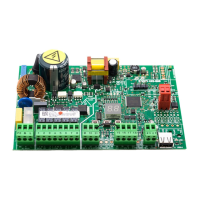
7.4 RADIO CONTROLS SLH/SLHLR
Memorise the first MASTER radio control on the board,
then add other radio controls that are required.
MEMORISING THE MASTER ON THE BOARD
A “MASTER” radio control has to be used. OPEN A and
OPEN B commands have to be memorised separately.
To check if it is a MASTER radio control Press and hold down
a button and watch the LED:
- flashes briefly, then the light becomes
steady = MASTER
- turns on immediately with a steady light = NON
MASTER
L
Whenever a master is memorised on the board, any
SLH/SLHLR radio controls that are already in use are
disabled.
This memorisation procedure for the MASTER applies to the inte-
grated OmniDEC receiver combined with the 3-pin plug in module
(it allows OPEN A and OPEN B commands to be memorised).
If a 5-pin plug in receiver is used (only for OPEN A command), follow
the specific instructions.
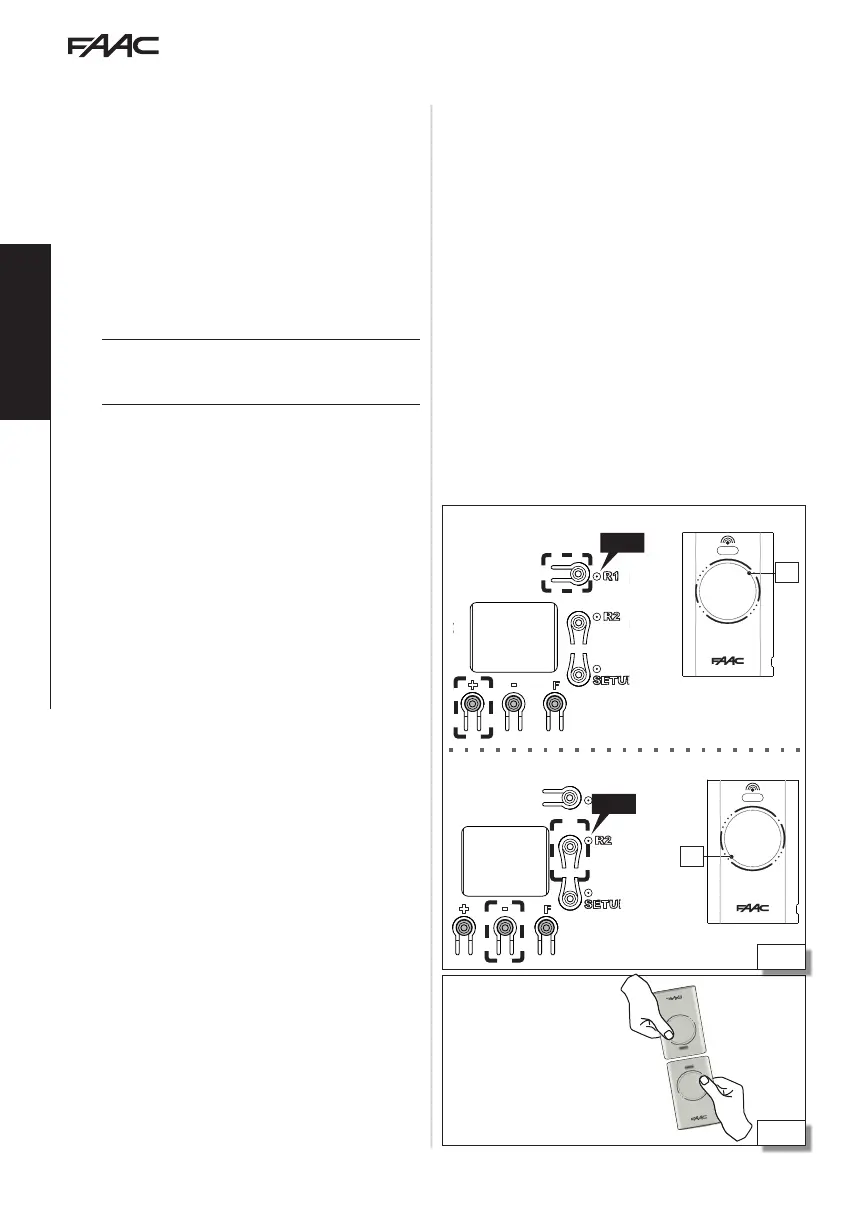
MEMORISING OPEN A
1. Press the
++ (or R1) button on the board and release
it when LED R1 starts to flash, for 20 s (time available
for the next steps).
2. Press buttons P1 and P2 simultaneously on the
radio control and release them when LED starts
to flash, for 8 s (time available for the next step).
3. On the radio control, held at approximately 50 cm
from the board, press button P1 and check LED R1
on the board: it becomes steady for 1 s and then
switches off (memorisation complete).
4. Release the button.
When using the memorised button for the first time,
press it twice in succession to obtain the command.
MEMORISING OPEN B
Proceed as for memorising OPEN A, using the
--
(or
R2) button combined with LED R2 and button P2 on
the board.
ADDING RADIO CONTROLS
It is necessary a MASTER that is already in use. It is not neces-
sary to be close to the board.
OPEN A COMMAND
1. Press buttons P1 and P2 simultaneously on the
MASTER board that is already in use and release
them when LED starts to flash, for 8 s (time available
for the next step).
2. Press and hold down button P1 and check the
LED: it becomes steady.
3. Without releasing the button, position the front of
radio control to be added so that it is in contact with
that of the master. Press and hold button P1 on the
radio control to be memorised and check the LED: it
flashes twice and then switches off.
4. Release both.
When using the memorised button for the first time,
press it twice in succession to obtain the command.
OPEN B COMMAND
Proceed as for copying OPEN A, using button P2 at
steps 2 and 3.
Memorising OPEN A
MEMORISING OPEN B
Adding radio controls
 Loading...