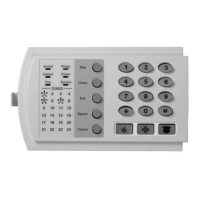
Programming the NX-148 LCD keypads
This section describes how to program the address and partition for each keypad, and it also
explains the options that are available. The address of the keypad is important because the
panel uses it to supervise the keypads.
The factory default for the Master code is [1]-[2]-[3]-[4] when using a 4-digit code, or [1]-[2]-
[3]-[4]-[5]-[6] for a 6-digit code. The factory default for the “Go To Program” code is [9]-[7]-[1]-
[3] when using a 4-digit code, or [9]-[7]-[1]-[3]-[0]-[0] for a 6-digit code.
[*]-[9]-[1] ADJUSTING THE VIEW / BRIGHTNESS OF THE LCD
1. Enter [*]-[9]-[1] The LCD screen will prompt for a “master” code.
2. Enter [master code] The LCD will now prompt you to increase or reduce
the viewing angle. By using the scroll keys to the right
of the LCD, you can increase or reduce the text-
viewing angle.
3. To advance to the brightness
option, press [*]
The LCD will prompt you to brighten or dim the LCD
lighting. Use the scroll keys again to set the desired
brightness. When completed, exit by pressing [*].
[*]-[9]-[2] PROGRAMMING CUSTOM MESSAGES IN THE KEYPAD
1. Enter [*]-[9]-[2] The LCD screen will prompt for the “Go To Program”
code.
2. Enter [program code] The LCD will now prompt you to enter the message
number followed by [#]. Zones 1 through 16 custom
messages are message numbers 1-16 respectively.
Message 193 - Custom message top line.
Message 194 - Custom message bottom line.
Message 195 – Shutdown message top line.
Message 196 – Shutdown message bottom line.
3. Enter message number to edit,
followed by [#]
The LCD will display the zone number on the top line.
The zone description will be displayed on the bottom
line. Use the instructions on page 29-30 to edit
character data.
4. When finished, exit by pressing [EXIT] while the LCD screen is prompting for a zone
message #. Any changes will automatically be copied to all other LCD keypads in the
system. NOTE: If you want a LCD keypad to have a different custom message, you must
enable custom message lock under the [*]-[9]-[3] function.
NX-4-EUR Installation manual Page 18 02/07/06
 Loading...