Home
JUKI
Sewing Machine
DP2100
JUKI DP2100 User Manual
5
of 1
of 1 rating
187 pages
Give review
Manual
Specs
To Next Page
To Next Page
To Previous Page
To Previous Page
−
3
−
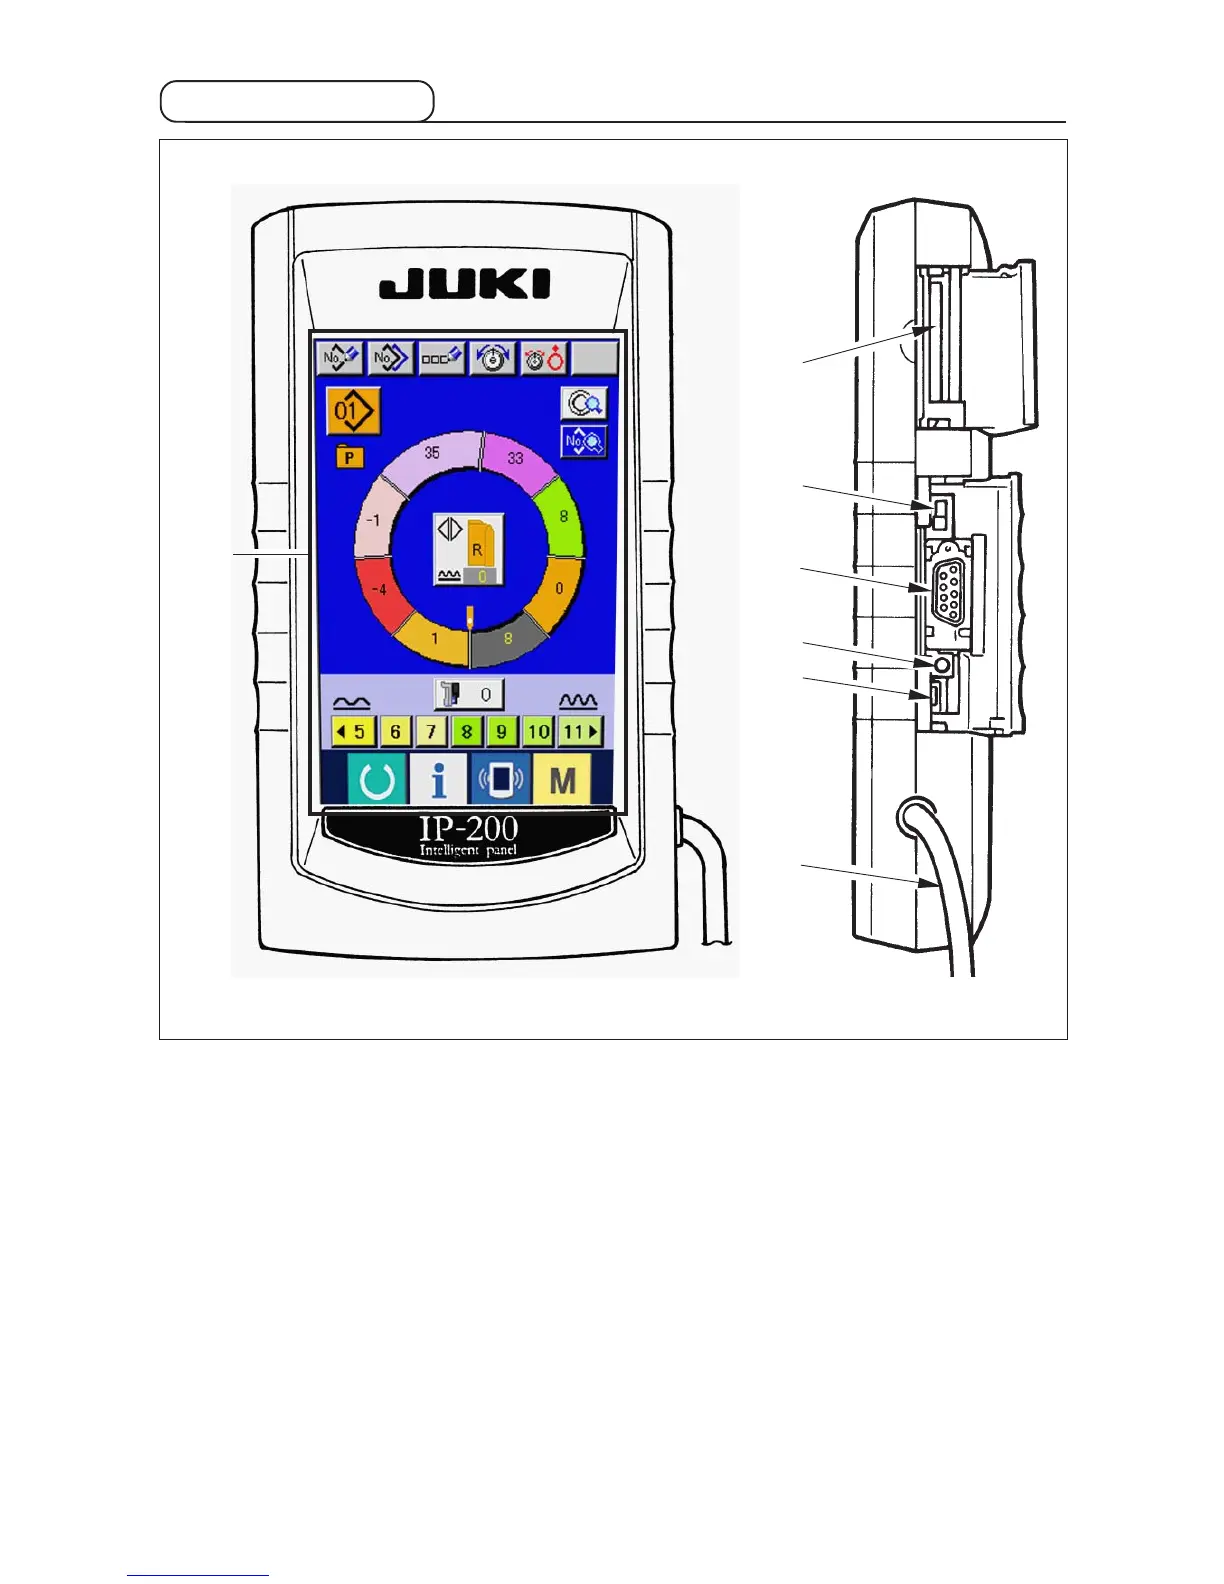
2-2 Operation panel
1
Touch panel, LCD display section
2
Smart media slot card (Use with the lid closed.)
3
Slide switch (Unused • OFF)
4
Connector for RS-232C communication
5
Variable resistor for adjusting color LCD screen contrast
6
Connector for external input
7
Cable
1
2
3
4
5
6
7
8
10
Table of Contents
Default Chapter
2
Table of Contents
2
1 Specifications
7
Specifications of the Machine Head
7
Specifications of the Control Box
7
2 Configuration
8
Sewing Machine Main Unit
8
Operation Panel
9
3 Installation
10
Caution at the Time of Set-Up
10
Assembling the Pedal Section of the Stand
11
Assembling the Table
12
Connecting the Power Cable
13
Installing the Sewing Machine Main Unit
13
Installing the Cover
14
Installing the Stopper for Tilt Prevention
14
Installing the Operation Panel
14
Connecting the Cords
15
Installing the Throat Plate Auxiliary Plate
16
Installing the Thread Guide Rod
16
Installing the Thread Stand
17
Assembling the Table for Work (WORK TOP TABLE)
17
4 Preparation before Operation
18
Attaching the Needle
18
Threading the Needle-Thread
18
Winding the Bobbin Thread
19
Setting the Bobbin into the Bobbin Case
19
Attaching and Removing the Bobbin Case
20
Adjusting the Thread Tension
20
Adjusting the Thread Take-Up Spring
20
Adjusting the Stitch Guide
20
5 Operation of the Sewing Machine (Semi-Automatic Basic Volume)
21
Data Input Scren
21
Sewing Screen
23
Details Data Input Screen
24
Feed Amount
26
Basic Operation of the Sewing Machine
27
Basic Change of the Set Value
31
Changing the Sewing Speed <Max. Sewing Speed Setting
31
Changing the Pitch <Pitch Setting
31
Changing the Needle Thread Tension <Needle Thread Tension Setting
32
Changing the Shirring Amount <Shirring Amount Setting
33
Changing the Shirring Amount of Auxiliary Feed <Auxiliary Feed Shirring Amount Setting
33
Creating the Pattern <Pattern Creation
34
Deleting the Pattern <Pattern Deletion
34
6 Operation of the Sewing Machine (Semi-Automatic Application Volume)
37
Increasing/Decreasing the Shirring Amount Immediately after Changeover of Step <Compensation Shirring Amount Setting
40
Adding the Step <Step Addition
41
Deleting the Step <Step Deletion
43
Naming the Pattern <Data Name Setting
48
Copying the Pattern <Pattern Copy
49
Pattern Copy in Semi-Automatic Mode <Copy to Semi-Automatic
49
Pattern Copying from Semi-Automatic to Fully-Automatic <Copy to Fully-Automatic
50
Creating the New Pattern <New Pattern Creation
51
Using the Other Functions
53
Directly Calling the Pattern from the Sewing Screen <Direct Pattern Selection
53
Adjust the STEP SELECTION Button to the Shape of Sleeve <Measure Function
53
7 Operation of the Sewing Machinre (Fully-Automatic Basic Volume)
54
Data Input Screen
54
Sewing Screen
56
Detailed Data Input Screen
57
Feed Amount
59
Basic Operation of the Sewing Machine
60
Changing the Basic Set Value
63
Changing the Sewing Machine Speed <Max. Sewing Speed Setting
63
Changing the Pitch <Pitch Setting
64
Changing the Needle Thread Tension <Needle Thread Tension Setting
64
Changing the Shirring Amount <Shirring Amount Setting
65
Changing the Shirring Amount of Auxiliary Feed <Auxiliary Feed Shirring Amount Setting
65
Creating the Pattern <Pattern Creation
66
Deleting the Pattern <Pattern Deletion
68
Correcting the Pattern
70
8 Operation of the Sewing Machine (Fully-Automatic Application Volume)
70
Changing the Length of Specified Step <Length between Steps Setting
70
Changing the Needle Thread Tension of Specified Step <Compensation Thread Tension Setting
71
Changing the Pitch of Specified Step <Compensation Pitch Setting
72
Increasing/Decreasing the Shirring Amount of All Steps <Shirring Amount Increase/Decrease Setting
74
Increasing/Decreasing the Shirring Amount Immediately after Changeover of Step <Compensation Shirring Amount Setting
75
Adding the Step <Step Addition
76
Deleting the Step <Step Deletion
78
Changing Gent's/Ladies' Wear Classification <Gent's/Ladies' Selection
80
Changing the Size <Size Change
81
Setting the Offset Value of Grading <Grading Value Setting
82
Changing the Start Position of Program <Start Position Change
83
Mirroring Function
84
Mirroring the Program of One Sleeve and Creating the Program of the Other One <Mirroring Function
84
Naming the Pattern <Data Name Setting
86
Copying the Pattern <Pattern Copy
87
Pattern Copy in the Fully-Automatic <Copy to Fully-Automatic
87
Pattern Copy from Fully-Automatic to Semi-Automatic <Copy to Semi-Automatic
88
Creating a New Pattern <New Pattern Creation
89
Using Other Functions
92
Directly Calling the Pattern from Sewing Screen <Direct Pattern Selection
92
Re-Registering the Length between Steps <Measure Function
93
9 Operation of the Sewing Machine (Manual Basic Volume)
94
Data Input Screen
94
Sewing Screen
95
Details Data Input Screen
96
Basic Operation of the Sewing Machine
97
Changing the Basic Set Value
98
Changing the Sewing Speed <Max. Sewing Speed Setting
98
Changing the Pitch <Pitch Setting
99
Changing the Needle Thread Tension <Needle Thread Tension Setting
100
10 Operation of the Sewing Machine (Manual Application Volume)
101
Changing the Detailed Set Value
101
Changing the Operating Mode of Auxiliary Pedal <Auxiliary Pedal Operation Selection
101
Changing the Auxiliary Feed Operating Mode <Auxiliary Feed Mode Selection
102
Setting the Auxiliary Feed Interlock Mode <Auxiliary Feed Interlock Mode Setting
104
Setting the Range of Shirring Amount <Shirring Amount Range Setting
106
Setting the Compensation Thread Tension <Compensation Thread Tension Setting
107
11 Using Counter
108
Setting Procedure of the Counter
108
Count-Up Releasing Procedure
111
12 Registering the Pattern to Direct Button
111
How to Register
111
Register State at the Time of Your Purchase
112
13 Changing Sewing Mode
113
14 Changing Memory Switch Data
114
Changing Procedure of Memory Switch Data
114
Memory Switch Data List
115
Explanation of Compensation Thread Tension
121
Explanation of Compensation Tension Manual (Numerical Value)
121
Explanation of Compensation Tension Manual (Level)
123
Explanation of Compensation Thread Tension Automatic
126
Explanation of the Shirring Smoothing Function
128
Explanation of the Motion of Shirring Smoothing Function
128
Setting of the Shirring Smoothing Function
129
Explanation of the Size Class
130
Size Development
132
15 Error Code List
133
16 Using Communication Function
138
Handling Possible Data
138
Performing Communication by Using the Smart Media
139
Performing Communication by Using RS-232C
141
Take-In of the Data
141
17 Information Function
144
Observing the Maintenance and Inspection Information
144
Inputting the Inspection Time
146
Releasing Procedure of the Warning
147
Observing the Production Control Information
148
When Displaying from the Information Screen
148
When Displaying from the Sewing Screen
149
Performing Setting of the Production Control Information
150
Observing the Working Measurement Information
153
18 Trial Sewing Function
156
Performing Trial Sewing
156
19 Performing Key Lock
158
20 Displaying Version Information
160
21 Using Check Program
161
Displaying the Check Program Screen
161
Performing the Auxiliary Pedal Setting
162
Performing Checking of A/D Value of Auxiliary Pedal
163
Performing LCD Check
163
Performing Touch Panel Compensation
164
Performing the Input Signal Check
166
Performing the Output Signal Check
168
22 Communication Screen of Maintenance Personnel Level
170
Data Which Are Possible to be Handledin Case of the Maintenance
170
Displaying Maintenance Personnel Level
171
23 Information Screen of the Maintenance Personnel Level
172
Display of Error Record
172
Display of the Cumulative Working Information
173
24 Maintenance
174
Replacing Procedure of Feed Belt
174
Replacing the Top Feed Belt
174
Replacing the Bottom Feed Belt
175
Replacing the Bottom Feed Roller
175
Changing the Amount of Alternate Vertical Movement of Walking Foot and Presser Foot
176
When Making Equal the Amount of Alternate Vertical Movement of Walking Foot and Presser Foot
177
When Making 2.5 MM the Amount of Alternate Vertical Movement
177
Adjusting the Height of the Walking Foot and the Presser Foot
178
Adjusting the Height of Walking Foot
178
Adjusting the Height of Presser Foot
178
Adjusting the Needle and the Hook
179
Adjusting the Height of Needle Bar
179
Adjusting the Hook
179
Adjusting the Thread Trimmer
180
Adjusting the Thread Trimmer Cam Timing
180
Adjusting the Initial Position of the Moving Knife
180
Adjusting the Initial Position of the Thread Trimmer Solenoid
180
Adjusting the Position of the Moving Knife and the Counter Knife
182
Greasing Parts
182
25 Others
183
Troubles in Sewing and the Corrective Measures
183
26 Drawing of the Table
184
Slant Table
184
Work Top Table
185
Edge Stopper a
186
Edge Stopper B
187
5
Based on 1 rating
Ask a question
Give review
Questions and Answers:
Need help?
Do you have a question about the JUKI DP2100 and is the answer not in the manual?
Ask a question
JUKI DP2100 Specifications
General
Brand
JUKI
Model
DP2100
Category
Sewing Machine
Language
English
Related product manuals
JUKI DU-140
24 pages
JUKI DDL 555
15 pages
JUKI DSU-145
272 pages
JUKI DDL 553
15 pages
JUKI DDL-8700
40 pages
JUKI DNU-1541
28 pages
JUKI DDL-900A
52 pages
JUKI DNU-261H
272 pages
JUKI DU-1181N
46 pages
JUKI DDL-5530
36 pages
JUKI DDL-9000
46 pages
JUKI DDL-9000B
26 pages