National Crane 3-29-2018 Control # 610-00 6-3
NBT40-1 SERIES OPERATOR MANUAL SET-UP
13. Use the jib jack (F, Figure 6-1) to align lower (C2) pin.
a. Remove the jack handle (G, Figure 6-1) from the
boom stowage bracket and check that the jack
release valve is closed.
b. Extend the jack (F, Figure 6-1) so that the lower (C2)
pin holes are aligned.
c. Install the lower (C2, Figure 6-1) pin and spring clip.
d. Open the jack release valve and retract the jack (F,
Figure 6-1.
14. Using hoist function, un-spool enough loadline to reeve
loadline over jib sheave case. Keep slight tension on
loadline to avoid bird caging of loadline on hoist drum.
15. Route loadline over jib sheave and install keeper. Install
line block to end of loadline.
16. Remove anti-two-block switch and weight/chain
assembly and install on jib tip, see Figure 6-10. Be
certain to use keeper provided with switch.
17. Disconnect anti-two- block cord going to boom anti-two-
block switch and attach to quick coupler on jib anti-two-
block wire on rear of jib between the upper and lower jib
ears.
18. Install jib swing pin (B, Figure 6-1) and spring clip into jib
ears.
19. For manually extendable jibs, pull extension retaining
pin (E, Figure 6-1), and extend second section out by
pulling on sheave case. The second section jib, as it
extends, will hit a mechanical stop that allows for
extension pin (E) installation. Install pin (E) and spring
clip.
20. Make ATB cord connections as required.
Stowing Procedure
Depending on the length of the jib extension being used; the
equipment can be equipped with either a two section or one
section jib. Certain stowing instructions may only be applied
to one or the other.
Always have at least one, if not both of the following in place
at all times:
• Side stow bracket must be completely engaged into
stow hook with stow pin A properly in place.
• Both pins C1, Figure 6-1 in upper and lower jib holes
must be properly in place through mating holes on boom
tip.
• Do not remove C1 pins from boom nose unless jib is
properly stowed and stow pin A is properly engaged and
secured.
1. Using lift function, lower boom so that jib deployment
pins (C1, Figure 6-1) and (C2, Figure 6-1) are easily
accessible from the ground.
NOTE: When lowering the boom below horizontal, the
operator may require the aid of an assistant while
operating the controls to retract the boom. With the
telescope control in neutral, the boom may creep
out when below horizontal.
2. Two section jib - For manually extendable jibs, pull
extension retaining pin (E, Figure 6-1) and fully retract
extendable 2
nd
section jib into the 1
st
section. Retraction
of 2
nd
section may be facilitated by attaching loadline
wedge socket to jib nose. Slowly activate the hoist up
function until the 2
nd
section is fully retracted.
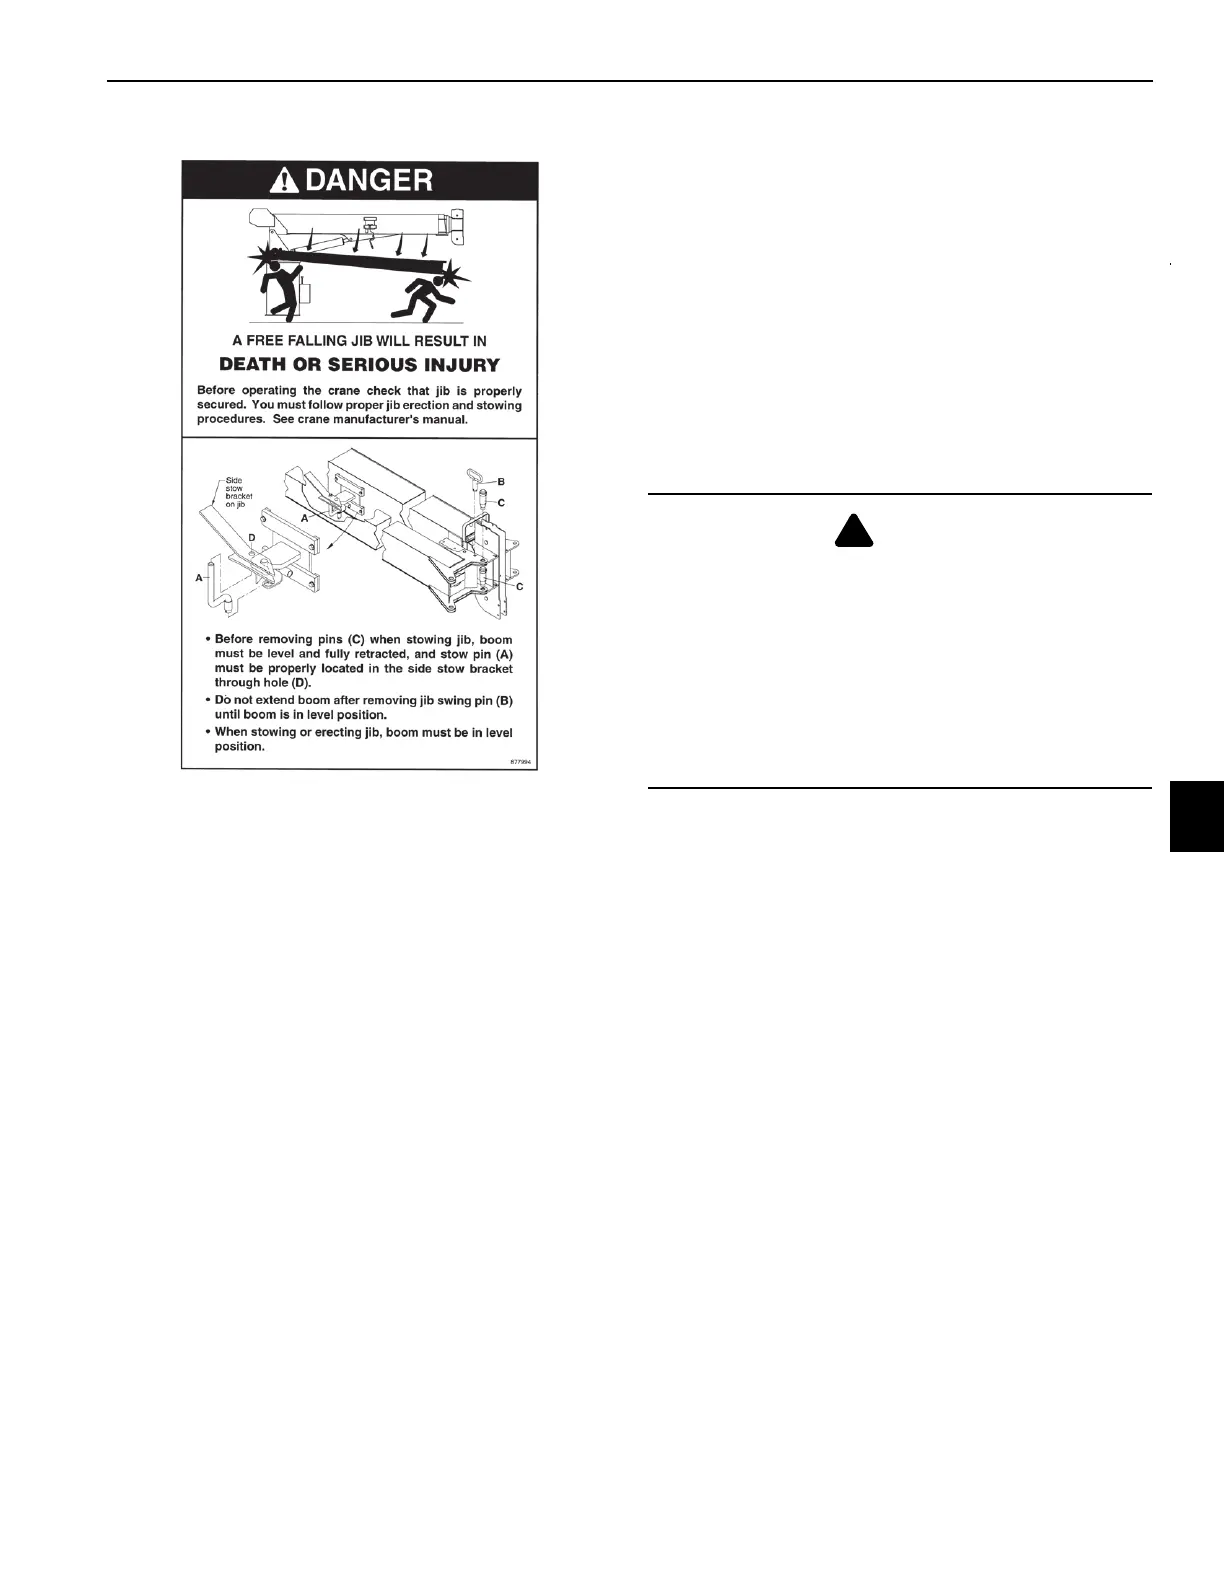
DANGER
Visually check all pin positions when stowing the jib and
ensure the jib is fully engaged into the side stow brackets,
jib stow attachment is secure, and all pins and spring clips
are in their proper locations. Failure to properly secure the
jib during stowing and erecting may allow the jib to fall.
Serious personal injury or death could result.
When jib is stowed, do not remove stow pin A unless both
C1 pins are properly in place through mating holes on the
boom.

 Loading...