Home
Ricoh
All in One Printer
AFICIO 1055
Ricoh AFICIO 1055 User Manual
4
of 1
of 1 rating
468 pages
Give review
Manual
Specs
To Next Page
To Next Page
To Previous Page
To Previous Page
Loading...
Cop
ying
154
2
A
A
A
A
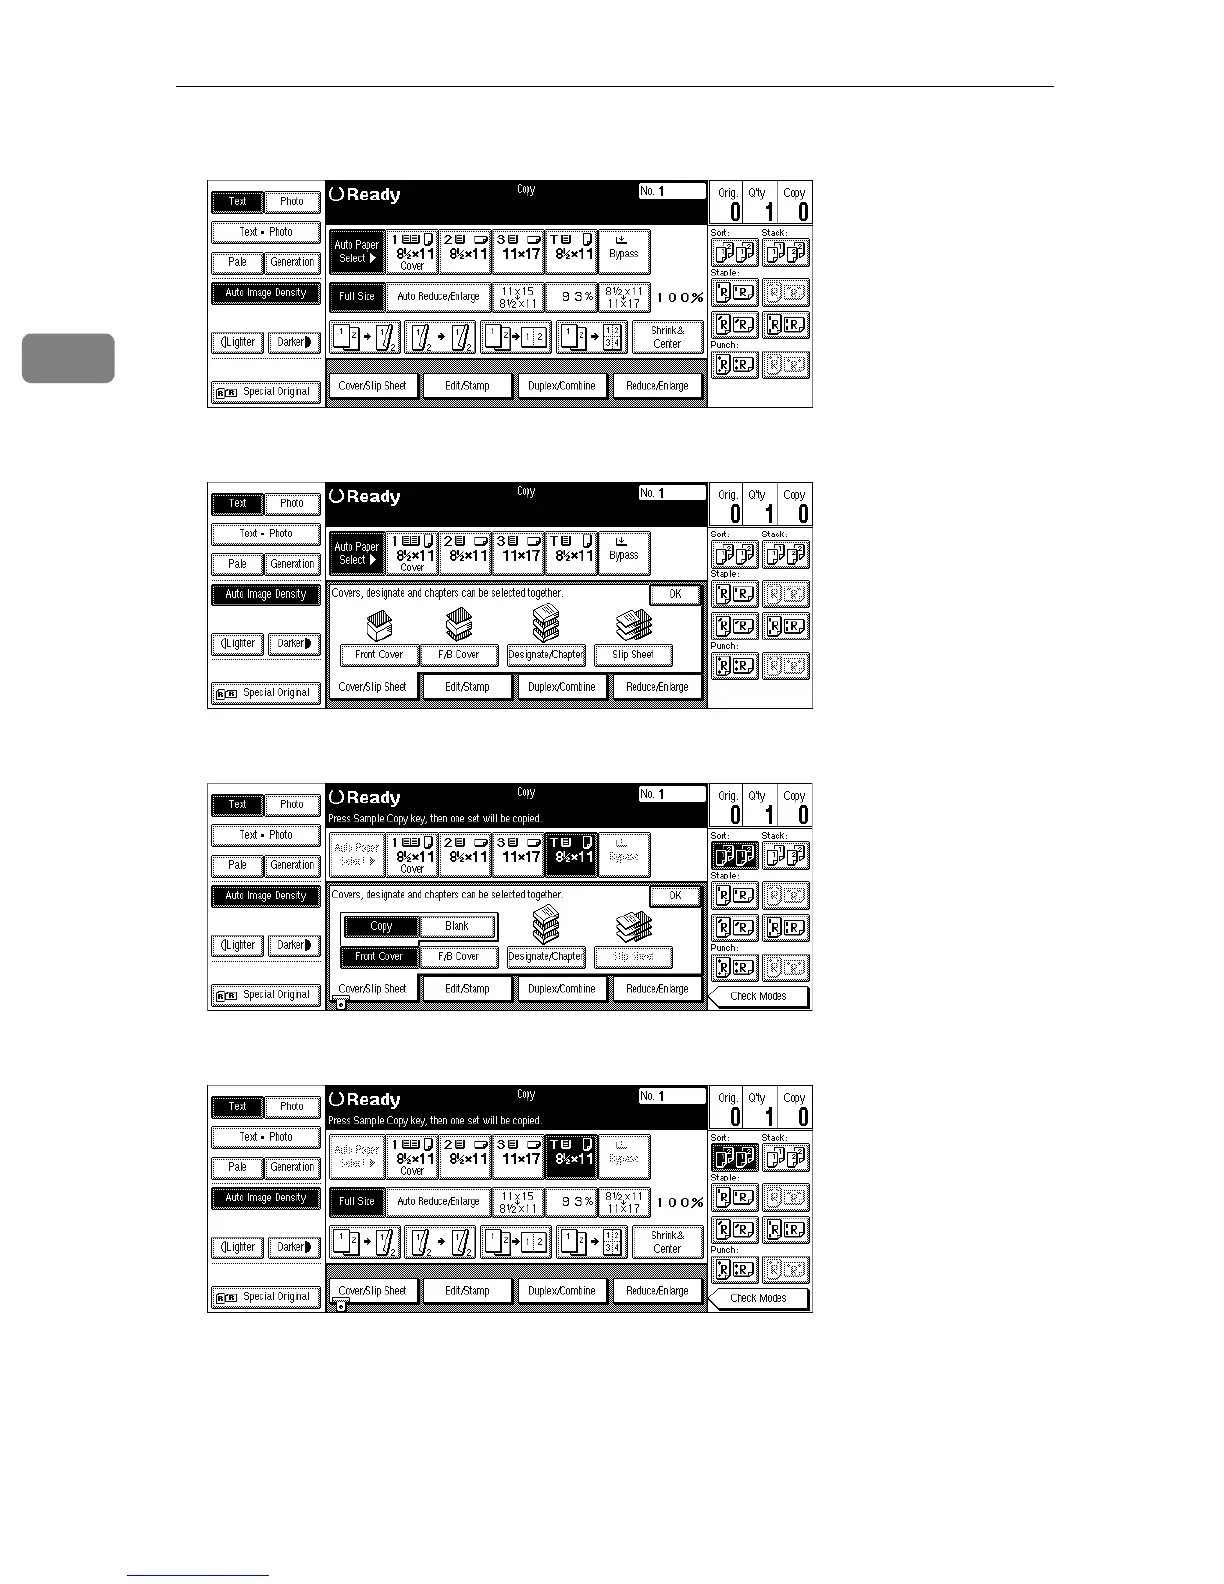
Press the
[
Cov
er/Sli
p Sheet
]
key.
B
B
B
B
Press the
[
Fron
t Cover
]
key.
C
C
C
C
Select
[
C
opy
]
or
[
Blank
]
for a cover sheet, and then press
the
[
OK
]
key.
D
D
D
D
Select
the paper t
ray co
ntaini
ng the no
n-co
ver sheet
paper
.
E
E
E
E
Set your origin
als in the document feeder, then press the
{
{
{
{
Start
}
}
}
}
key.
161
163
Table of Contents
Table of Contents
3
Default Chapter
1
Operating Instructions
1
Safety Information
9
Safety During Operation
9
Positions of Labels and Hallmarks for R
11
R R R R R Caution
11
R WARNING and R
11
How to Read this Manual
12
What You Can Do with this Machine (Copy Mode)
14
Guide to Components
16
Output Tray Guide
18
Ventilation Hole
18
Options
19
Control Panel
20
Screen Contrast Knob
20
Display Panel
22
Displays and Key Operations
22
Function List Based on Options
25
Basics
29
Turning on the Power
29
Turning on the Main Power
29
Starting the Machine
30
Shutting down the Machine
30
Turning off the Main Power
30
Originals
31
Sizes and Weights of Recommended Originals
31
Sizes Detectable by the Auto Paper Select
32
Missing Image Area
33
Copy Paper
34
Recommended Paper Sizes and Types
34
Non-Recommended Paper
36
Paper Storage
37
Toner
38
Handling Toner
38
Toner Storage
38
Used Toner
38
Copying
39
Basic Procedure
39
Auto Reset
40
Setting Originals
41
Setting Originals on the Exposure Glass
42
Setting Originals in the Document Feeder
43
Original Orientation
44
Setting Special Originals
46
Basic Functions
50
Adjusting Copy Image Density
50
Selecting Original Type Setting
52
Selecting Copy Paper
54
Rotated Copy
56
Auto Reduce/Enlarge
57
Copying Onto Tab Stock
59
Sort/Stack/Staple
63
Sort
64
Stack
67
Staple
69
To Stop Scanning Temporarily
73
When Memory Reaches 0
74
To Remove the Paper from the Staple Unit
74
Punch
75
Copying from the Bypass Tray
78
When Copying Onto OHP Transparencies or Thick Paper
81
Programs
83
Storing a Program
84
Changing a Stored Program
85
Deleting a Program
86
Recalling a Program
87
Job Preset
88
Editing Job Preset
90
Deleting Job Preset
91
Other Functions
93
Energy Saver Mode
93
Interrupt Copy
94
User Codes
95
Auto Start
96
Original Beeper
96
Sample Copy
97
Changing the Number of Sets
98
Preset Reduce/Enlarge
100
Shrink&Center Mode
102
Zoom
103
Size Magnification
105
Directional Magnification (%)
107
Directional Size Magnification (Inch)
110
Duplex/Combine
113
Original Direction and Completed Copies
115
Originals and Copy Direction
116
Specifying Orientation of Bound Originals
116
Duplex
118
❖ ❖ ❖ ❖ 1 Sided → → → → 2 Sided
118
Combine
123
1 Sided 2 Pages → → → → Combine 1 Side
125
1 Sided 4 Pages → → → → Combine 1 Side
127
1 Sided 8 Pages → → → → Combine 1 Side
128
1 Sided 4 Pages → → → → Combine 2 Side
130
1 Sided 8 Pages → → → → Combine 2 Side
131
1 Sided 16 Pages → → → → Combine 2 Side
133
2 Sided 2 Pages → → → → Combine 1 Side
136
2 Sided 4 Pages → → → → Combine 1 Side
137
2 Sided 8 Pages → → → → Combine 1 Side
139
2 Sided 4 Pages → → → → Combine 2 Side
140
2 Sided 8 Pages → → → → Combine 2 Side
142
2 Sided 16 Pages → → → → Combine 2 Side
144
Series/Book
146
Series Copies
147
Copying Book Originals
150
Cover/Slip Sheet
160
Front Cover
161
Front/Back Covers
163
Designate
165
Chapters
168
Slip Sheets
171
Double Copies
174
Image Repeat
176
Margin Adjustment
179
Erase
181
Border Erase
182
Center Erase
185
Center/Border Erase
187
Centering
190
Stamp
192
Background Numbering
192
Preset Stamp
194
User Stamp
198
Date Stamp
205
Page Numbering
209
Combination Chart
217
Document Server
219
Overview
219
Document Server Features
219
Features and Benefits
220
On Demand Printing
220
File Merge Printing
221
Scanning Originals
222
Printing Saved Documents
226
Sample Printing
228
Print First Page
228
To Search by File Name
229
Deleting Saved Documents
230
Connect Copy (Option)
233
What Is Connect Copy
233
How Connect Copy Works
235
Connectable Copier
235
Functions Not Available with Connect Copy
235
Interrupt Functions
236
Before You Start
236
Connect Copy Display Panel
237
Using Connect Copy
240
Auto off
245
Exiting Connect Copy Mode
246
Printing Saved Documents with Connect Copy
247
Relationship between Master Unit and Sub-Unit System Settings
250
Relationship between Master Unit and Sub-Unit Copy/Document Server Features
253
Troubleshooting
257
If Your Machine Does Not Operate as You Want
257
General
257
Document Server
260
Display
261
If Connect Copy Is Cleared
263
If You Cannot Exit Connect Copy
264
If You Cannot Make Clear Copies
266
If You Cannot Make Copies as You Want
267
General
267
Adjust Image
268
Combine
268
Duplex
269
Stamp
269
When Memory Is Full
270
B Loading Paper
271
Loading Paper in Tray 1 (Tandem Tray)
271
Loading Paper in Tray 2 or 3
273
Loading Paper in the Large Capacity Tray
274
D Changing the Toner Bottle
276
Clearing Misfeeds
278
Changing the Paper Size
286
Changing the Paper Size in Tray 2
286
Adding Staples
289
50-Sheet Finisher
289
Removing Jammed Staples
291
50-Sheet Finisher
291
Removing Punch Waste
293
50-Sheet Finisher
293
User Tools (Copy/Document Server Features)
295
Accessing the User Tools (Copy/Document Server Features)
295
Exiting from the User Tools
296
User Tools Menu (Copy/Document Server Features)
298
Settings You Can Change with the User Tools
300
General Features 1 / 3
300
General Features 2 / 3
303
General Features
303
Reproduction Ratio
305
Reproduction Ratio
306
Page Format
307
Page Format 2 / 2
307
Stamp Setting
311
Input/Output
317
Count Manager
319
Remarks
321
Do's and Don'ts
321
Where to Put Your Machine
322
Machine Environment
322
Moving
323
Power Connection
323
Access to the Machine
324
Maintaining Your Machine
325
Cleaning the Exposure Glass
325
Cleaning the Document Feeder
325
Specifications
327
Mainframe
327
Document Feeder
330
50-Sheet Finisher (Option)
331
Punch Kit (Option)
333
Output Tray (Option)
334
Large Capacity Tray (LCT) (Option)
335
Copy Connector Cable (Option)
336
Index
337
Table of Contents
347
Notice
349
ENERGY STAR Program
350
How to Read this Manual
352
Manuals for this Machine
353
Keys for the User Tools (System Settings)
355
User Tools (System Settings)
355
Accessing the User Tools (System Settings)
356
Exiting from the User Tools
357
User Tools Menu (System Settings)
358
Settings You Can Change with the User Tools
359
Basic
359
Basic
362
Set Time
363
Paper Size Setting
365
Count Manager
368
Index
369
Printer Controller
373
Table of Contents
375
Default Chapter
377
Manuals for this Machine
377
How to Read this Manual
378
1 Getting Started
379
Connecting the Machine
379
Requirements
379
Connecting the Machine Using Network Interface Board Type 450-E
381
Connecting the Machine to the Host Using the Parallel Interface Cable
382
Features of this Machine
383
Printer Drivers for this Machine
384
Software and Utilities Included on the CD-ROM
385
Guide to this Machine
386
Control Panel
386
Display Panel
387
Configuring the Printer for the Network with the Control Panel
389
Protecting the Network Menu
390
3 Installing the Printer Driver
393
Installation Method
393
Quick Install
394
Installing the PCL 6/5E Printer Driver
396
Installing the Postscript 3 Printer Driver
398
Windows 95/98/Me - Installing the Postscript 3 Printer Driver
398
Windows 2000/XP - Installing the Postscript 3 Printer Driver
400
Windows NT 4.0 - Installing the Postscript 3 Printer Driver
402
Mac os - Installing the Postscript 3 Printer Driver and Utilities
404
Mac os X - Installing the Postscript 3 Printer Driver
406
Installing the Smartnetmonitor for Client / Admin
407
Installing the Agfa Monotype Font Manager 2000
408
Using Adobe Pagemaker Version 6.0, 6.5 or 7.0
409
Index
410
Table of Contents
415
Manuals for this Machine
417
How to Read this Manual
418
1 Uninstalling the Printer Driver
419
Windows 95/98/Me - Uninstalling the Printer Driver
419
Windows 2000/XP - Uninstalling the Printer Driver
419
Windows NT 4.0 - Uninstalling the Printer Driver
420
Mac os - Uninstalling the Postscript 3 Printer Driver
420
Mac os X - Uninstalling the Postscript 3 Printer Driver
420
Accessing the Printer Properties
421
Windows 95/98/Me - Accessing the Printer Properties
421
Windows 2000/XP - Accessing the Printer Properties
422
Windows NT 4.0 - Accessing the Printer Properties
424
Macintosh - Setting up for Printing
426
2 Setting up the Printer Driver and Cancelling a Print Job
421
Cancelling a Print Job
427
Windows - Cancelling a Print Job
427
Macintosh - Cancelling a Print Job
428
Error & Status Messages on the Control Panel
431
3 Troubleshooting
431
Machine Does Not Print
436
Other Printing Problems
437
Adjusting Printer Features
439
Printer Features Menu
439
4 Using the Control Panel
439
Printer Features Parameters
442
Pcl
442
Postscript
443
Paper Feed
444
Parallel
446
Network
447
Configuration
448
List Print
449
Reset Select
449
Printer Condition
450
Adjusting System Settings
451
Accessing the System Settings
451
System Settings Parameters
452
Printing with the Control Panel
456
Using the Sample Print
456
Using the Locked Print
458
Accessing the Document Server
459
5 Appendix
461
Staple and Punch Position
461
Specifications
463
Options
464
Index
465
4
Based on 1 rating
Ask a question
Give review
Questions and Answers:
Need help?
Do you have a question about the Ricoh AFICIO 1055 and is the answer not in the manual?
Ask a question
Ricoh AFICIO 1055 Specifications
General
Brand
Ricoh
Model
AFICIO 1055
Category
All in One Printer
Language
English
Related product manuals
Ricoh Aficio 1022
313 pages
Ricoh Aficio 1075
776 pages
Ricoh Aficio 1060
776 pages
Ricoh Aficio 1018
32 pages
Ricoh Aficio 1027
313 pages
Ricoh Aficio 1015
32 pages
Ricoh aficio 1013F
384 pages
Ricoh Aficio SP 100SU e
76 pages
Ricoh Aficio SP 100SF e
140 pages
Ricoh Aficio 1515
68 pages
Ricoh Aficio MP 161
6 pages
Ricoh Aficio MP 1600/MP 2000
6 pages
 Loading...


