25
GB
Getting Started
Notes
• The Auto Calibration function does not work when
headphones are connected.
• If the muting function has been activated before
you perform Auto Calibration, the muting function
will be set to off automatically.
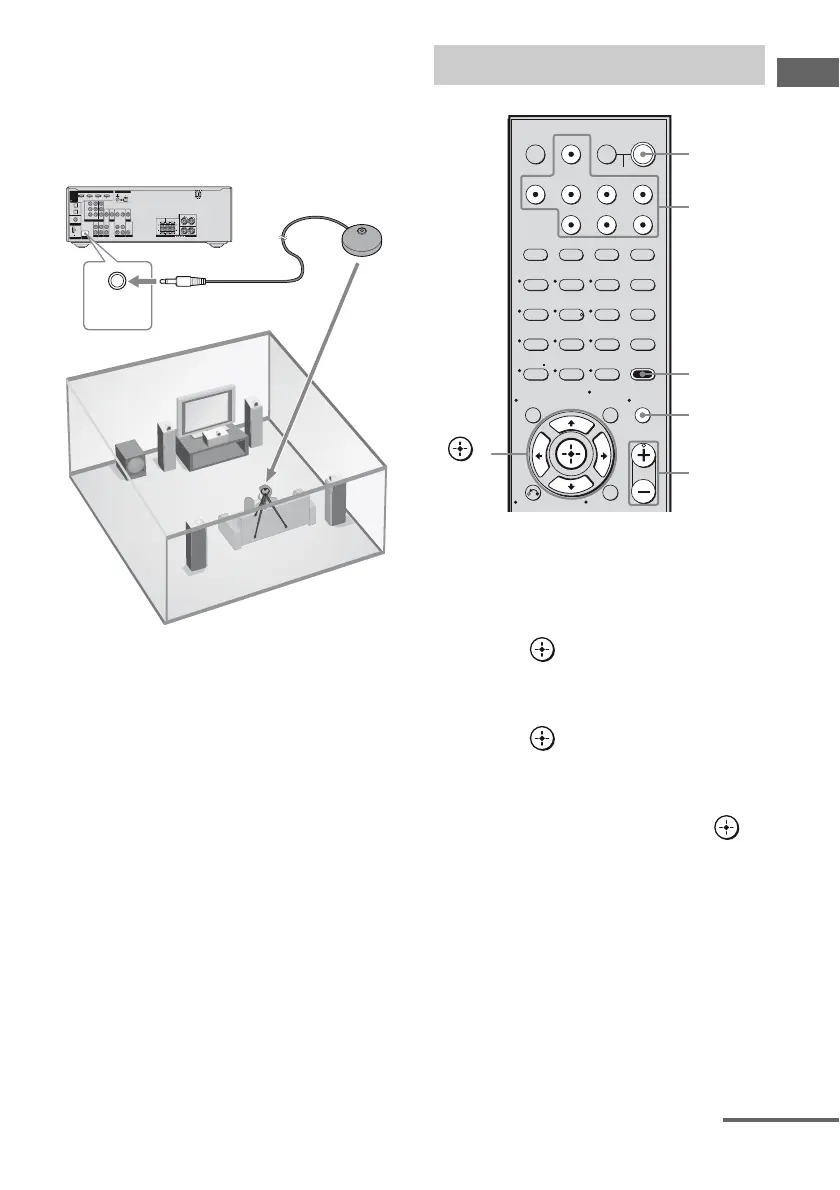
1 Connect the supplied optimizer
microphone to the AUTO CAL
MIC jack on the rear panel.
2 Set up the optimizer
microphone.
Place the optimizer microphone at your
listening position.You can also use a stool
or tripod so that the optimizer
microphone remains at the same height as
your ears.
Tip
When you face the speaker towards the optimizer
microphone, you will get a more accurate
measurement.
1 Press AMP MENU.
2 Press V/v repeatedly to select
“8-A. CAL”.
3 Press or b to enter the
menu.
“AUTO CAL” appears on the display.
4 Press or b to enter the
parameter.
5 Press V/v repeatedly to select
“A.CAL YES”, then press .
Measurement starts in 5 seconds and the
display changes as follows:
A.CAL [5] t A.CAL [4] t A.CAL [3]
t A.CAL [2] t A.CAL [1]
While the time is counting down, stand
away from the measurement area to avoid
measurement error.
The measurement process will take a few
minutes to complete.
BD
IN
DIGITAL
COMPONENT VIDEO
DMPORT
SA-CD
/
CD
DC5V 0.7A MAX
OPTICAL
COAXIAL
SAT
IN
SAT IN
IN
TV
IN
SAT
AUDIO
IN
DVD IN MONITOR
OUT
DVD
IN
Y
P
B
/
C
B
P
R
/
C
R
VIDEO
IN
VIDEO
AUDIO
OUT
AUDIO
OUT
VIDEO
OUT
AUDIO
IN
VIDEO
IN
DVD
VIDEO
IN
MONITOR
SUBWOOFER
VIDEO
OUT
AM
SURROUNDCENTER
L
L
R
R
SPEAKERS
FRONT
R
L
ANTENNA
SAT IN DVD IN BD IN OUT
HDMI
CONNECT
TO
DIGITAL
INPUT
FOR
AUDIO
AUTO CAL
MIC
AUTO CAL
MIC
Optimizer microphone
Performing Auto Calibration
123
46
78
0/10
ENTER
9
SYSTEM STANDBY
TV INPUT
SLEEP DMPORT
VIDEO BD DVD SAT
2CH A.F.D.
RETURN/EXIT
MOVIE MUSIC
MEMORY AMP MENU
CLEAR
DISPLAY MUTING
MASTER VOL
TV VOL
D.SKIP
D.TUNING
DVD/BD
MENU
SA-CD/CDTV TUNER
?/1
-
5
>10/
TV
?/1
AV
?/1
TOOLS/
OPTIONS
MENU/HOME
Input
buttons
?/1 switch
MUTING
MASTER
VOL +/–
AMP
MENU
V/v/B/b,
continued
 Loading...