EasyManua.ls Logo

Sony ZS-X3CP User Manual

Sony ZS-X3CP
56 pages
To Next Page IconTo Next Page
To Previous Page IconTo Previous Page
Page #5 background imageLoading...
Page #5 background image
5
ZS-X3CP
SECTION 2
GENERAL
4
Playing an audio CD or MP3 files
Connect the supplied AC power adaptor (see page 18).
1
Press POWER (US, Canadian models) or OPERATE
to turn on the player.
2
Press Z PUSH down to open the CD
compartment and place the CD on
the CD compartment until it clicks
into place.
3
Close the lid of the CD compartment.
With the label side up
1
42, 3
Basic Operations
(Except US, Canadian models)
Basic
Operations
5
Display
Playing
time
Track
number
To Do this
adjust the volume Press VOLUME +*, –.
stop playback Press x.
pause playback Press u*.
Press the button again to
resume play after pause.
go to the next track Push jog lever toward >.
go back to the previous track Push jog lever toward ..
remove the CD** Press Z PUSH.
turn on/off the player Press POWER.
* The button has a tactile dot.
**Once you open the CD compartment, the track to start play will
change to the beginning of the first track.
Tip
Playback starts from the
track you last stopped
playing (Resume play).
During stop, the track
number to be played are
displayed.
To cancel the resume play
to start play from the
beginning of the first track,
press x in stop mode.
u
POWER (US, Canadian models)
OPERATE
(Except US, Canadian models)
VOLUME +, –
x
Z PUSH
continued
4 Press u.
The player plays all the tracks once.
To play a CD with MP3 files, see
page 6.
Jog lever
Use these buttons for additional operations
(US, Canadian models)
Press OPERATE.
(Except US, Canadian models)
6
Note
Before playing a file, this
player reads all file and
folder information on the
CD. Depending on the
file structure, it may take
more than a minute to
read them. During this
time, “Reading” is
displayed.
Tip
You can use the buttons
mentioned in the table on
page 5 for additional
operations in the same
way as when playing an
audio CD.
Playing a CD with MP3 files
1 Press POWER (US, Canadian models) or ORERATE
to turn on the player.
2 Press Z PUSH to open the CD compartment and place
the CD on the CD compartment (see page 4) .
3 Close the lid of the CD compartment.
4 Press u.
The player plays all MP3 files on the CD.
When you play a CD with MP3 files, the MP3
indicator lights up.
To select a folder
Push the jog lever toward FLDR + to go forward and
FLDR – to go backward.
To select a file
Push the jog lever toward > to go forward and . to
go backward.
Track number
Folder name
u
Jog lever
MP3 indicator
POWER (US, Canadian models)
OPERATE
(Except US, Canadian models)
File name
Playing time
Z PUSH
Playing an audio CD or MP3 files (continued)
(Except US, Canadian models)
Basic Operations
7
CD-R
CD-RW
3
2
1
2
4
5
3
6
7
8
4
9
5
0
6
1
Example of folder structure and playing
order
The playing order of the folders and files is as follows:
MP3 file
Notes
¥ A folder that does not
include an MP3 file is
skipped.
¥ Maximum number of
folders: 255
Maximum number of files:
255
¥ Folder names and file
names can be displayed
with up to 64 characters.
¥ The characters A - Z, a - z,
0 - 9, and _ can be
displayed on this player.
Other characters are
displayed as *.
¥ This player conforms to
Version 1.1 of the ID3 tag
format. If the file has the
ID3 tag information, song
title, artist name and
album name can be
displayed.
Folder
Ver 1.1
This section is extracted from
instruction manual.

Other manuals for Sony ZS-X3CP

Question and Answer IconNeed help?

Do you have a question about the Sony ZS-X3CP and is the answer not in the manual?

Sony ZS-X3CP Specifications

Audio Specifications IconAudio Specifications
digital filter8X Oversampling
digital to analog conversion1 Bit
cd frequency response20-20000Hz, +1, -2dB
Tuner Specifications IconTuner Specifications
tuner frequency range AM530-1710kHz
tuner frequency range FM87.6-108MHz
antenna system AMBuilt-in Ferrite Bar Antenna
antenna system FMTelescopic Antenna
Speaker Specifications IconSpeaker Specifications
speakers4" (10cm) x 2
outputsHeadphone (stereo mini jack)
Power IconPower
power requirements batteries“D” x 6 Batteries (optional)
power requirements ACAC 120V, 60Hz
inputsDC In
Weight and Dimensions IconWeight and Dimensions
dimensions16 [7]⁄8" x 6 [3]⁄4" x 11 [1]⁄4" (430 x 172 x 287.5mm)
weight8 lbs 8 [2]⁄3 oz (3.8kg) w/batteries

Summary

SPECIFICATIONS

AUDIO POWER SPECIFICATIONS

Describes audio output power and distortion.

Other Specifications

Details on CD player and radio sections.

General Specifications

Covers speaker, outputs, power requirements, and dimensions.

IMPORTANT SAFETY INFORMATION

Repair Precautions

Notes on handling components and circuit boards during repair.

Safety Leakage Test

Procedure to check for AC leakage from exposed metal parts.

MP3 and Media Compatibility

Information on playable CD formats and MP3 files.

SERVICING NOTES

Optical Pick-up Handling

Precautions for handling the optical pick-up block to prevent damage.

Laser Diode Emission Check

Procedure for checking laser diode emission and focus search.

GENERAL OPERATIONS

Playing CDs (Audio & MP3)

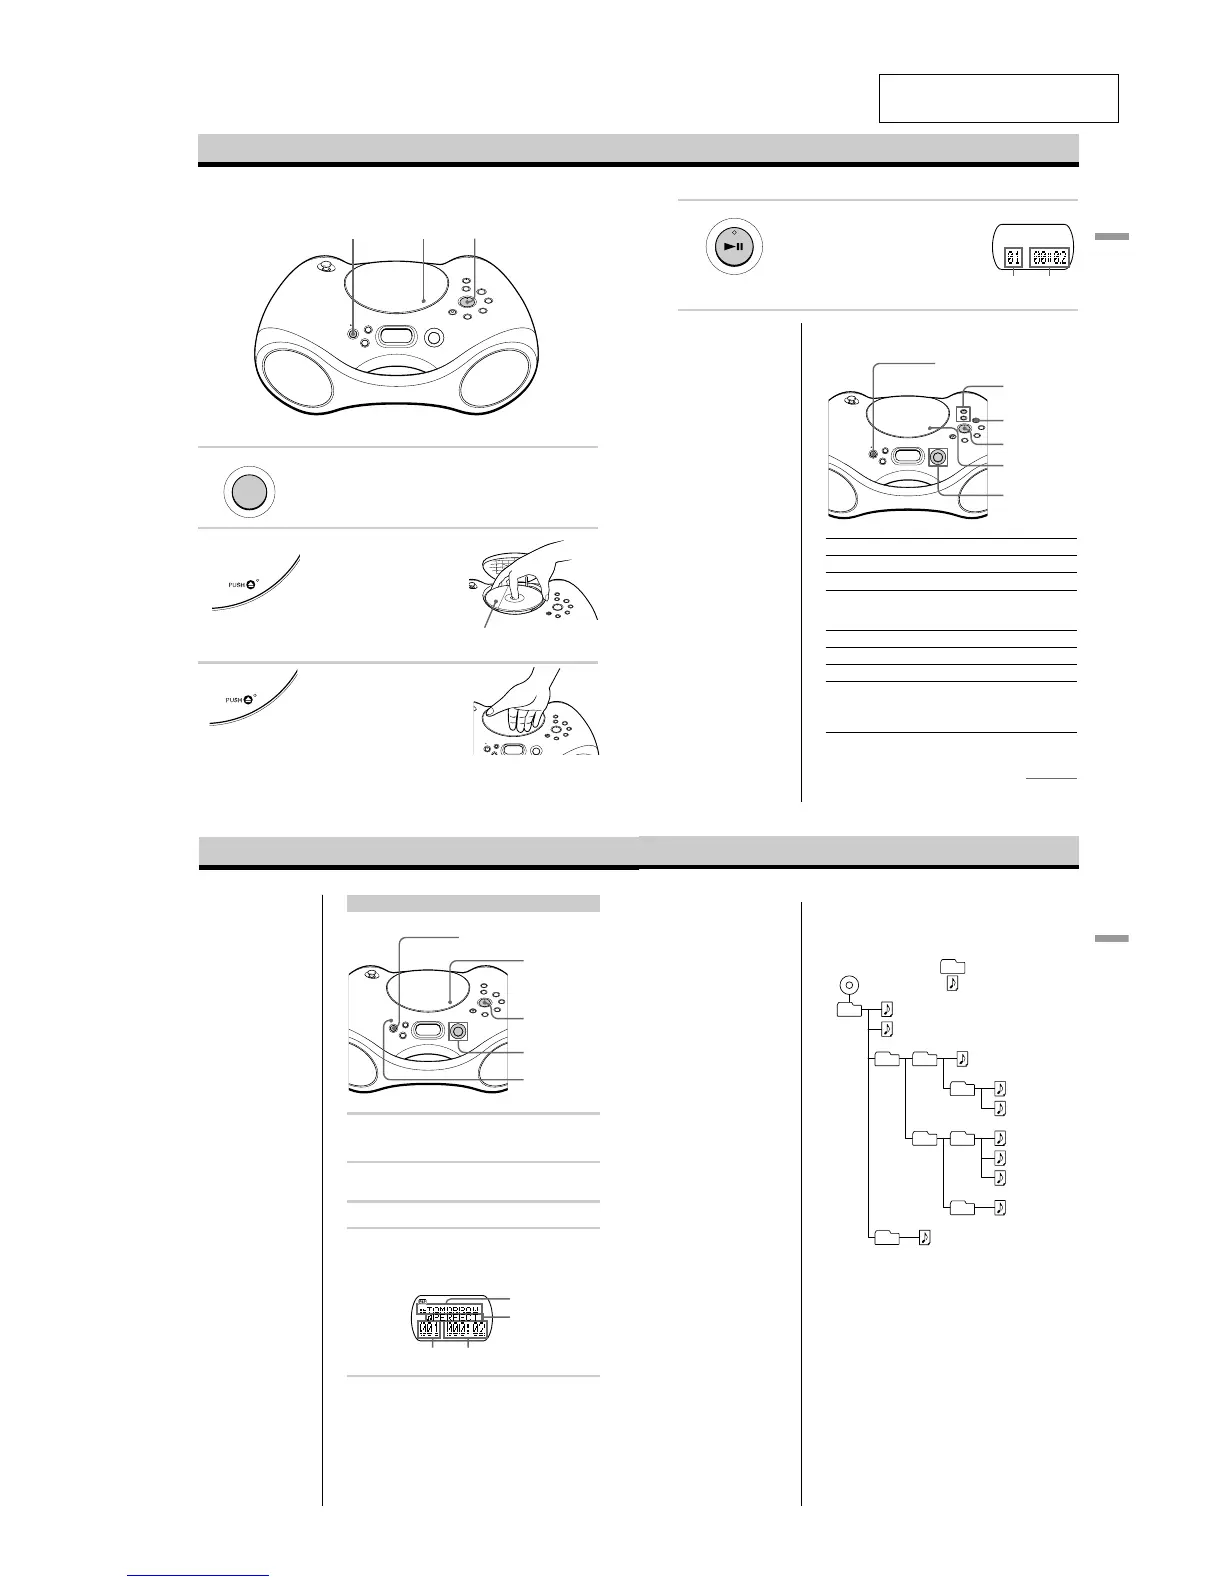
Instructions for playing audio CDs and MP3 files.

Listening to the Radio

Instructions for tuning and listening to radio stations.

DISASSEMBLY PROCEDURES

Disassembly Flow Chart

Visual guide to the sequence of disassembly steps.

Cabinet and Antenna Removal

Steps to remove the lower cabinet and telescopic antenna.

Tuner and Control Board Removal

Steps for removing the tuner and control boards.

CDMP3 Board Removal

Steps to remove the CDMP3 board.

Optical Pick-up Section Removal

Steps to remove the optical pick-up section.

Sled Motor Assembly Removal

Steps to remove the sled motor assembly.

Optical Pick-up (KSS-900A) Removal

Steps to remove the optical pick-up unit.

Front Cabinet Section Removal

Steps to remove the front cabinet section.

Speaker Removal

Steps to remove the left and right speakers.

CD Lid Removal

Steps to remove the CD lid.

ELECTRICAL ADJUSTMENTS

Tuner Section Adjustments

Procedures for AM/MW/LW and FM tuner adjustments.

Adjustment Locations

Diagrams showing the location of adjustment points on tuner boards.

CD SECTION TESTING

CD Test Mode Entry

Procedure to enter CD test mode for diagnostics.

Focus Bias and Traverse Checks

Procedures for checking focus bias and traverse operations.

SCHEMATICS AND DIAGRAMS

CD Section Block Diagram

Block diagram illustrating the CD section's signal flow.

Tuner Section Block Diagram

Block diagram illustrating the tuner section's signal flow.

Main Section Block Diagram

Block diagram illustrating the main control and power sections.

Schematic and PCB Notes

Notes on interpreting schematics and printed wiring boards.

Circuit Board Locations

Diagrams indicating the physical location of circuit boards.

Waveform Examples

Oscilloscope waveform examples for various ICs in the CD section.

CD Section Printed Wiring Boards

Component and conductor side views of CD section PCBs.

CD Section Schematic (Part 1)

Detailed schematic for the CD section (first half).

CD Section Schematic (Part 2)

Detailed schematic for the CD section (second half).

Tuner Section PCB (US/Canadian)

Printed wiring board layout for the tuner section (US/Canadian models).

Tuner Section Schematic (US/Canadian)

Schematic diagram for the tuner section (US/Canadian models).

Tuner Section PCB (Other Models)

Printed wiring board layout for tuner section (non-US/Canadian models).

Tuner Section Schematic (Other Models)

Schematic diagram for tuner section (non-US/Canadian models).

Control Section Printed Wiring Boards

Printed wiring board layouts for control, LCD, button, and enter boards.

Control Section Schematic

Schematic diagram for the control section, including connections to other boards.

Audio/Power Section PCBs

Printed wiring board layouts for audio, jack, and battery boards.

Audio/Power Section Schematic

Schematic diagram for the audio/power section, including jack and battery boards.

IC Block Diagrams

Block diagrams for key ICs in the CDMP3 and Tuner sections.

IC Pin Function Descriptions

Detailed pin function descriptions for IC703 (MP3 Decoder).

EXPLODED VIEWS

Cabinet Lower Section

Exploded view and parts list for the lower cabinet assembly.

Cabinet Front Section

Exploded view and parts list for the front cabinet assembly.

Upper Cabinet Section-1

Exploded view and parts list for the upper cabinet assembly (part 1).

Upper Cabinet Section-2

Exploded view and parts list for the upper cabinet assembly (part 2).

Upper Cabinet Section-3

Exploded view and parts list for the upper cabinet assembly (part 3).

Main Chassis Section

Exploded view and parts list for the main chassis.

Optical Pick-up Section

Exploded view and parts list for the optical pick-up unit.

ELECTRICAL PARTS LIST

Audio Board Parts

Detailed list of electrical components for the audio board.

Battery, Button Power, and CDMP3 Board Parts

Component lists for battery, button power, and CDMP3 boards.

CDMP3 Board Components

Detailed component listings for the CDMP3 board.

Control Board Components

Detailed component listings for the control board.

Control, Enter, Jack, and LCD Board Parts

Component lists for control, enter, jack, and LCD boards.

Relay and Tuner Board Parts

Component lists for relay and tuner boards.

Tuner Board Components

Detailed component listings for the tuner board.

Tuner, Volume, and Miscellaneous Parts

Component lists for tuner, volume, miscellaneous items, and accessories.

Related product manuals