PSR-A3000 Owner’s Manual 125
Styles
2
A Style is made up of the different Sections (Intro, Main, Ending, etc.) and each Section has separate channels
(rhythm pattern, bass line, chord backing, pad, or phrase, each of which is referred to as a “Source Pattern”). With
the Style Creator function, you can create an original Style by separately recording the channels, or by copying
pattern data from other existing Styles.
Basic Procedure for Creating a Style
1 Select the desired Style to be used as the basis for the new Style.
2 Call up the Style Creator display.
[FUNCTION] TAB [F] MENU 2 [A] STYLE CREATOR
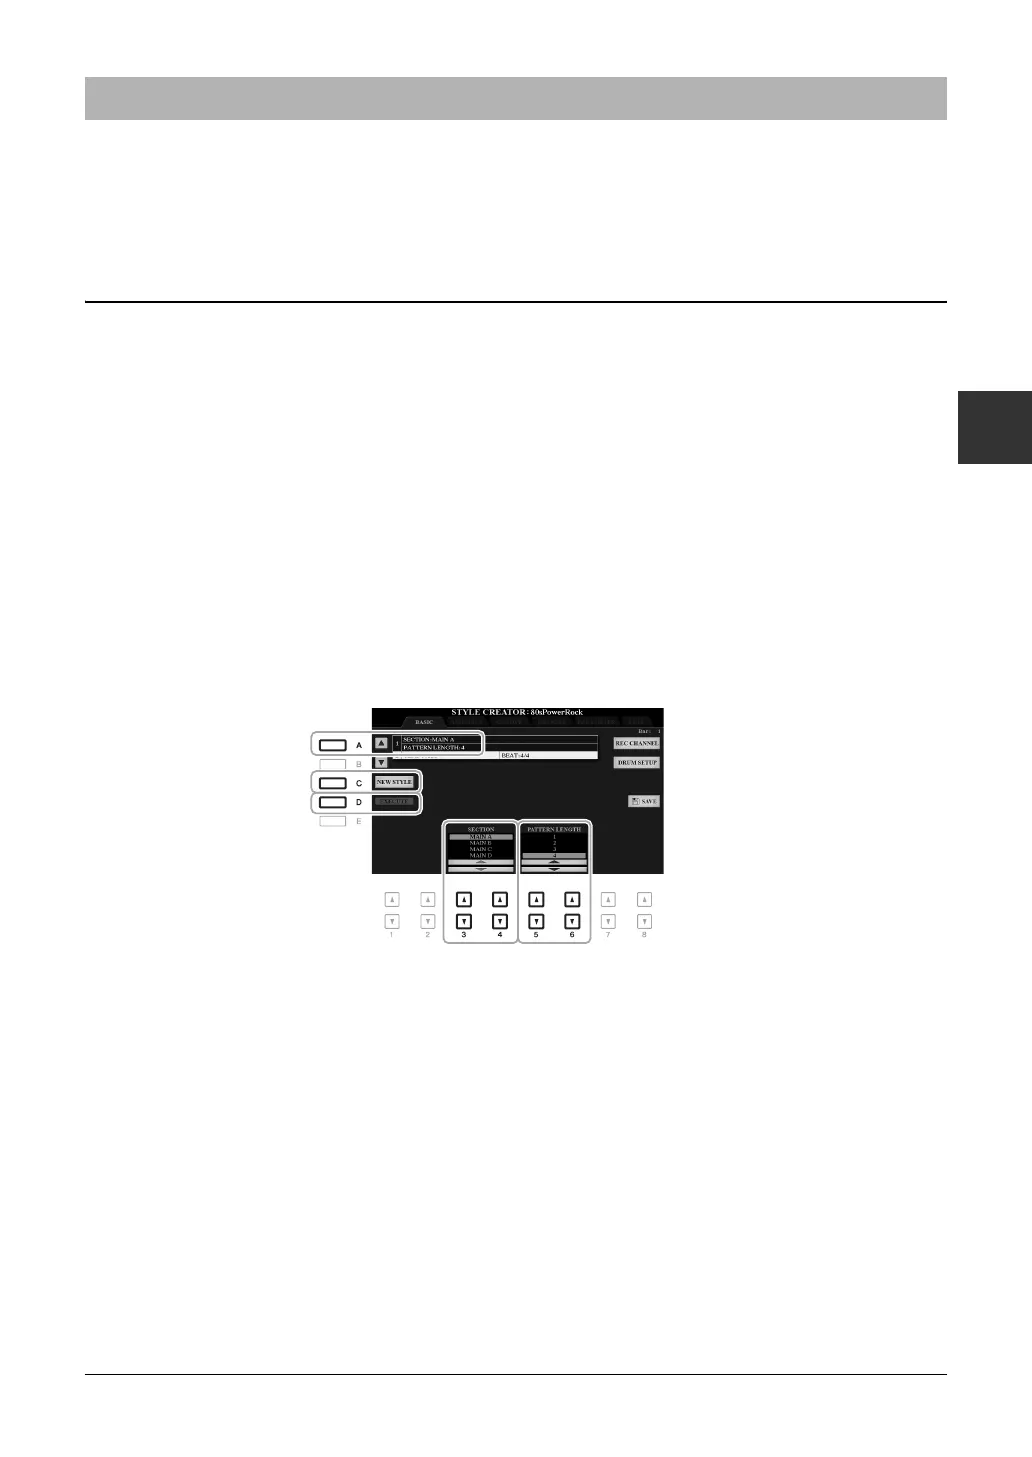
3 From the BASIC page, select a Section.
(If the RECORD display is shown in the lower half section of the display, press the [EXIT] button.) Press the
[A] button to select “1 SECTION,” then use the [3 ]/[4 ] buttons to select a Section.
Carry out the following operations as necessary.
• If you create a Style entirely from scratch, press the [C] (NEW STYLE) button to call up an empty new
Style.
• For the current Section, select the pattern length via the [5 ]/[6 ] buttons. After selecting, press the
[D] (EXECUTE) button to actually enter the specified length.
• For the entire current Style, use the [A]/[B] buttons to select “2 TEMPO/BEAT,” then set the Tempo via the
[3 ]/[4 ] buttons, and the Time Signature via the [5 ]/[6 ] buttons.
NOTE Even when you are editing an existing Style, changing the Time Signature (BEAT) clears the data from all sections, and you will need to create the Style
from scratch.
4 Create the Source Pattern for each channel.
• Realtime Recording on the BASIC page (page 126)
Lets you record the Style by simply playing the keyboard.
• Step Recording on the EDIT page (page 130)
Lets you enter each note individually.
• Style Assembly on the ASSEMBLY page (page 130)
Lets you copy various patterns from other preset Styles or Styles you have already created.
5 Edit the already recorded channel data.
• Editing the channel data on the GROOVE (page 132), CHANNEL (page 134), and EDIT (page 130)
pages
Lets you change the rhythmic feel, quantizing and velocity, etc.
• Editing the SFF parameters on the PARAMETER page (page 135)
Lets you edit the SFF (Style File Format) related parameters of the already recorded channels.
• Editing the rhythm part on the BASIC page by using the Drum Setup function (page 140)
Lets you edit the rhythm part of the Style, such as changing the sounds of the individual instruments.
Creating/Editing Styles (Style Creator)

 Loading...