- 20 -
English
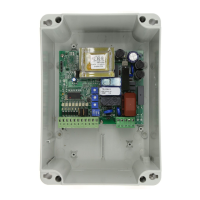
SWING APRICODE 230
CONTROL UNIT
SYSTEM START-UP3.
When the power supply to the unit is switched ON,
the following information is shown on the display: the
FIRMWARE release NUMBER and the name of the system.
When this information is no longer displayed the unit can
be operated.
When the power supply is switched ON to the unit for the
fi rst time, Lrn fl ashes on the display: preliminary checks
and the self-teach procedure must be performed.
P3.1 reliminary checks: inputs - movement direction
- operator parameters
Make the following checks and settings when Lrn fl ashes
on the display:
INPUT CHECKS
During the Lrn phase, the fourth display on the card shows
the status of the inputs (
fi g.2
).
MOVEMENT DIRECTION CHECK (OPEN / CLOSE)
During the Lrn phase and with the gate is closed, move the
wings using the special button (
fi g.3
) and check that:
- The FIRST time the
YELLOW
or
BLUE button is pressed
the
relevant wing is OPENED.
If this does not occur then you must adjust the parameter
d1 and/or d2 (press the
RED
button to access programming).
OPERATOR PARAMETERS CHECK
During the Lrn phase, press the RED button to access
programming (
fi g.4
) and if necessary modify the Mod and
rEL, parameters in accordance with the type of operator
installed (see the Programming section).
Self-teach movements3.2
The unit learns the point at which
SLOWING STARTS and
the
stroke of the movement (
STOPPING point
).
During the Lrn phase, press the
START
controls in sequence
for the self-teach procedure:
START
OPENING starts;
START
SLOWING starts;
START
STOP;
START
CLOSING starts;
START
SLOWING starts;
START
STOP.
If there are two wings then the sequence is wing 1 then
wing 2 OPENING and wing 2 then wing 1 CLOSING (
fi g. 6
).
Warning
!
External signals are ignored during the self-teach procedure
except for the photocell during closing and STOP signals. If
these signals are triggered the self-teach procedure is stopped
and must be repeated.
IMPORTANT!
The
START
command to self-teach the
STOPPING
point
during opening and closing must be given when the wing
reaches the mechanical stop. The additional thrust at the end
of the movement is managed by the parameter (ta-t1).
The self-teach procedure for slowing differs in accordance
with the features of the operator installed:
• Hydraulic operators without
hydraulic slowing and the
Electro-
mechanical
operators use
electronic slowing
. The self-teach
procedure identifi es the start points, therefore the
START
command must be given when the wing reaches the point
at which you require slowing to start (
WARNING
: rEL
=1
).
Special operation during fi g. 3 - lrn status:
to move the wings press and hold:
wing1•
YELLOW button
wing2•
BLUE button
Each time the button is released and then pressed again,
the movement of the relevant wing is reversed.
MOVES WING 1
MOVES WING 2
BLUE
YELLOW
Access to programming during fi g. 4 - lrn
Access to parameters during Lrn:
LO.0
RED
L r N
_
_
-
display 4
during Lrn: INPUTS
(segment ON = contact closed)
L r N
_
_
-
_
_
2
4
5
6
7
2 = CLOSING PHOTOCELL
4 = PEDESTRIAN START
5 = SAFETY DEVICE during OPENING
6 = START
7 = STOP
During standby, segments 2, 7 and 5 fl ash if the relevant
connections or jumpers are correct.
Testing of inputs during fi g. 2 - lrn
Start of movements during SELF-TEACHfi g. 5 -
Start the self-teach movements:
L r N
_
_
-
START
(
Ö
FA 1
)
fi g.7
note: while the display shows FA1 the gate can be stopped
and the Lrn phase re-accessed. Simply press the
YELLOW
button or the
STOP
control if connected.
display
during LRn
 Loading...