3–20 z 3.3 Setting Character Height and Character Orientation Section 3
3.3.2 Operating procedure
For general
instructions on the
modification of
settings, see
Section 2.1.3,
"Operations for
Modifying the Setting
Contents".
If the cursor is not
displayed,
press [Show cursor].
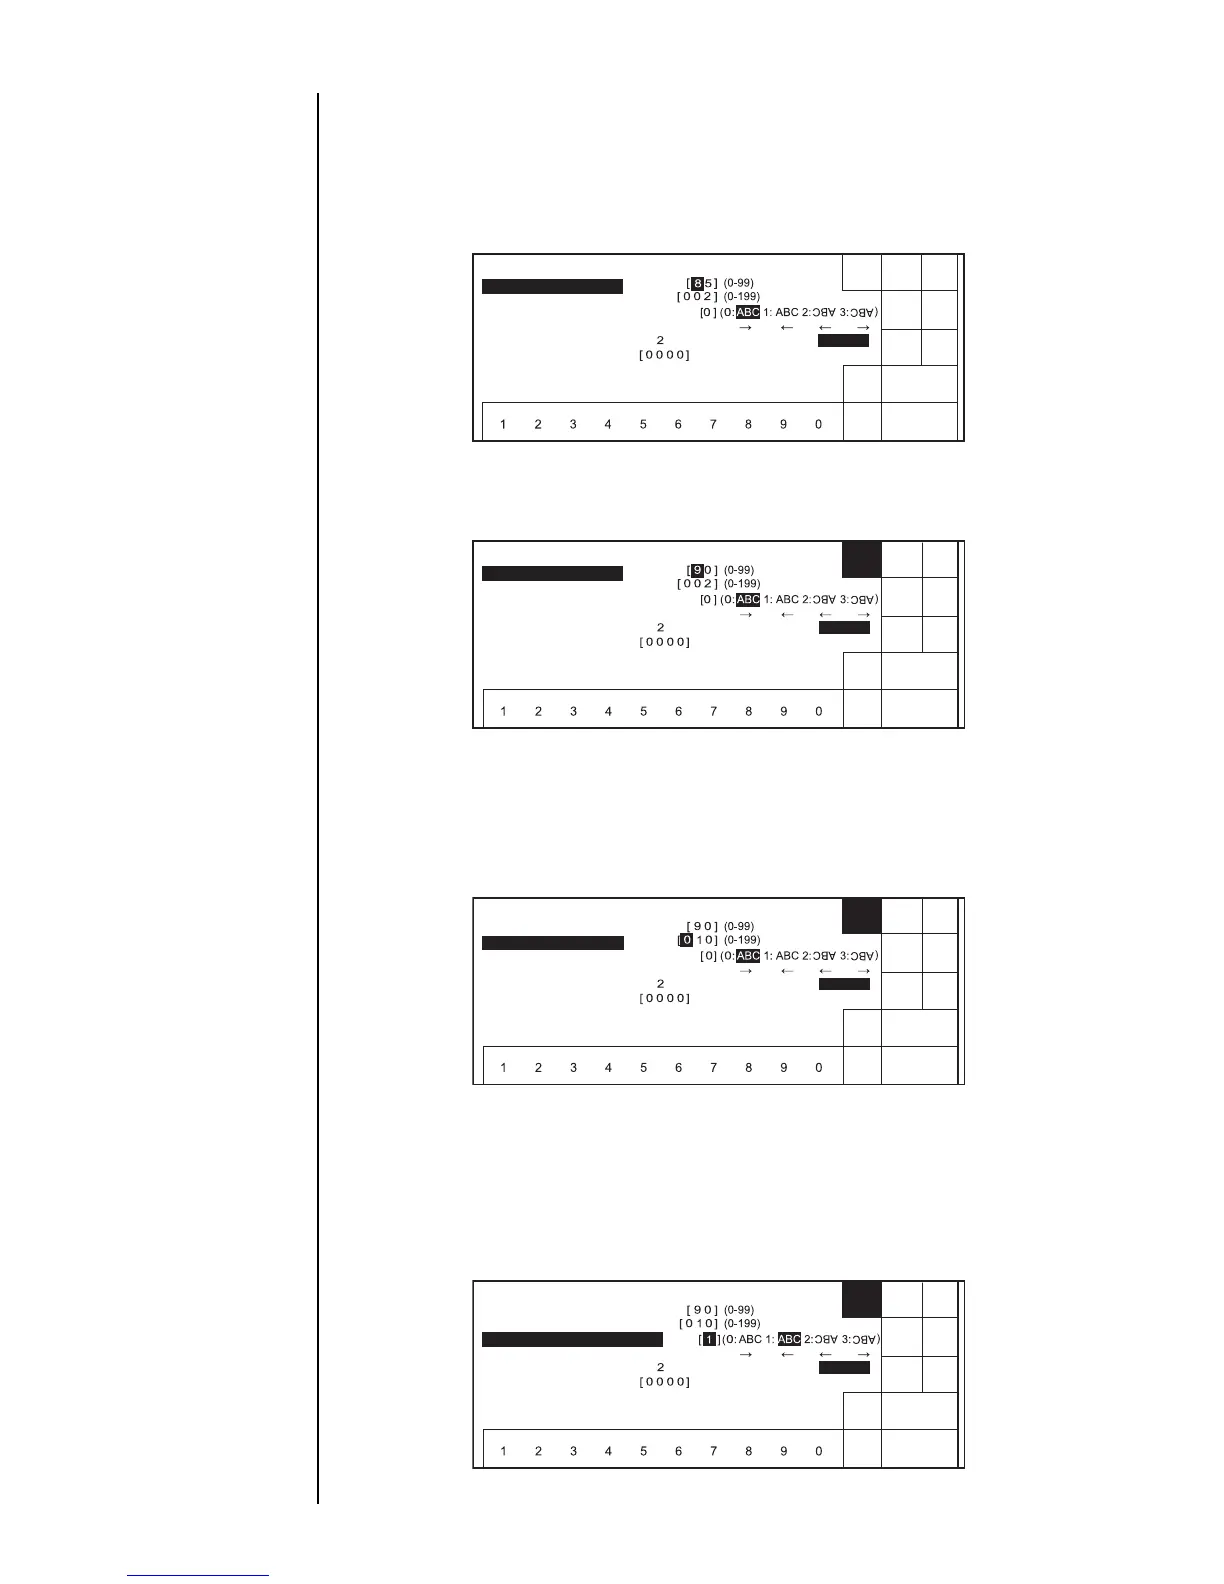
Set the character height to 90, character width to 10, character orientation to 1.
1. From the "Print description" screen, press [Print spec.].
The "Print specifications" screen opens. (The maximum value for the write position
varies with the character size.)
2. Press [9] and [0] successively.
The character height is then set to 90.
3. Touch the line to set character width.
The cursor moves to the character width input field.
4. Press [0], [1], and [0] successively.
The character width is then set to 10.
5. Touch the line to set character orientation.
The cursor moves to the character orientation input field.
6. Press [1].
Character orientation option 1 (ABC) is then selected.
The same result is obtained by pressing [Increment].
ĸĺ
3ULQWVSHFLILFDWLRQV
6WDWXV5HDG\
6KXW
GRZQ
'HFUH
PHQW
,QFUH
PHQW
%DFN
0DQXDO
6KRZ
FXUVRU
&KDUDFWHUKHLJKW
&KDUDFWHUZLGWK
&KDUDFWHURULHQWDWLRQ
$UURZ3ULQWLQJGLUHFWLRQ
3ULQWLQJPHWKRG VLQJOHVFDQLQWHUODFHG
:ULWHVWDUWSRVLWLRQ VFDQQLQJXQLW6&
1H[W
GLVSOD\
8QLWFKDQJH
ĸĺ
3ULQWVSHFLILFDWLRQV
6WDWXV5HDG\
6KXW
GRZQ
'HFUH
PHQW
,QFUH
PHQW
%DFN
0DQXDO
$SSO\
&KDUDFWHUKHLJKW
&KDUDFWHUZLGWK
&KDUDFWHURULHQWDWLRQ
$UURZ3ULQWLQJGLUHFWLRQ
3ULQWLQJPHWKRG VLQJOHVFDQLQWHUODFHG
:ULWHVWDUWSRVLWLRQ VFDQQLQJXQLW6&
1H[W
GLVSOD\
8QLWFKDQJH
ĸĺ
3ULQWVSHFLILFDWLRQV
6WDWXV5HDG\
6KXW
GRZQ
'HFUH
PHQW
,QFUH
PHQW
%DFN
0DQXDO
$SSO\
&KDUDFWHUKHLJKW
&KDUDFWHUZLGWK
&KDUDFWHURULHQWDWLRQ
$UURZ3ULQWLQJGLUHFWLRQ
3ULQWLQJPHWKRG VLQJOHVFDQLQWHUODFHG
:ULWHVWDUWSRVLWLRQ VFDQQLQJXQLW6&
1H[W
GLVSOD\
8QLWFKDQJH
ĸĺ
3ULQWVSHFLILFDWLRQV
6WDWXV5HDG\
6KXW
GRZQ
'HFUH
PHQW
,QFUH
PHQW
%DFN
0DQXDO
$SSO\
&KDUDFWHUKHLJKW
&KDUDFWHUZLGWK
&KDUDFWHURULHQWDWLRQ
$UURZ3ULQWLQJGLUHFWLRQ
3ULQWLQJPHWKRG VLQJOHVFDQLQWHUODFHG
:ULWHVWDUWSRVLWLRQ VFDQQLQJXQLW6&
1H[W
GLVSOD\
8QLWFKDQJH
 Loading...