EasyManua.ls Logo

QRP Labs QMX User Manual

QRP Labs QMX
90 pages
To Next Page IconTo Next Page
To Previous Page IconTo Previous Page
Page #17 background imageLoading...
Page #17 background image
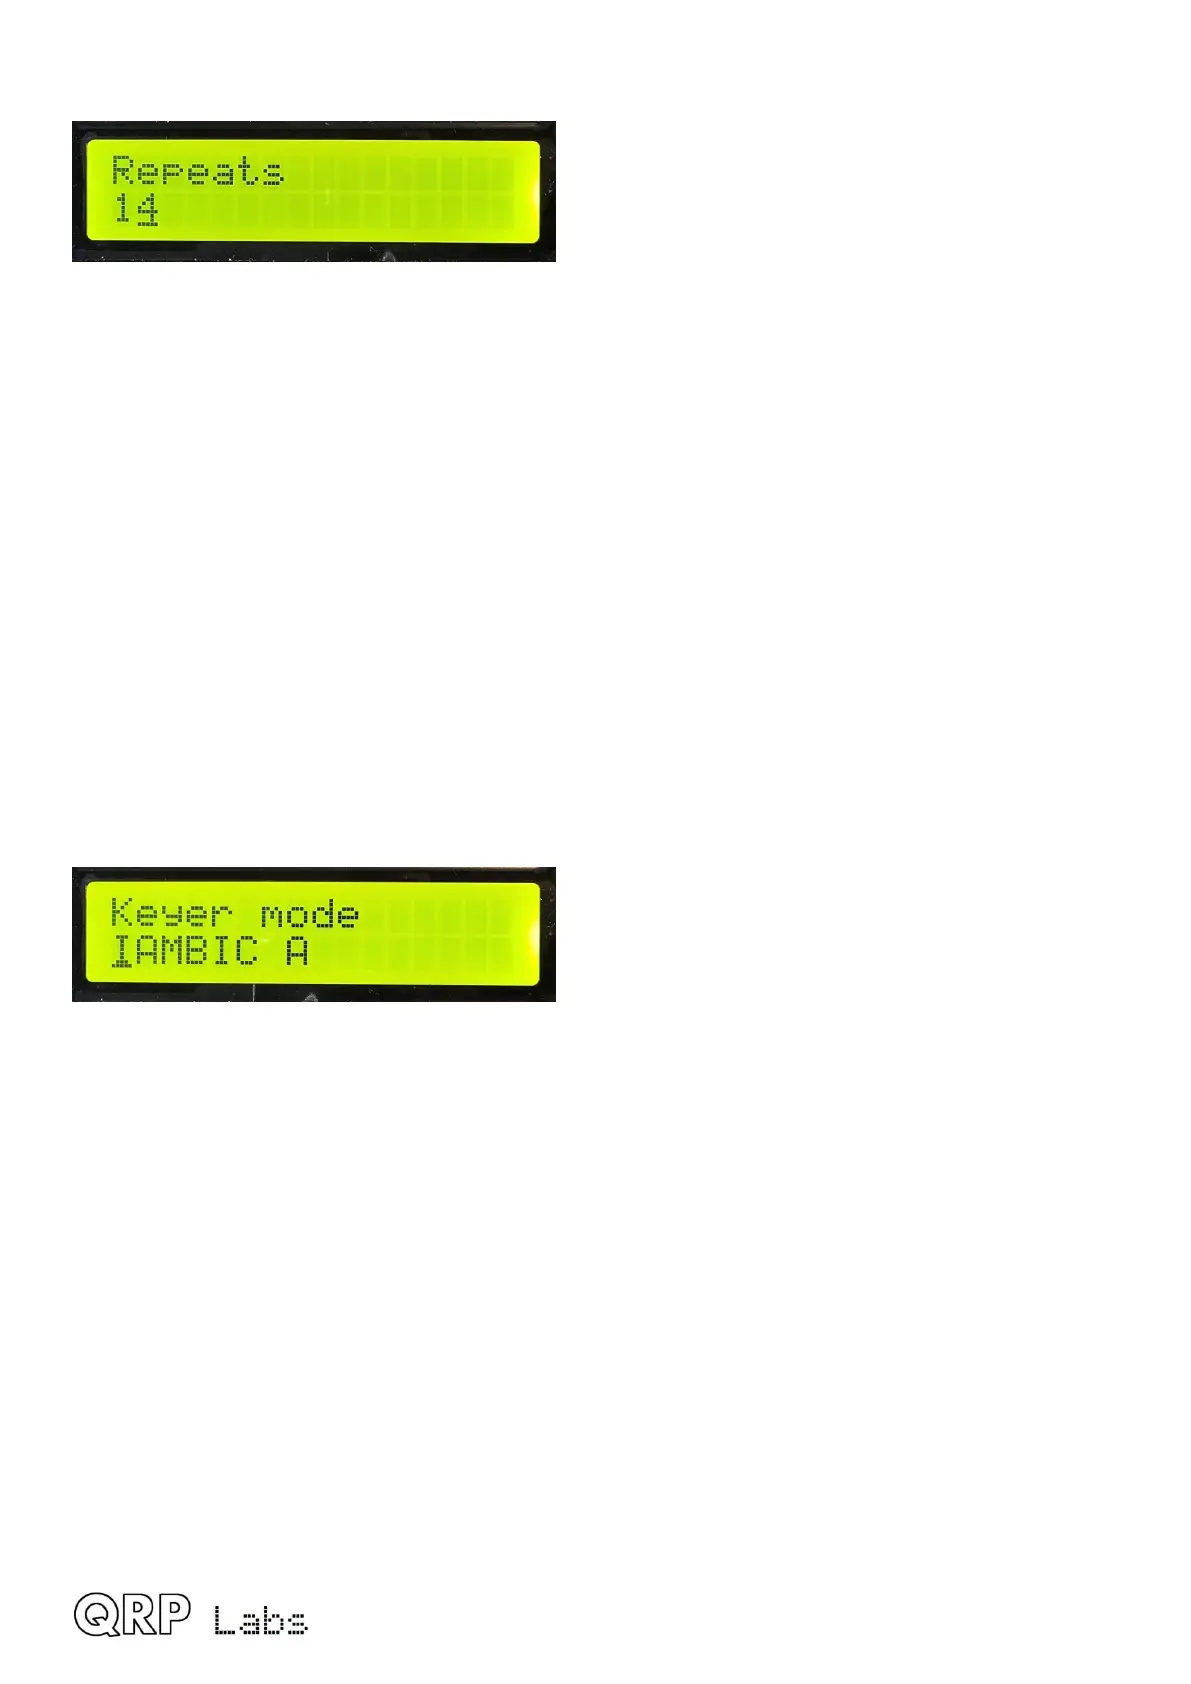
For example, here is the message repeat interval setting, containing a small number (1 or 2 digits):
The underline cursor below the 4 indicates that editing is active; turning the TUNE knob will
change the parameter value.
When you are finished editing, press the “Exit” button to conclude editing. This saves the
parameter in the microcontroller’s EEPROM memory.
A flashing inverted cursor is also available, you can choose that in the “Cursor Style” parameter in
the “Other” menu (see later section).
The procedure for editing list, string and number parameters is described below; the above simple
example is a short number that is simply adjusted using the TUNE knob; for longer numbers such
as frequency, the procedure is different (see following sections).
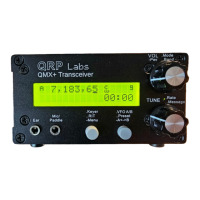
5.4 Editing a LIST parameter
Editing a list parameter is very simple, it is just a matter of turning the rotary encoder. The display
scrolls through the list items. For example, this is the “Keyer mode” parameter in the “CW Keyer”
menu:
Note that the editing indicator cursor appears under the leftmost character. Turn the TUNE knob to
scroll through the list of possible values.
When you are happy with your selection, press either “Select” or “Exit”, to save the change.
5.5 Editing a BOOLEAN parameter
Editing a BOOLEAN parameter (such as YES/NO, ENABLED/DISABLED, ON/OFF) is exactly the
same as editing a LIST parameter, except that now the list of items is always restricted to just the
two values (representing True/False).
5.6 Editing a NUMBER parameter
When editing a number parameter, the cursor underline appears under the currently edited digit.
The cursor starts at the far left (most significant digit). The TUNE knob adjusts the selected digit.
The operation is very similar to tuning a VFO in ordinary operation.
QMX operang manual; rmware 1_00_012 17

Other manuals for QRP Labs QMX

Question and Answer IconNeed help?

Do you have a question about the QRP Labs QMX and is the answer not in the manual?

QRP Labs QMX Specifications

General IconGeneral
BrandQRP Labs
ModelQMX
CategoryTransceiver
LanguageEnglish

Summary

1. Overview of Features

QMX Portability

Highlights the small size and low current consumption for portable operations.

Synthesised VFO Tuning

Details the VFO tuning using a Si5351A chip and rotary encoder, with two VFOs.

CW Keyer and Break-in

Explains the integrated lambic keyer and full/semi break-in operation.

2. Connectors

Paddle Connector Functions

Details the 3.5mm stereo jack for paddle, GPS data, and microphone input.

Audio and DC Power Connectors

Describes the 3.5mm audio output and 2.1mm barrel jack DC input.

3. Display Elements

4. Operator Controls

4.1 Tune Rate

Explains how to adjust the VFO tuning rate using the rotary encoder.

4.2 Keyer Speed

Details how to adjust the CW keyer speed using the 'Select' button and encoder.

4.3 RIT

Explains how to adjust Receiver Incremental Tuning (RIT) using double-click and encoder.

4.4 VFO Mode

Describes selecting between VFO A, VFO B, and Split modes for operation.

5. Menu System

5.1 Saving Current Operating Parameters

Stores current operating conditions like VFO frequency, mode, and keyer speed upon power down.

5.3 Editing Configuration Parameters

Details the process of editing menu parameters using the rotary encoder and buttons.

5.8 Audio Menu

Controls audio settings like volume step and sidetone volume and its absolute/relative mode.

5.11 Keyer Menu

Configures CW keyer settings like mode, swap, weight, and auto-space.

5.16 Protection Menu

Configures protection features like SWR protection, threshold, and supply voltage monitoring.

5.19 Factory Reset

Resets the radio to its default factory configuration, erasing all custom settings.

5.20 Update Firmware

Guides the user through rebooting into bootloader mode for firmware updates via USB.

6. Operating QMX on Digital Modes

WSJT-X Configuration

Step-by-step guide for configuring WSJT-X for audio and CAT control with QMX.

7. Firmware Update Procedure

Entering Bootloader Mode

Explains methods to enter firmware update mode, including button presses and jumpers.

8. Terminal Applications

PC Terminal Emulator Setup

Guides setting up terminal emulators like PuTTY for connecting to QMX.

8.5 Band Configuration

Details configuring parameters for each amateur radio band, including frequencies and PTT.

8.6 Hardware Tests Menu

Accesses tools for optimizing and testing hardware, including filter sweeps and diagnostics.

8.7 PC and CAT Menu

Covers PC interface and CAT commands, including system config and input analysis.

9. Resources

10. Document Revision History

Related product manuals