33
Sampling Menu
Exporting User Tones to a USB Flash Drive
(UST Export)
1. In the Tone section, press the [User] button.
The User Tone list appears.
2. Use the direct buttons to select the tone that you want
to export.
3. Press the [Option] button.
The UST Option screen appears.
4. Use the direct buttons to select “Export.”
A screen appears in which you can name the tone.
&
“Assigning Names” (Owner’s Manual: p. 16)
If you decide to cancel, press the [Exit] button.
5. Press the [F5] (Exec) button.
MEMO
The exported tone is placed in the “My UST” folder of the
USB ash drive. The tone is exported with its user samples and
multisamples.
It may take some time for the export to be completed if the data
size is large.
NOTE
5 It is possible to change the le name when executing UST Export/
UDK Export.
However, this changes only the le name; it does not change the
name of the tone.
This means that if you import a UST or UDK whose le name was
changed, the original tone names are displayed. Since you won’t
be able to tell the original tone names, we recommend that you
not change the le name when exporting.
5 When you export, the samples and multisamples remain in the
E-A7. (The data is copied and saved on the USB ash drive.)
If you want to increase the amount of free memory, export the
data, then delete unneeded user tones, and execute sample clean
up (p. 38).
If more than one User Tone uses the same user samples or
multisamples, the user samples are not deleted until all related
User Tones are deleted (i.e., the amount of free memory will not
increase).
Loading Exported User Tones
1. In the Tone section, press the [User] button.
The User Tone list appears.
2. Use the direct buttons or function buttons to select the
import destination.
3. Press the [Option] button.
The UST Option screen appears.
4. Use the direct buttons to select “Import.”
Files that can be imported from the USB ash drive are shown.
5. Use the direct buttons to select the le that you want to
import.
A conrmation message appears.
6. To import the data, select “ Ye s .”
If you want to change the import destination, select “No” to return
to the page where you can change the import destination.
NOTE
If the user sample memory is full, you can’t import user tones.
Increase the amount of free memory and then import once again.
MEMO
Place the les you want to import in the “My UST” folder of the
USB ash drive.
If there is no “My UST” folder in External Storage (USB ash
drive), you can either use the E-A7 to format the USB ash drive,
or create a folder named “My UST.”
User Drum Kit
The E-A7 lets you use user samples or multisamples to create your
own original drum kit (User Drum Kit).
You can also edit an internal drum kit (Preset Drum Kit) and save it as
a User Drum Kit.
In this manual we will sometimes abbreviate “User Drum Kit” as
“UDK.”
NOTE
5 Some of the internal drum kits contain tones that cannot be
edited. The screen indicates “Can’t edit this tone.” and you won’t
be able to enter the edit screen.
5 Tones with an “E” symbol at the right of the tone number in the
tone list screen can be edited.
5 When you edit the settings of a tone, an “*” symbol appears in
place of the “E” symbol. When you save the tone, the “*” symbol
disappears.
5 If you turn o the power, select another tone, or enter the sample
or multisample edit screen, the changes you made are lost. If you
want to keep the changes you made, you must save the settings.
Each drum instrument in a drum kit can be copied from a dierent
drum kit and reused (the Drum Inst copy function).
This lets you combine drum instruments from the internal drum kits
to create a new drum kit, or replace specic drum instruments of an
internal drum kit with user drum instruments that use samples.
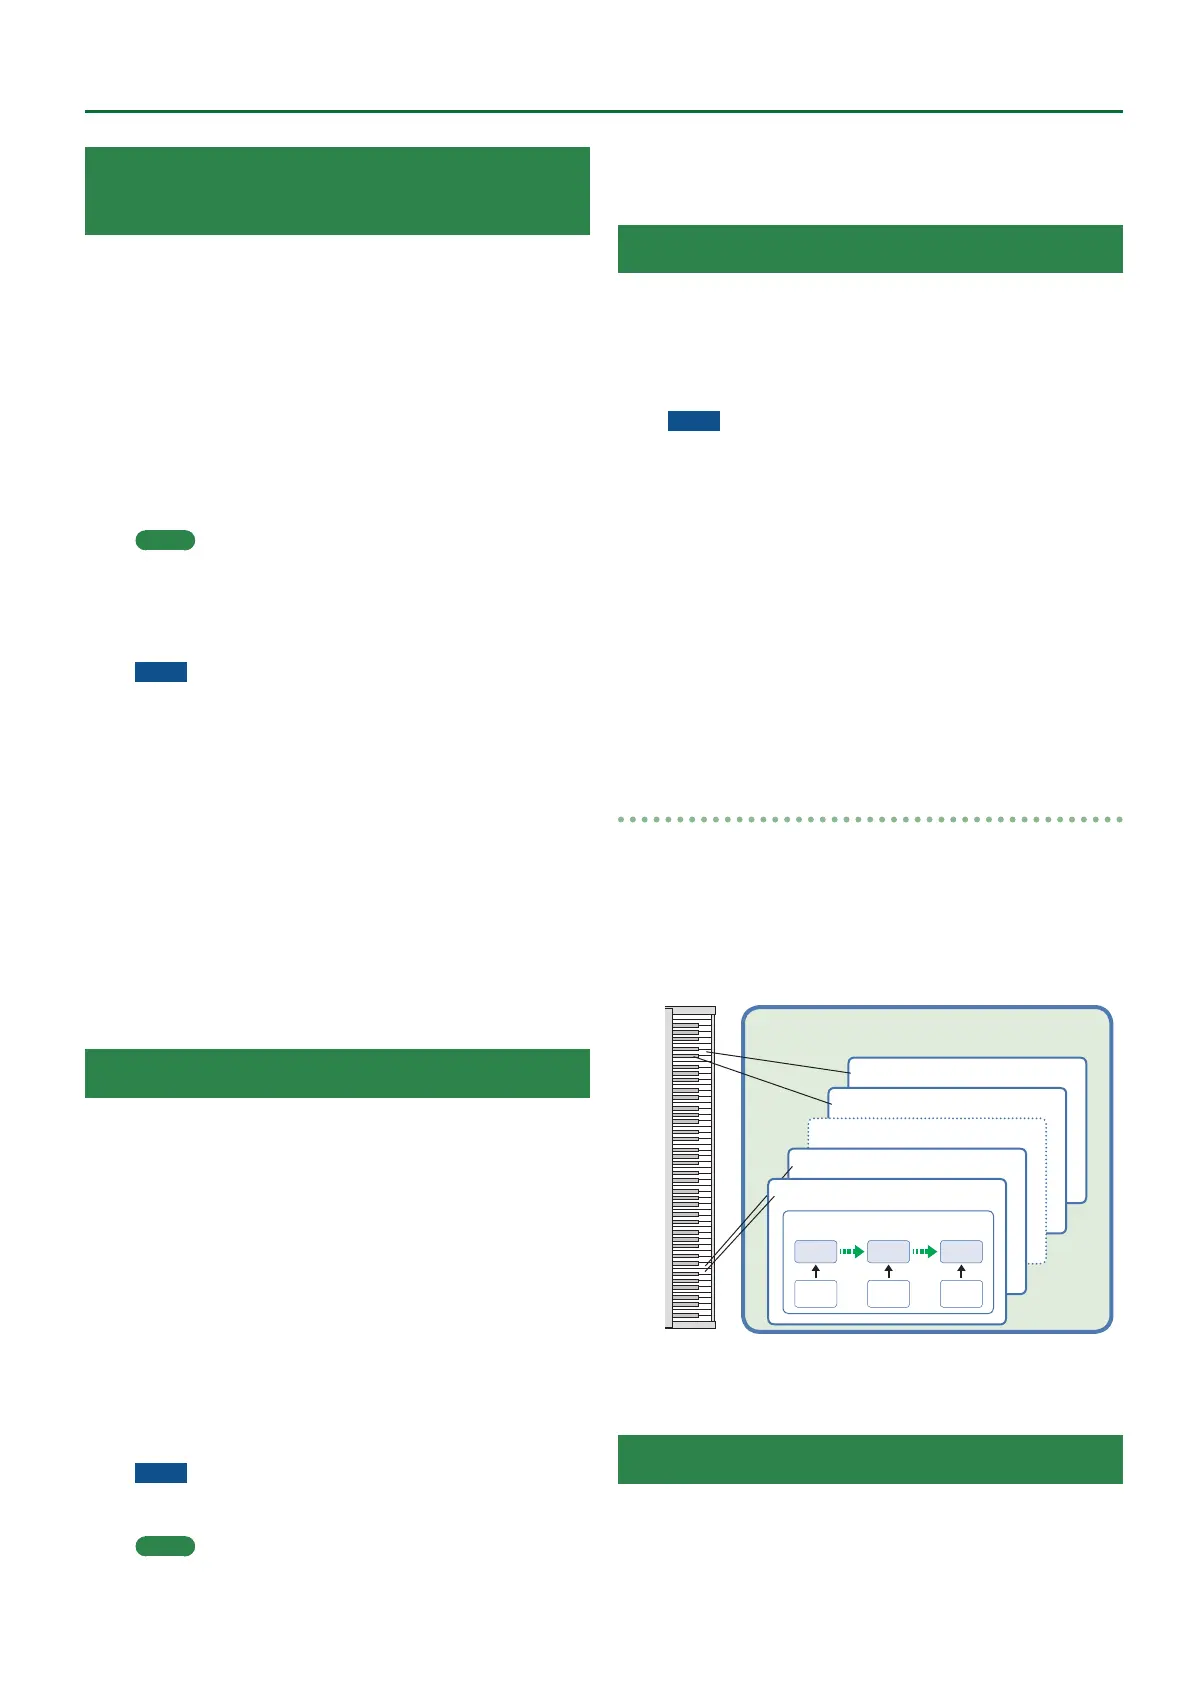
How a drum kit is structured
A drum kit is a group of multiple percussion instrument sounds
(drum instruments).
Percussion instrument sounds are not typically used to play
melodies, so there is no need to be able to play them at dierent
pitches from the keyboard. It’s also important to be able to play a
large number of dierent percussion instrument sounds at once.
For these reasons, a drum kit lets you play dierent percussion
instrument sounds by playing dierent keys (note numbers).
Drum Kit
Note number 98 (D7)
Note number 97 (C#7)
Note number 36 (C2)
Pitch
Envelope
TVF
Envelope
TVA
Envelope
WG TVF TVA
Drum Inst (percussion instrument sound)
Note number 35 (B1)
* Each drum instrument consists of four elements of sound
(WAVE1–4).
* Drum instruments do not have an LFO.
Creating a User Drum Kit
The E-A7 lets you create your own original drum kit (User Drum Kit)
from user samples and multisamples. Here’s how to create a new
user drum kit.
 Loading...