1-13
DCR-TRV240/TRV340
54
You can make a time-lapse recording by
setting your camcorder to automatically
record and standby sequentially. You can
achieve an excellent recording for flowering,
gradual appearances, etc., with this function.
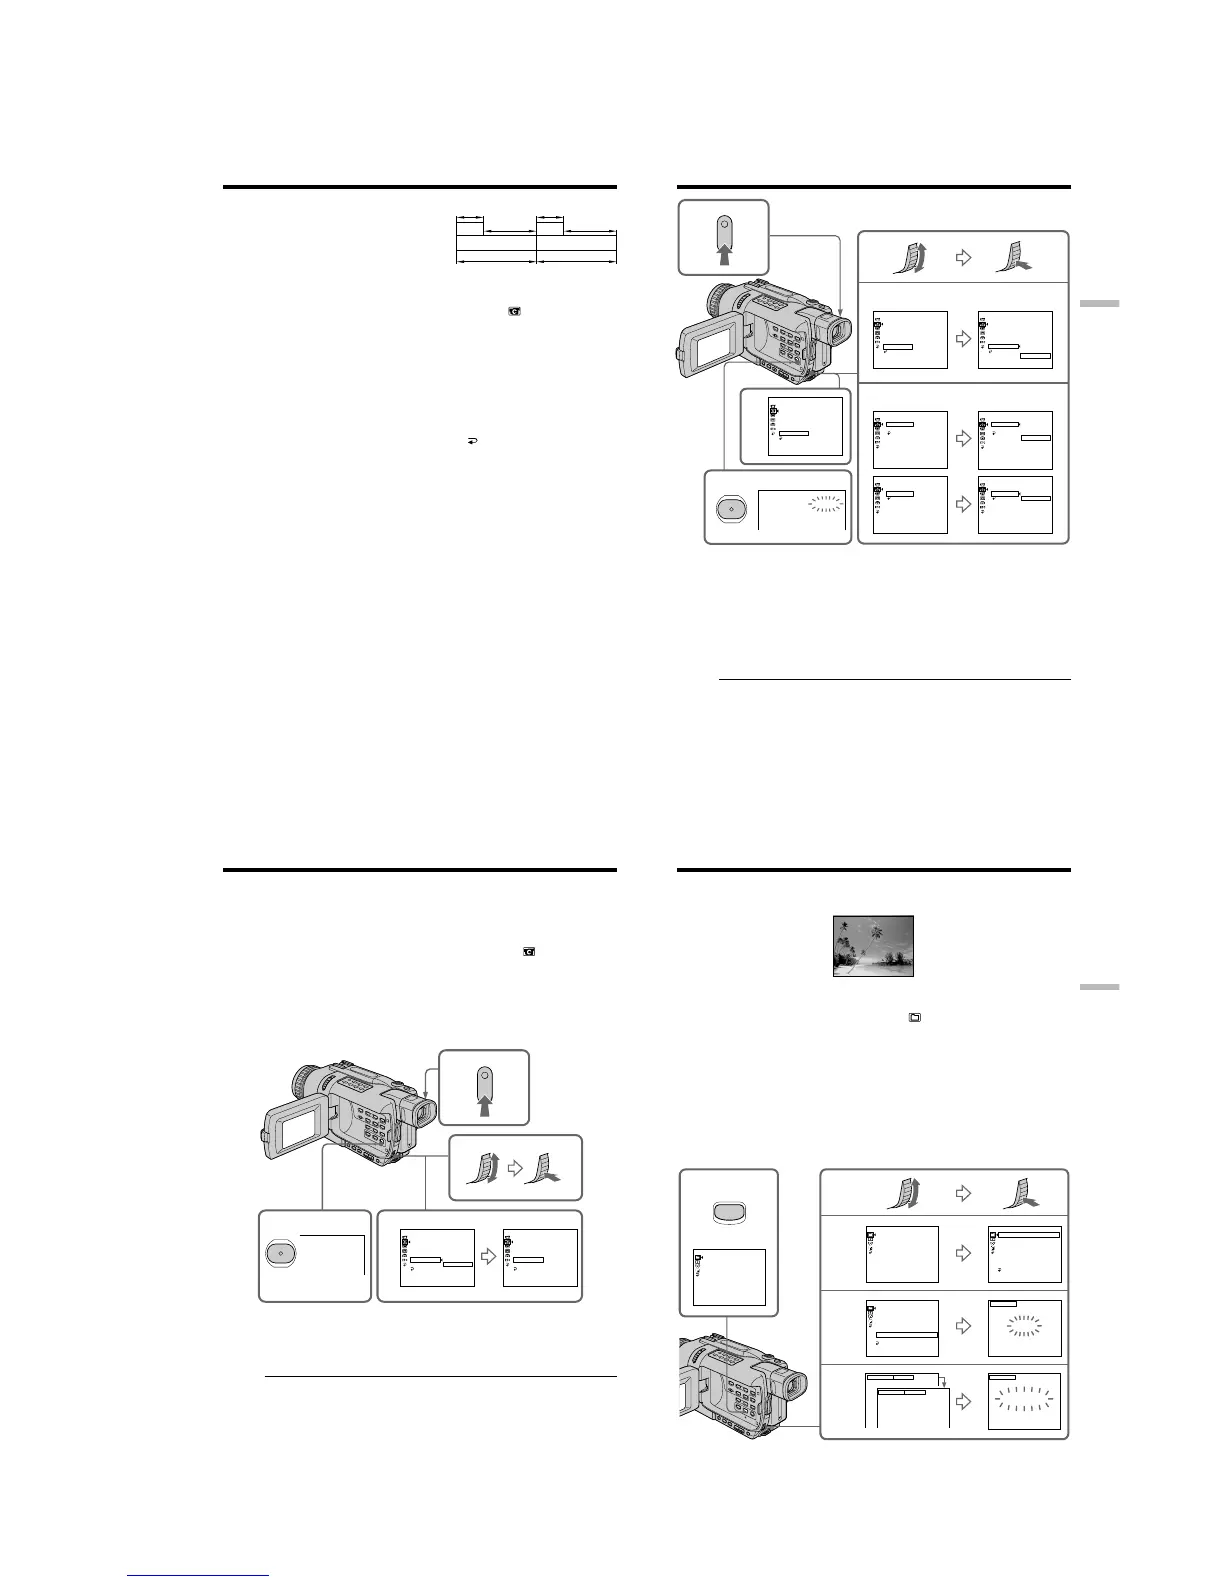
(1) In the standby mode, press MENU to display the menu settings.
(2) Turn the SEL/PUSH EXEC dial to select INT. REC in
, then press the dial.
(3) Turn the SEL/PUSH EXEC dial to select SET, then press the dial.
(4) Set INTERVAL and REC TIME.
1 Turn the SEL/PUSH EXEC dial to select INTERVAL, then press the dial.
2 Turn the SEL/PUSH EXEC dial to select the desired interval time, then
press the dial.
The time: 30SEC y 1MIN y 5MIN y 10MIN
3 Turn the SEL/PUSH EXEC dial to select REC TIME, then press the dial.
4 Turn the SEL/PUSH EXEC dial to select the desired recording time, then
press the dial.
The time: 0.5SEC y 1SEC y 1.5SEC y 2SEC
5 Turn the SEL/PUSH EXEC dial to select
RETURN, then press the dial.
(5) Turn the SEL/PUSH EXEC dial to select ON, then press the dial.
(6) Press MENU to make the menu settings disappear. The INTERVAL indicator
flashes.
(7) Press START/STOP to start interval recording. The INTERVAL indicator lights
up.
Interval recording
10 min10 min
1 s 1 s
9 min 59 s 9 min 59 s
[a][a]
[b][b]
Example
[a]REC TIME
[b]INTERVAL
55
Advanced Recording Operations
Interval recording
To cancel interval recording
Perform either of the following:
– Set INT. REC to OFF in the menu settings.
– Set the POWER switch to other than CAMERA.
To perform normal recording during interval recording
You can perform normal recording only once during INTERVAL.
Press START/STOP. The INTERVAL indicator flashes, and normal recording starts. To
stop normal recording, press START/STOP again.
On recording time
There may be a discrepancy in the recording time of up to +/– six frames from the
selected time.
5
7
CAMERA SET
SELFT
I
MER
D ZOOM
PHOTO REC
16 : 9W
I
DE
STEADYSHOT
FRAME REC
I
NT. REC
RETURN
ON
[
MENU
]
:
END
CAMERA SET
SELFT
I
MER
D ZOOM
PHOTO REC
16 : 9W
I
DE
STEADYSHOT
FRAME REC
I
NT. REC
RETURN
[
MENU
]
:
END
CAMERA SET
SELFT
I
MER
D ZOOM
PHOTO REC
16 : 9W
I
DE
STEADYSHOT
FRAME REC
I
NT. REC
RETURN
ON
OFF
SET
OFF
[
MENU
]
:
END
CAMERA SET
I
NT. REC
I
NTERVAL
REC T
I
ME
RETURN
30SEC
[
MENU
]
:
END
CAMERA SET
I
NT. REC
I
NTERVAL
REC T
I
ME
RETURN
30SEC
1M
I
N
5M
I
N
10M
I
N
[
MENU
]
:
END
CAMERA SET
I
NT. REC
I
NTERVAL
REC T
I
ME
RETURN
0
.
5SEC
[
MENU
]
:
END
CAMERA SET
I
NT. REC
I
NTERVAL
REC T
I
ME
RETURN
0
.
5SEC
1SEC
1
.
5SEC
2SEC
[
MENU
]
:
END
2,3
4
6
STBY
I
NTERVAL
MENU
56
You can make a recording with a stop-motion animated effect using frame recording.
To create this effect, alternately move the subject a little and make a frame recording.
We recommend that you use a tripod, and operate your camcorder using the Remote
Commander after step 5.
(1) In the standby mode, press MENU to display the menu settings.
(2) Turn the SEL/PUSH EXEC dial to select FRAME REC in
, then press the
dial.
(3) Turn the SEL/PUSH EXEC dial to select ON, then press the dial.
(4) Press MENU to make the menu settings disappear.
The FRAME REC indicator appears.
(5) Press START/STOP to start frame recording. Your camcorder makes a
recording for about six frames, and returns to recording standby.
(6) Move the subject, and repeat step 5.
To cancel the frame recording
Perform either of the following:
– Set FRAME REC to OFF in the menu settings.
– Set the POWER switch to other than CAMERA.
Note
The remaining tape time is not indicated correctly if you use this function continuously.
When using the frame recording function
The last recorded cut is longer than other cuts.
Frame by frame recording
– Frame recording
5
4
STBY
FRAME REC
MENU
3
CAMERA SET
SELFT
I
MER
D ZOOM
PHOTO REC
16 : 9W
I
DE
STEADYSHOT
FRAME REC
I
NT. REC
RETURN
ON
[
MENU
]
:
END
CAMERA SET
SELFT
I
MER
D ZOOM
PHOTO REC
16 : 9W
I
DE
STEADYSHOT
FRAME REC
I
NT. REC
RETURN
OFF
ON
[
MENU
]
:
END
57
Advanced Recording Operations
You can select one of eight preset titles and two custom titles (p. 59). You can also select
the language, color, size and position of titles.
(1) In the standby mode, press TITLE to display the title menu. The title menu
display appears on the screen.
(2) Turn the SEL/PUSH EXEC dial to select
, then press the dial.
(3) Turn the SEL/PUSH EXEC dial to select the desired title, then press the dial.
The titles are displayed in the language you selected.
(4) Change the color, size, or position, if necessary.
1 Turn the SEL/PUSH EXEC dial to select COLOR, SIZE, or POSITION, then
press the dial. The selected item appears on the screen.
2 Turn the SEL/PUSH EXEC dial to select the desired item, then press the
dial.
3 Repeat steps 1 and 2 until the title is laid out as desired.
(5) Press the SEL/PUSH EXEC dial again to complete the setting.
(6) Press START/STOP to start recording.
(7) When you want to stop recording the title, press TITLE.
Superimposing a title
VACATION
1
2
3
4
TITLE
PRESET TITLE
HELLO!
HAPPY BIRTHDAY
HAPPY HOLIDAYS
CONGRATULATIONS!
OUR SWEET BABY
WEDDING
VACATION
THE END
[
TITLE
]
: END
PRESET TITLE
HELLO!
HAPPY BIRTHDAY
HAPPY HOLIDAYS
CONGRATULATIONS!
OUR SWEET BABY
WEDDING
VACATION
THE END
RETURN
[
TITLE
]
: END
VACATION
[
TITLE
]
: END
TITLE
VACATION
[
TITLE
]
: END
TITLE
PRESET TITLE
HELLO!
HAPPY BIRTHDAY
HAPPY HOLIDAYS
CONGRATULATIONS!
OUR SWEET BABY
WEDDING
VACATION
THE END
[
TITLE
]
: END
PRESET TITLE
HELLO!
HAPPY BIRTHDAY
HAPPY HOLIDAYS
CONGRATULATIONS!
OUR SWEET BABY
WEDDING
VACATION
THE END
RETURN
[
TITLE
]
: END
VACATION
SIZE SMALL
SIZE LARGE
 Loading...