EasyManua.ls Logo

Sony Handycam DCR-HC20 User Manual

Sony Handycam DCR-HC20
100 pages
To Next Page IconTo Next Page
To Previous Page IconTo Previous Page
Page #81 background imageLoading...
Page #81 background image
AdditionalInformation
Usingyourcamcorder
abroad
Power supply
You can use your camcorder in any countries/
regions using the AC Adaptor supplied with
your camcorder within AC 100 V to 240 V,
50/60 Hz.
Use a commercially available AC plug
adaptor [a], if necessary, depending on the
design of the wall outlet [b].
[
AC-L25A/L25B
[al
[bl
OnTV colorsystems
Your camcorder is an NTSC system4_ased
camcorder. If you want to view the playback
picture on a TV, it must be an NTSC system*
based TV (see the following list) wilh the
AUDIO/VIDEO input jack.
NTSC Bahama Islands, Bolivia, Canada,
Central America, Chile, Colombia,
Ecuador, Guyana, Jamaica, Japan,
Korea, Mexico, Peru, Surinam,
Taiwan, the Philippines, the
U.S.A., Venezuela, etc.
PAL Aus_alia, Austria, Belgium,
China, Czech Republic, Denmark,
Finland, Germm_y, Holland, ltong
Kong, llungary, Italy, Kuwait,
Malaysia, New Zealand, Norway,
Poland, Portugal, Singapore,
Slovak Republic, Spain, Sweden,
Switzerland, Thailand, United
Kingdom, etc.
PAL _ M Brazil
PAL - N Argentina, Paraguay, Uruguay
SECAM Bulgaria, France, Guiana, lran,
[raq, Monaco, Russia, Ukraine, etc.
Simplesetting of clockbytime
difference
You can easily set the clock to the local time by
setting a time difference when using your
camcorder abroad. Select [WORLD TIME] in
d_e _m_ (O'IHERS) menu, then set 1he time
difference (p. 60).
&
o
l=l
Additional Information 81

Table of Contents

Other manuals for Sony Handycam DCR-HC20

Question and Answer IconNeed help?

Do you have a question about the Sony Handycam DCR-HC20 and is the answer not in the manual?

Sony Handycam DCR-HC20 Specifications

General IconGeneral
BrandSony
ModelHandycam DCR-HC20
CategoryCamcorder
LanguageEnglish

Summary

Read this first

WARNING

Safety warning to prevent fire or shock hazard by avoiding exposure to rain or moisture.

CAUTION

Safety warning to reduce risk of electric shock by not removing covers.

Owner's Record

Note on Cassette Memory

Details on using mini DV cassettes with Cassette Memory for advanced functions.

Notes on recording

Important considerations and tips before starting video recording.

Quick Start Guide

Recording movies

Basic steps to attach battery, insert cassette, and start recording.

Recording/Playing back with ease

Using the Easy Handycam mode for simplified operation.

Getting started

Step 1: Checking supplied items

Verify all included accessories are present before operation.

Step 2: Charging the battery pack

Procedure for charging the InfoLITHIUM battery pack.

Step 3: Turning the power on

Instructions on how to power up the camcorder.

Step 4: Adjusting the LCD panel and viewfinder

Optimizing display settings for comfortable viewing.

Step 5: Setting the date and time

Essential setup for accurate date/time stamping of recordings.

Step 6: Inserting a cassette tape

Procedure for loading a mini DV cassette into the camcorder.

Step 7: Setting the screen language

Selecting the desired language for the on-screen display.

Recording

Recording movies

Detailed steps for capturing video with stereo sound.

Recording for a longer time

Tips on using the LP mode to extend recording duration.

Using zoom

How to operate the power zoom lever for magnification.

Using the self-timer

Starting recording automatically after a delay.

Recording still images - Tape photo recording

Capturing still photographs onto the video tape.

Recording with ease - Easy Handycam

Simplified recording mode for beginner users.

Adjusting the exposure

Adjusting the exposure for backlit subjects

Compensating for strong backlight to improve subject visibility.

Fixing the exposure for the selected subject – Flexible spot meter

Setting exposure based on a specific point on the screen.

Adjusting the white balance manually

Manually correcting color balance based on ambient lighting.

Adjusting the exposure manually

Recording in dark places - NightShot plus

Adjusting the focus

Adjusting the focus for an off-center subject – SPOT FOCUS

Selecting a specific point on the screen to set the focus.

Adjusting the focus manually

Manual control over focus for precise sharpness.

Recording a picture using various effects

Fading in and out of a scene - FADER

Applying smooth transitions between scenes.

Searching for the starting point

Searching for the last scene of the most recent recording - END SEARCH

Quickly locating the end of the last recorded sequence.

Searching manually - EDIT SEARCH

Manual search for specific points within recordings.

Playback

Viewing pictures recorded on a tape

Steps to play back recorded video content from a tape.

To adjust the volume

Controlling the audio level during playback.

Indicators displayed during playback

Explanation of icons shown on the screen during playback.

Playing back in various modes

Options for playback speed and viewing modes.

Playing back with ease - Easy Handycam

Simplified playback mode for beginner users.

Various playback functions

Displaying the screen indicators

Showing information like time code and tape counter on screen.

Displaying the date/time and camera settings data - Data code

Viewing recorded date, time, and camera settings.

Playing the picture on a TV

Locating a scene on a tape for playback

Searching quickly for a desired scene - Zero set memory

Marking specific points to easily return to them later.

Searching for a scene using Cassette Memory - Title search

Finding scenes based on titles added using Cassette Memory.

Searching for a scene by date of recording - Date search

Locating footage based on the date it was recorded.

Searching for a still image - Photo search

Finding specific still images captured on the tape.

Playing back still images in sequence - Photo scan

Reviewing still images automatically, one after another.

Advanced operations

Customizing Your Camcorder

Modifying various settings to personalize camcorder functions.

Dubbing/Editing

Transferring and manipulating video content between devices.

Customizing Your Camcorder

Changing the menu settings

Navigating menus to adjust system configurations.

Using the [MANUAL SET] menu

Accessing manual shooting adjustments and scene modes.

Using the [CAMERA SET] menu

Adjusting camera-specific settings like zoom and aspect ratio.

Using the [VCR SET] menu

Settings related to VCR functions and audio modes.

Using the [LCD/VF SET] menu

Adjusting brightness and color settings for LCD and viewfinder.

Using the [CM SET] menu

Managing Cassette Memory functions like titles and labels.

Using the [TAPE SET] menu

Configuring tape recording modes and indicators.

Using the [SETUP MENU] menu

General system setup including clock and language.

Using the ETC [OTHERS] menu

Accessing miscellaneous settings like world time and beep sounds.

Dubbing/Editing

Connecting to a VCR or TV

Setup for connecting the camcorder to external devices for copying.

Dubbing to another tape

Copying and editing video content to another recording device.

Recording pictures from a VCR

Importing video footage from a VCR into the camcorder.

Dubbing selected scenes from a tape

Selecting and arranging specific clips for editing.

Dubbing sound to a recorded tape

Adding new audio tracks to existing recordings.

Creating DVDs or VCDs

Burning recorded video content onto DVDs or VCDs.

Troubleshooting

Overall operations

Solutions for problems with basic camcorder functions.

Battery/Power sources

Troubleshooting power-related issues and battery problems.

Cassette tapes

Resolving issues related to tape loading and Cassette Memory.

LCD screen/viewfinder

Diagnosing and fixing display problems on the screen and viewfinder.

Recording

Solutions for problems encountered during the recording process.

Playback

Troubleshooting issues that occur during video playback.

Dubbing/Editing

Resolving problems related to video transfer and editing operations.

Warning indicators and messages

Self-diagnosis display/Warning indicators

Interpreting system alerts, error codes, and warning signals.

Warning messages

Specific error messages, their causes, and corrective actions.

Additional Information

Using your camcorder abroad

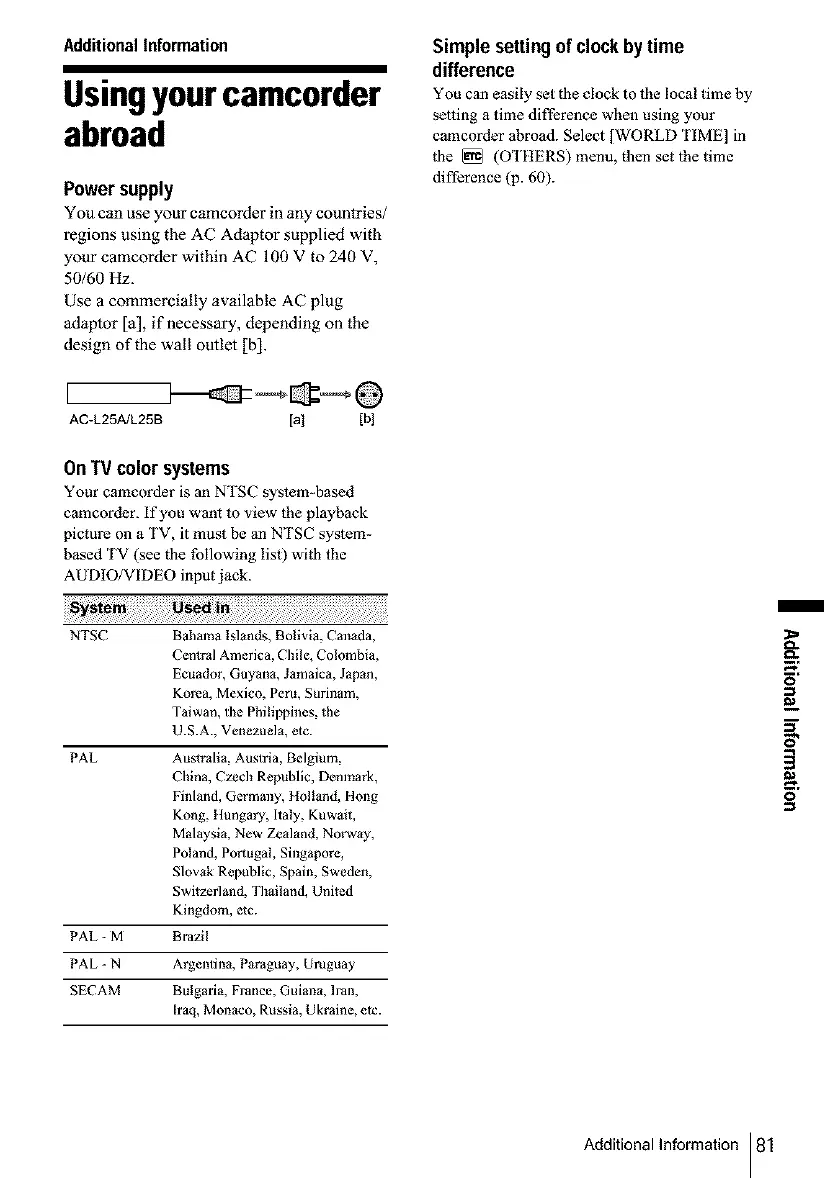
Tips and considerations for operating the camcorder internationally.

Usable cassette tapes

Information on compatible mini DV cassette types and features.

About the "InfoLITHIUM" battery pack

Details about the lithium-ion battery, its functions, and charging.

To use the battery pack effectively

Tips for optimizing battery performance and lifespan.

About i.LINK

Technical information about the i.LINK digital interface and its use.

Maintenance and precautions

On use and care

General guidelines for operating, cleaning, and handling the camcorder.

Moisture condensation

Information on condensation and how to prevent or resolve it.

Video head

Maintenance procedures for the video head, including cleaning.

LCD screen

Guidelines for cleaning and calibrating the LCD screen.

Specification

Video camera recorder

Technical specifications for the camcorder's system and components.

Mass (approx.)

Weight details for the main unit and included accessories.

AC Adaptor AC-L25A/L25B

Specifications for the power adapter, including requirements and consumption.

Quick Reference

Identifying parts and controls

Visual guide to camcorder buttons, switches, and connectors.

Remote Commander

Information on operating the remote control and its components.

Indicators for the LCD screen and viewfinder

Explanation of icons displayed on the screen and in the viewfinder.

Related product manuals