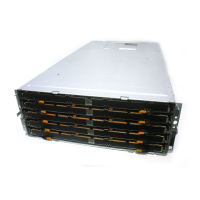
Figure 57. Removing and installing midplane assembly components
1. midplane 2. fan-cable clip (2)
3. screw (2) 4. Mylar insulator
4. Remove the five screws that secure the midplane assembly to the system.
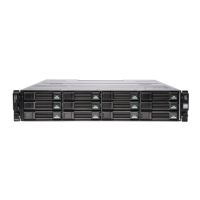
Figure 58. Removing and installing the midplane
1.
KVM cable 2. midplane
3. control panel cable 4. midplane assembly screw (5)
5. cable cover 6. power bus bar
7. power interposer board
5. Remove the screws that secure the cable tube on the left side of the chassis.
6. Remove the control panel cable from the cable tube.
7. Remove the screws on the front of the KVM panel that secure the KVM panel board.
8. Remove the screws that secure the KVM cover.
9. Remove the screws that secure the cable tube on the right side of the chassis.
10. Place the cable tube on the chassis without removing the KVM panel cable and the KVM panel.
11. Lift the midplane assembly from the system and place it on top of the chassis.
NOTE:
Exercise care when removing midplane assembly and placing it on the chassis, to prevent any damage to the
KVM and control panel cables.
70 Installing and removing PowerEdge FX2/FX2s enclosure components
 Loading...