5
IP2368EN
EN
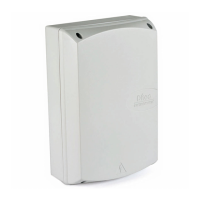
3.1 Applications
4. Installation and electrical connections
• Perforate the relevant points in the bottom part of the box (Fig. 4.1, page 6).
• Fix the control panel firmly in place. You are advised to use convex head screws (max head Ø
10mm) with a cross imprint (the centre distance for the holes is shown in Fig. 4.2, page 6).
• Insert the cable glands and corrugated tubes from the lower side of the container.
• Before connecting the power supply, make sure the plate data correspond to those of the mains
power supply.
• An omnipolar disconnection switch with a contact opening distance of at least 3mm must be
fitted on the mains supply.
• Check there is an adequate residual current circuit breaker and overcurrent cutout upstream
of the electrical system.
• In order to comply with the essential requisites of the Standards in force, reclose the cover once
the wires have been connected to the terminals.
The connections to the mains power supply and to any possible low voltage wires (230V)
in the section outside the control panel must be made on an independent channel sep-
arated from the connections to the command and safety devices (SELV = Safety Extra
Low Voltage). The corrugated tubes must enter the control panel by a few centimetres
via the holes on the base box.
• Make sure there are no sharp edges that may damage the cables.
• Make sure the mains power wires (230V) and the accessory wires (24V) are separated (Fig. 4.3).
• The cables must have dual insulation, be sheathed near the relative connection terminals, and
be held in place with ties [B] (not supplied).
• After making the adjustments and settings, fix the cover in place with the screws supplied (Fig.
4.4, page 6).
 Loading...