Home
Kyocera
All in One Printer
ECOSYS M6026cidn
Kyocera ECOSYS M6026cidn User Manual
4
of 1
of 1 rating
375 pages
Give review
Manual
Specs
To Next Page
To Next Page
To Previous Page
To Previous Page
Loading...
2PX/2PY
1-5-87
(4)
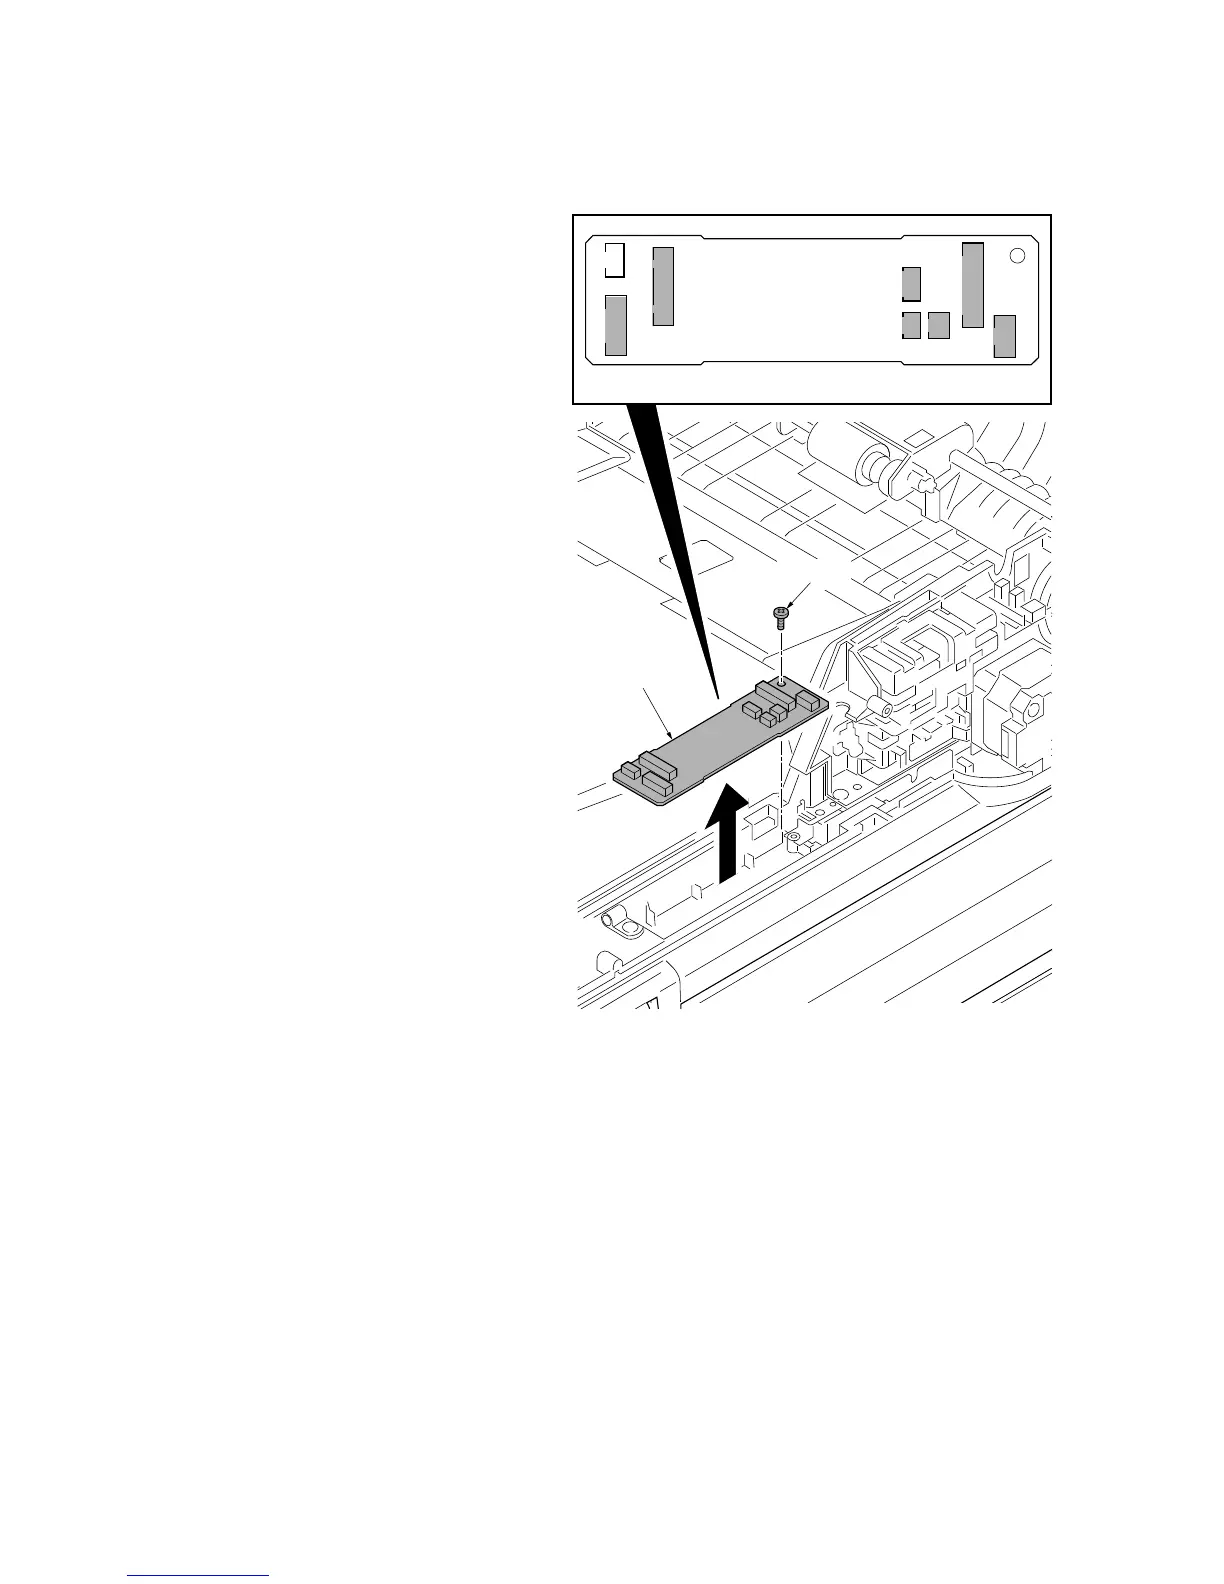
Detaching an
d refitt
ing the DP drive PWB
Procedure
1.
Remove the DP rear cover (see page 1-
5-82).
2.
Remove all connectors from DP drive
PWB.
3.
Remove the screw an
d then remove the
DP drive PWB.
4.
Check or replace the DP drive PWB
and refit all the remove
d parts.
Figure 1-5-142
Screw
YC1
YC8
YC6
YC4
YC2
YC3
YC5
DP drive PWB
DP drive
PWB
272
274
Table of Contents
Default Chapter
1
Service Manual
1
Revision History
3
Safety Precautions
5
Installation Precautions
7
Table of Contents
11
Specifications
15
Machine (Front Side)
15
Machine (Rear Side)
21
Document Processor
22
Operation Panel
23
Machine Cross Section
24
1-2 Installation
25
Installation Environment
25
Unpacking
26
Installing the Expansion Memory (Option)
36
Installing the SD Card (Option)
38
Maintenance Mode
39
Executing a Maintenance Item
39
Maintenance Modes Item List
40
Contents of the Maintenance Mode Items
44
Event Log
45
Display Description
85
U610 Setting System
87
U612 Setting System
90
U630 Setting Communication Control
93
Setting the Waiting Period to Prevent Echo Problems at the
94
U632 Setting Communication Control
96
U634 Setting Communication Control 5
98
U640 Setting Communication Time
99
U641 Setting Communication Time
100
Setting the T2 Time-Out Time
101
Setting the Tb2 Time-Out Time
102
U650 Setting Modem
103
Service Mode
117
Executing a Service Mode
117
Description of Service Mode
118
Service Status Page
119
Engine Information
120
1-4 Troubleshooting
135
Paper Misfeed Detection
135
Paper Misfeed Indication
135
Paper Misfeed Detection Condition
135
Self-Diagnostic Function
139
Self Diagnostic Codes
139
Image Formation Problems
161
No Image Appears (Entirely White)
161
No Image Appears (Entirely Black)
161
A Specific Color Is Printed Solid
163
The Back Side Gets Dirty
163
Image Is too Light
163
The Background Is Colored
164
White Streaks Are Printed Vertically
164
Black Streaks Are Printed Vertically
164
Streaks Are Printed Horizontally
165
Spots Are Printed
165
The Leading Edge of Image Begins to Print too Early or too Late
165
Paper Is Wrinkled
165
Offset Occurs
166
Part of Image Is Missing
166
Fusing Is Loose
166
Colors Are Printed Offset to each Other
167
Electric Problems
168
Mechanical Problems
173
Send Error Code
175
Scan to SMB Error Codes
175
Scan to FTP Error Codes
176
Scan to E-Mail Error Codes
178
Error Codes
180
Error Code
180
Table of General Classification
181
U004XX Error Code Table: Interrupted Phase B
183
U006XX Error Code Table: Problems with the Unit
183
U008XX Error Code Table: Page Transmission Error
183
U009XX Error Code Table: Page Reception Error
183
U010XX Error Code Table: G3 Transmission
184
U011XX Error Code Table: G3 Reception
185
U017XX Error Code Table: V.34 Transmission
186
U018XX Error Code Table: V.34 Reception
186
1-5 Assembly and Disassembly
187
Precautions for Assembly and Disassembly
187
Precautions
187
Drum
187
Toner
187
How to Tell a Genuine Kyocera Toner Container
188
Outer Covers
189
Detaching and Refitting the Rear Upper Cover, Right Upper Cover, Left Upper Cover and
189
Detaching and Refitting the Right Rear Cover, Right Cover and Right Lower Cover
192
Detaching and Refitting the Left Rear Cover, Left Cover and Left Lower Cover
195
Detaching and Refitting the Inner Cover
197
Paper Feed Section
199
Detaching and Refitting the Retard Roller Unit
199
Detaching and Refitting the Paper Feed Roller Unit
201
Detaching and Refitting the MP Paper Feed Roller
203
Developing Section
205
Detaching and Refitting the Developing Unit
205
Drum Section
207
Detaching and Refitting the Drum Unit
207
Transfer/Separation Section
208
Detaching and Refitting the Intermediate Transfer Unit
208
Detaching and Refitting the Transfer Roller Unit
211
Fuser Section
212
Detaching and Refitting the Fuser Unit
212
Pwbs
213
Detaching and Refitting the Engine PWB
213
Detaching and Refitting the Power Source PWB
215
Detaching and Refitting the Main PWB
216
Detaching and Refitting the High Voltage PWB
221
Detaching and Refitting the FAX Control PWB (4 in 1 Model (with FAX) Only)
222
Drive Section
223
Detaching and Refitting the MP Feed Drive Unit
223
Detaching and Refitting the Drum/Developing Drive Unit
224
Detaching and Refitting the Paper Feed Drive Unit
226
Detaching and Refitting the Fuser Pressure Drive Unit
227
Detaching and Refitting the Middle Transfer Drive Unit
229
Optical Section
231
Detaching and Refitting the Laser Scanner Unit
231
Detaching and Refitting the Scanner Unit
234
Detaching and Refitting the Image Scanner Unit
238
Document Processor
264
Detaching and Refitting the Document Processor
264
Detaching and Refitting the DP Paper Feed Pulley Unit
268
Detaching and Refitting the DP Separation Pad
272
Detaching and Refitting the DP Drive PWB
273
Others
274
Detaching and Refitting the Paper Conveying Unit
274
Detaching and Refitting the Operation Panel
276
Detaching and Refitting the Power Source Inlet
277
Direction of Installing the Principal Fan Motors
279
Upgrading the Firmware
281
Remarks on Engine PWB Replacement
283
Paper Feed/Conveying Section
284
Cassette Paper Feed Section
284
MP Tray Paper Feed Section
286
Paper Conveying Section
288
Drum Section
290
Developing Section
292
Optical Section
294
Image Scanner Section
294
Laser Scanner Section
297
Transfer/Separation Section
299
Intermediate Transfer Unit Section
299
Secondary Transfer Roller Section
301
Fuser Section
302
Eject/Feedshift Section
304
Duplex Conveying Section
306
Document Processor
308
Original Feed Section
308
Original Conveying Section
310
Original Switchback/Eject Sections
312
Electrical Parts Layout
314
Pwbs
314
Switches and Sensors
317
Motors
319
Others
321
Document Processor
322
1-6 Requirements on PWB Replacement
281
2-1 Mechanical Construction
284
2-2 Electrical Parts Layout
314
2-3 Operation of the Pwbs
324
Power Source PWB
324
Engine Pwb
326
Main PWB
336
Drum Relay PWB
344
DP Drive PWB
347
2-4 Appendixes
350
Appendixes
350
Maintenance Kits
350
Repetitive Defects Gauge
351
Firmware Environment Commands
352
Maintenance Commands
358
Wiring Diagram
366
Installation Guide
371
Card Authentication Kit(D)
371
Other manuals for Kyocera ECOSYS M6026cidn
Quick Installation Guide
31 pages
Servise Manual
16 pages
4
Based on 1 rating
Ask a question
Give review
Questions and Answers:
Need help?
Do you have a question about the Kyocera ECOSYS M6026cidn and is the answer not in the manual?
Ask a question
Kyocera ECOSYS M6026cidn Specifications
General
Brand
Kyocera
Model
ECOSYS M6026cidn
Category
All in One Printer
Language
English
Related product manuals
Kyocera ECOSYS M6026cdn Type B
579 pages
Kyocera ECOSYS M6026
6 pages
Kyocera ECOSYS M6030cdn
409 pages
Kyocera ECOSYS M6035cdn
426 pages
Kyocera ECOSYS M6035cidn
433 pages
Kyocera Ecosys M6526cdn
375 pages
Kyocera ECOSYS M6530cdn
426 pages
Kyocera ECOSYS M6535cidn
433 pages
Kyocera ECOSYS M6526cidn
375 pages
Kyocera ECOSYS M2540dn
410 pages
Kyocera ECOSYS M2540dw
410 pages
Kyocera ECOSYS M3540idn
427 pages
 Loading...